Bambu Studio Fine Tuning: Tips and Tricks for X1 and P1P
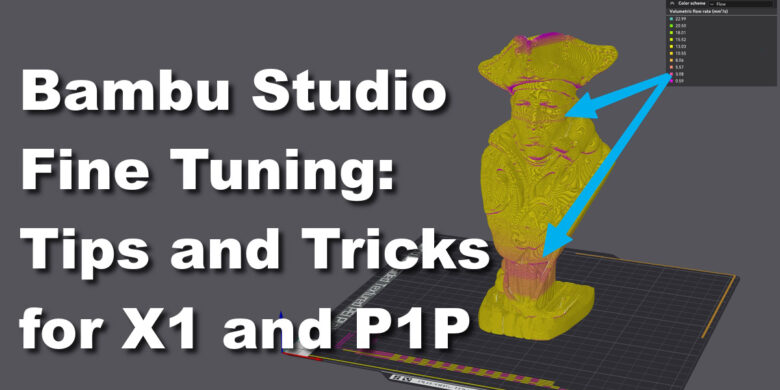
There’s no denying that the Bambu Lab printers are fast and able to produce great print quality. But I noticed that some aftermarket filaments are not as user-friendly when it comes to printing them fast. Most of the time, the printer either prints too fast and the filament can’t keep up or slows down too much generating print quality issues.
In this article, I will share some tips and tricks on how to properly tune your filaments in Bambu Studio / Orca Slicer to work well with the Bambu Lab X1C and P1P. This guide will also work with other printers when you are using Bambu Studio or Orca Slicer, and will be mostly focused on fast printing.
I use the same method on printers like the QIDI X-PLUS 3, FLSUN V400 and other Klipper machines with good results.
The Slicer Profile Problem
Bambu Studio comes with a lot of pre-tuned filament profiles made for Bambu filament. Those profiles usually work great and they’re very fast, but it’s not always possible to use them with filaments from other manufacturers and get perfect results, if the filament does not have a high flow rate.
Bambu Lab advertises their hotend to be capable of up to 32mm^3/s but that’s with specific higher flow filaments and conditions. In my testing, the hotend can usually reach about 20-22mm^3/s for reliable prints, with a slightly increased print temperature.
Of course, this depends a lot on the filament type and you can sometimes be limited to about 14-16mm^3/s if the filament used is not made for high-flow/fast printing applications. I had this issue with some specific PETG filaments and also with a bad batch of PLA.
To workaround that problem, Bambu Lab has set the “Generic” filament profiles in the slicer to a much lower Maximum Volumetric Speed to ensure that flow is consistent with a wide range of filaments without needing specific calibration. Usually, the value is pretty conservative but provides decent results with lower print speeds.
This brings us to the problem we’re trying to resolve in this article: fine-tuning the generic filament profiles based on the needs of specific filaments made by other manufacturers. The focus is to find a flow rate that works best according to the specific speed and layer height used, while also finding the “sweet spot” where the filament is not overheated to allow for a higher flow rate. All that, while also ensuring a consistent and smooth movement during printing for a uniform finish.
Changes in the flow rate and print speed during printing can lead you in believing the printer has a Z banding or an extrusion problem, where in reality, the issue might not be related to the motion system and it’s actually related to the slicer settings used for the printed model.
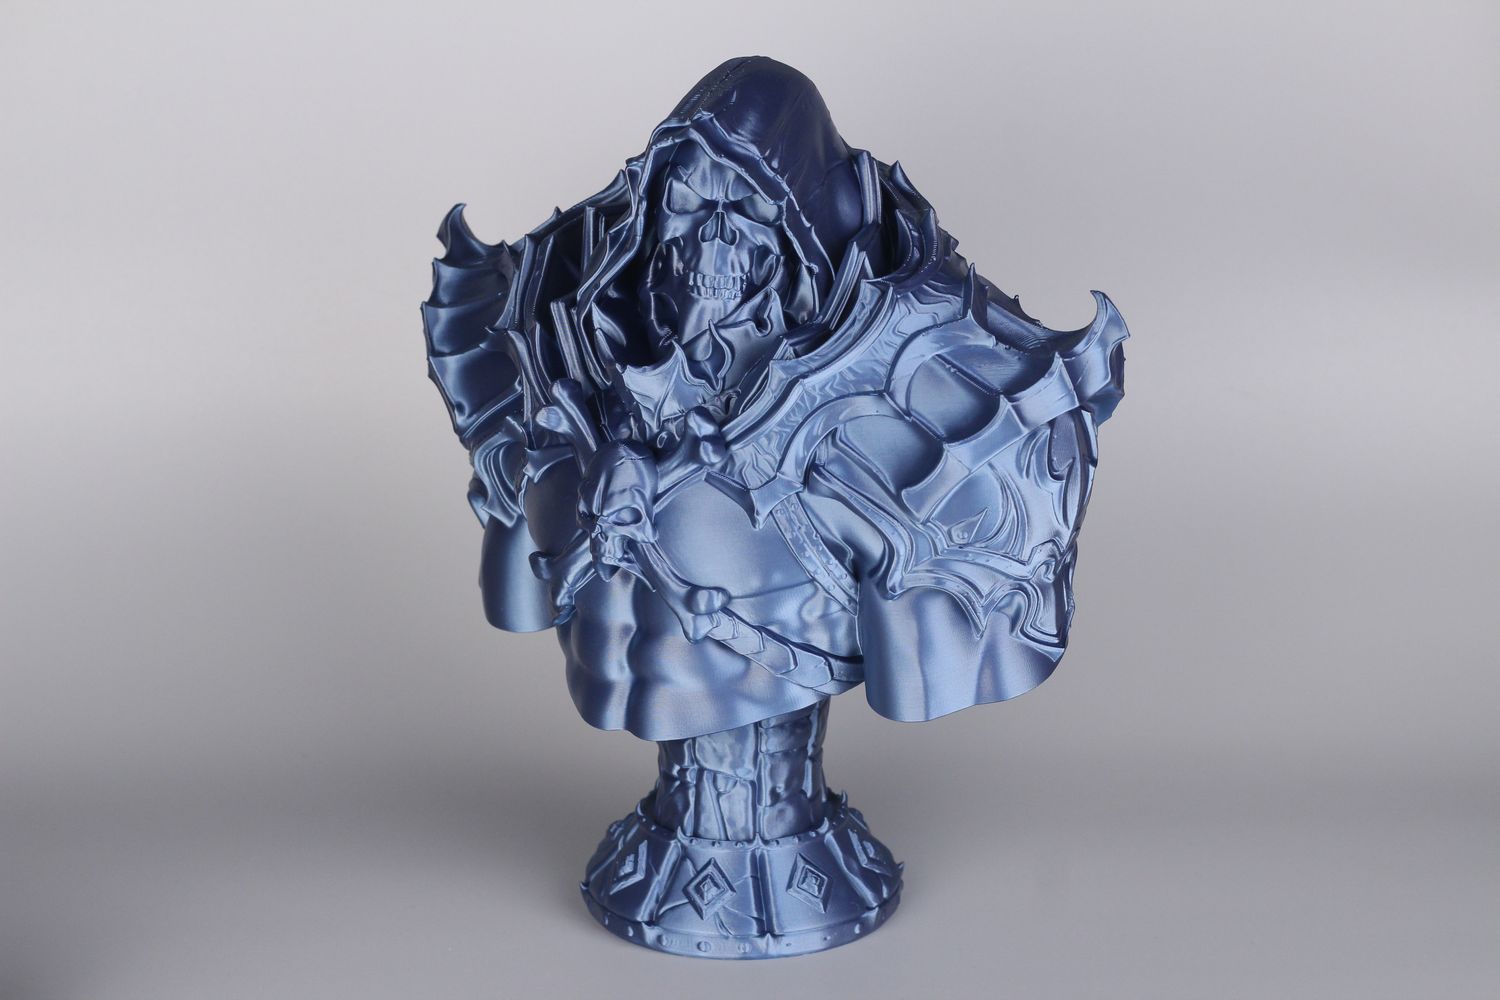
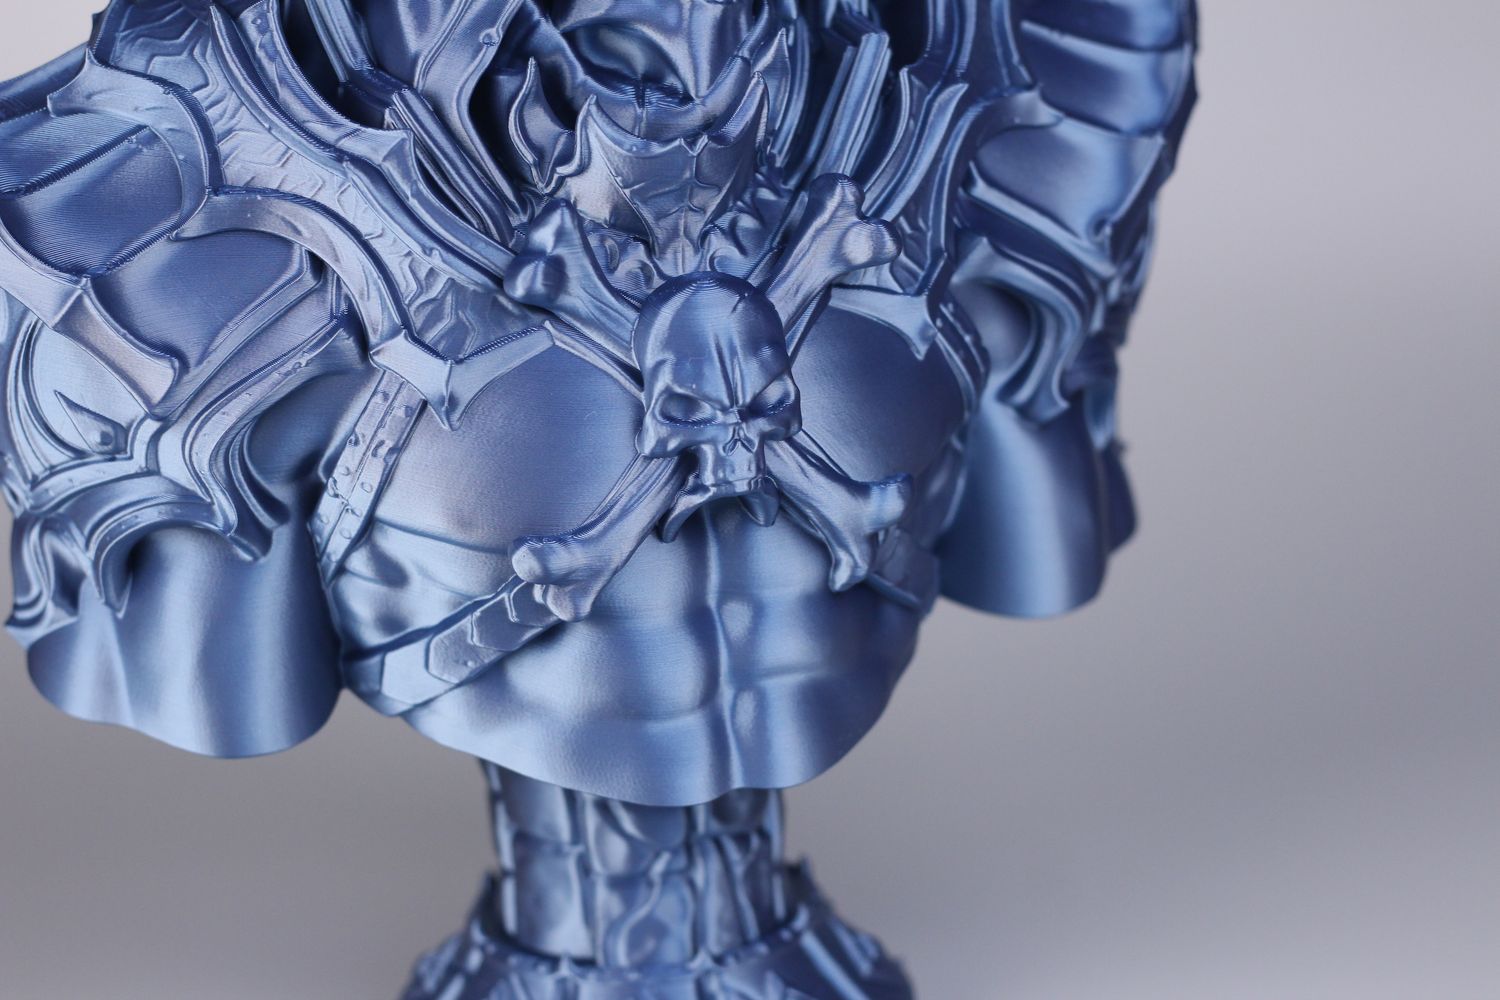
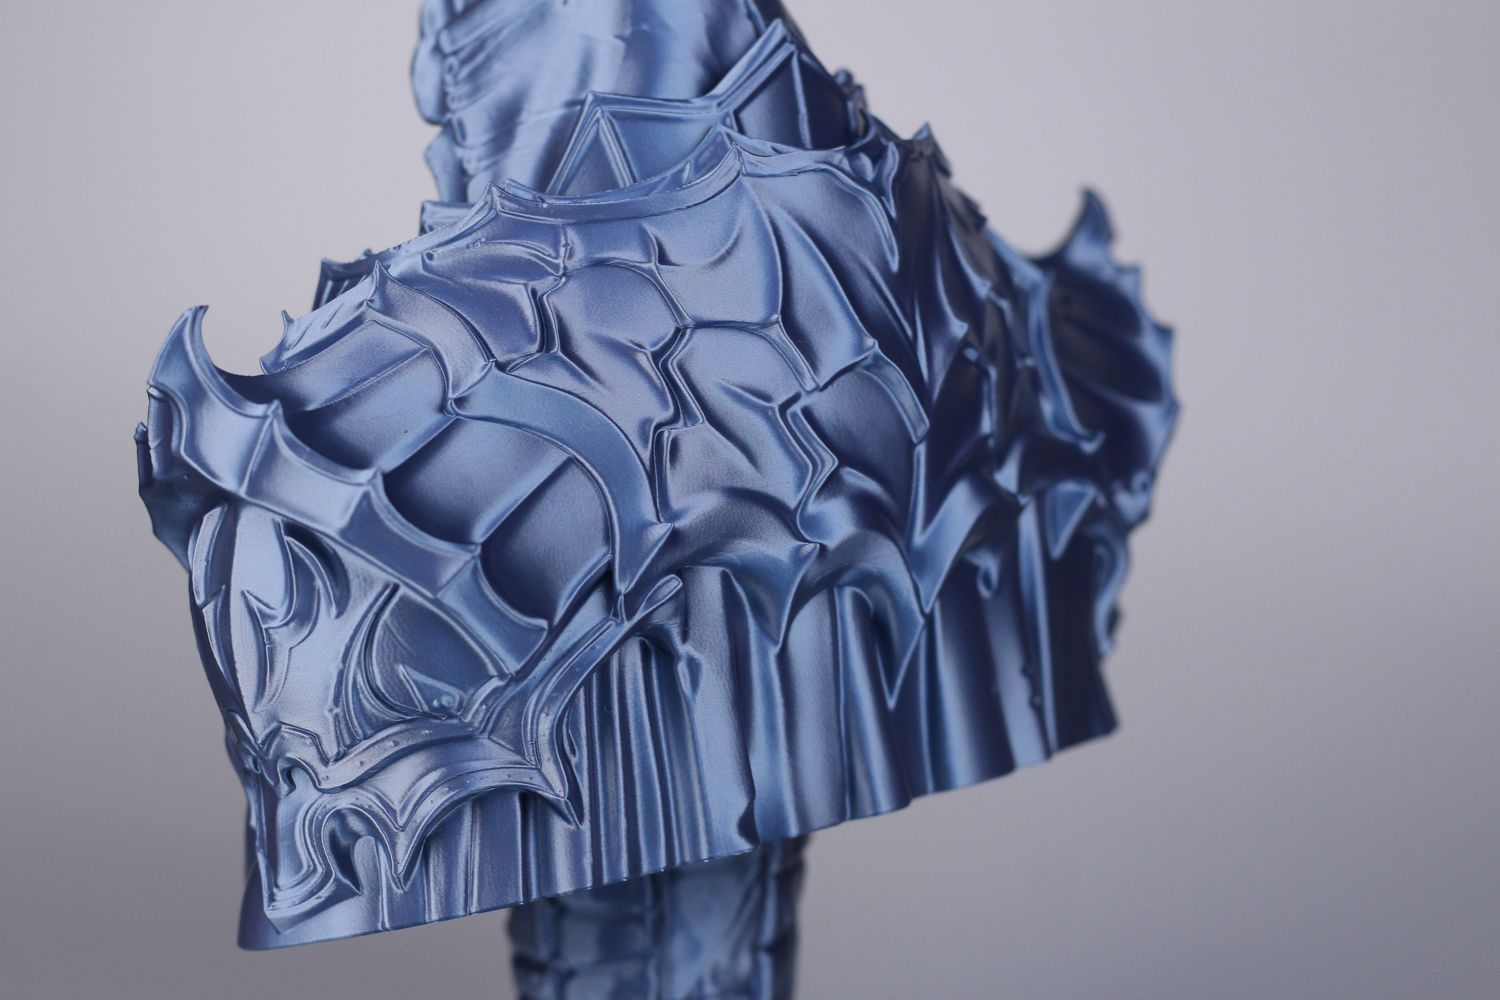
After reading this article and following the suggestions, you should be able to easily get prints like this. Model is Skeletor by Eastman.

Uncap the speed
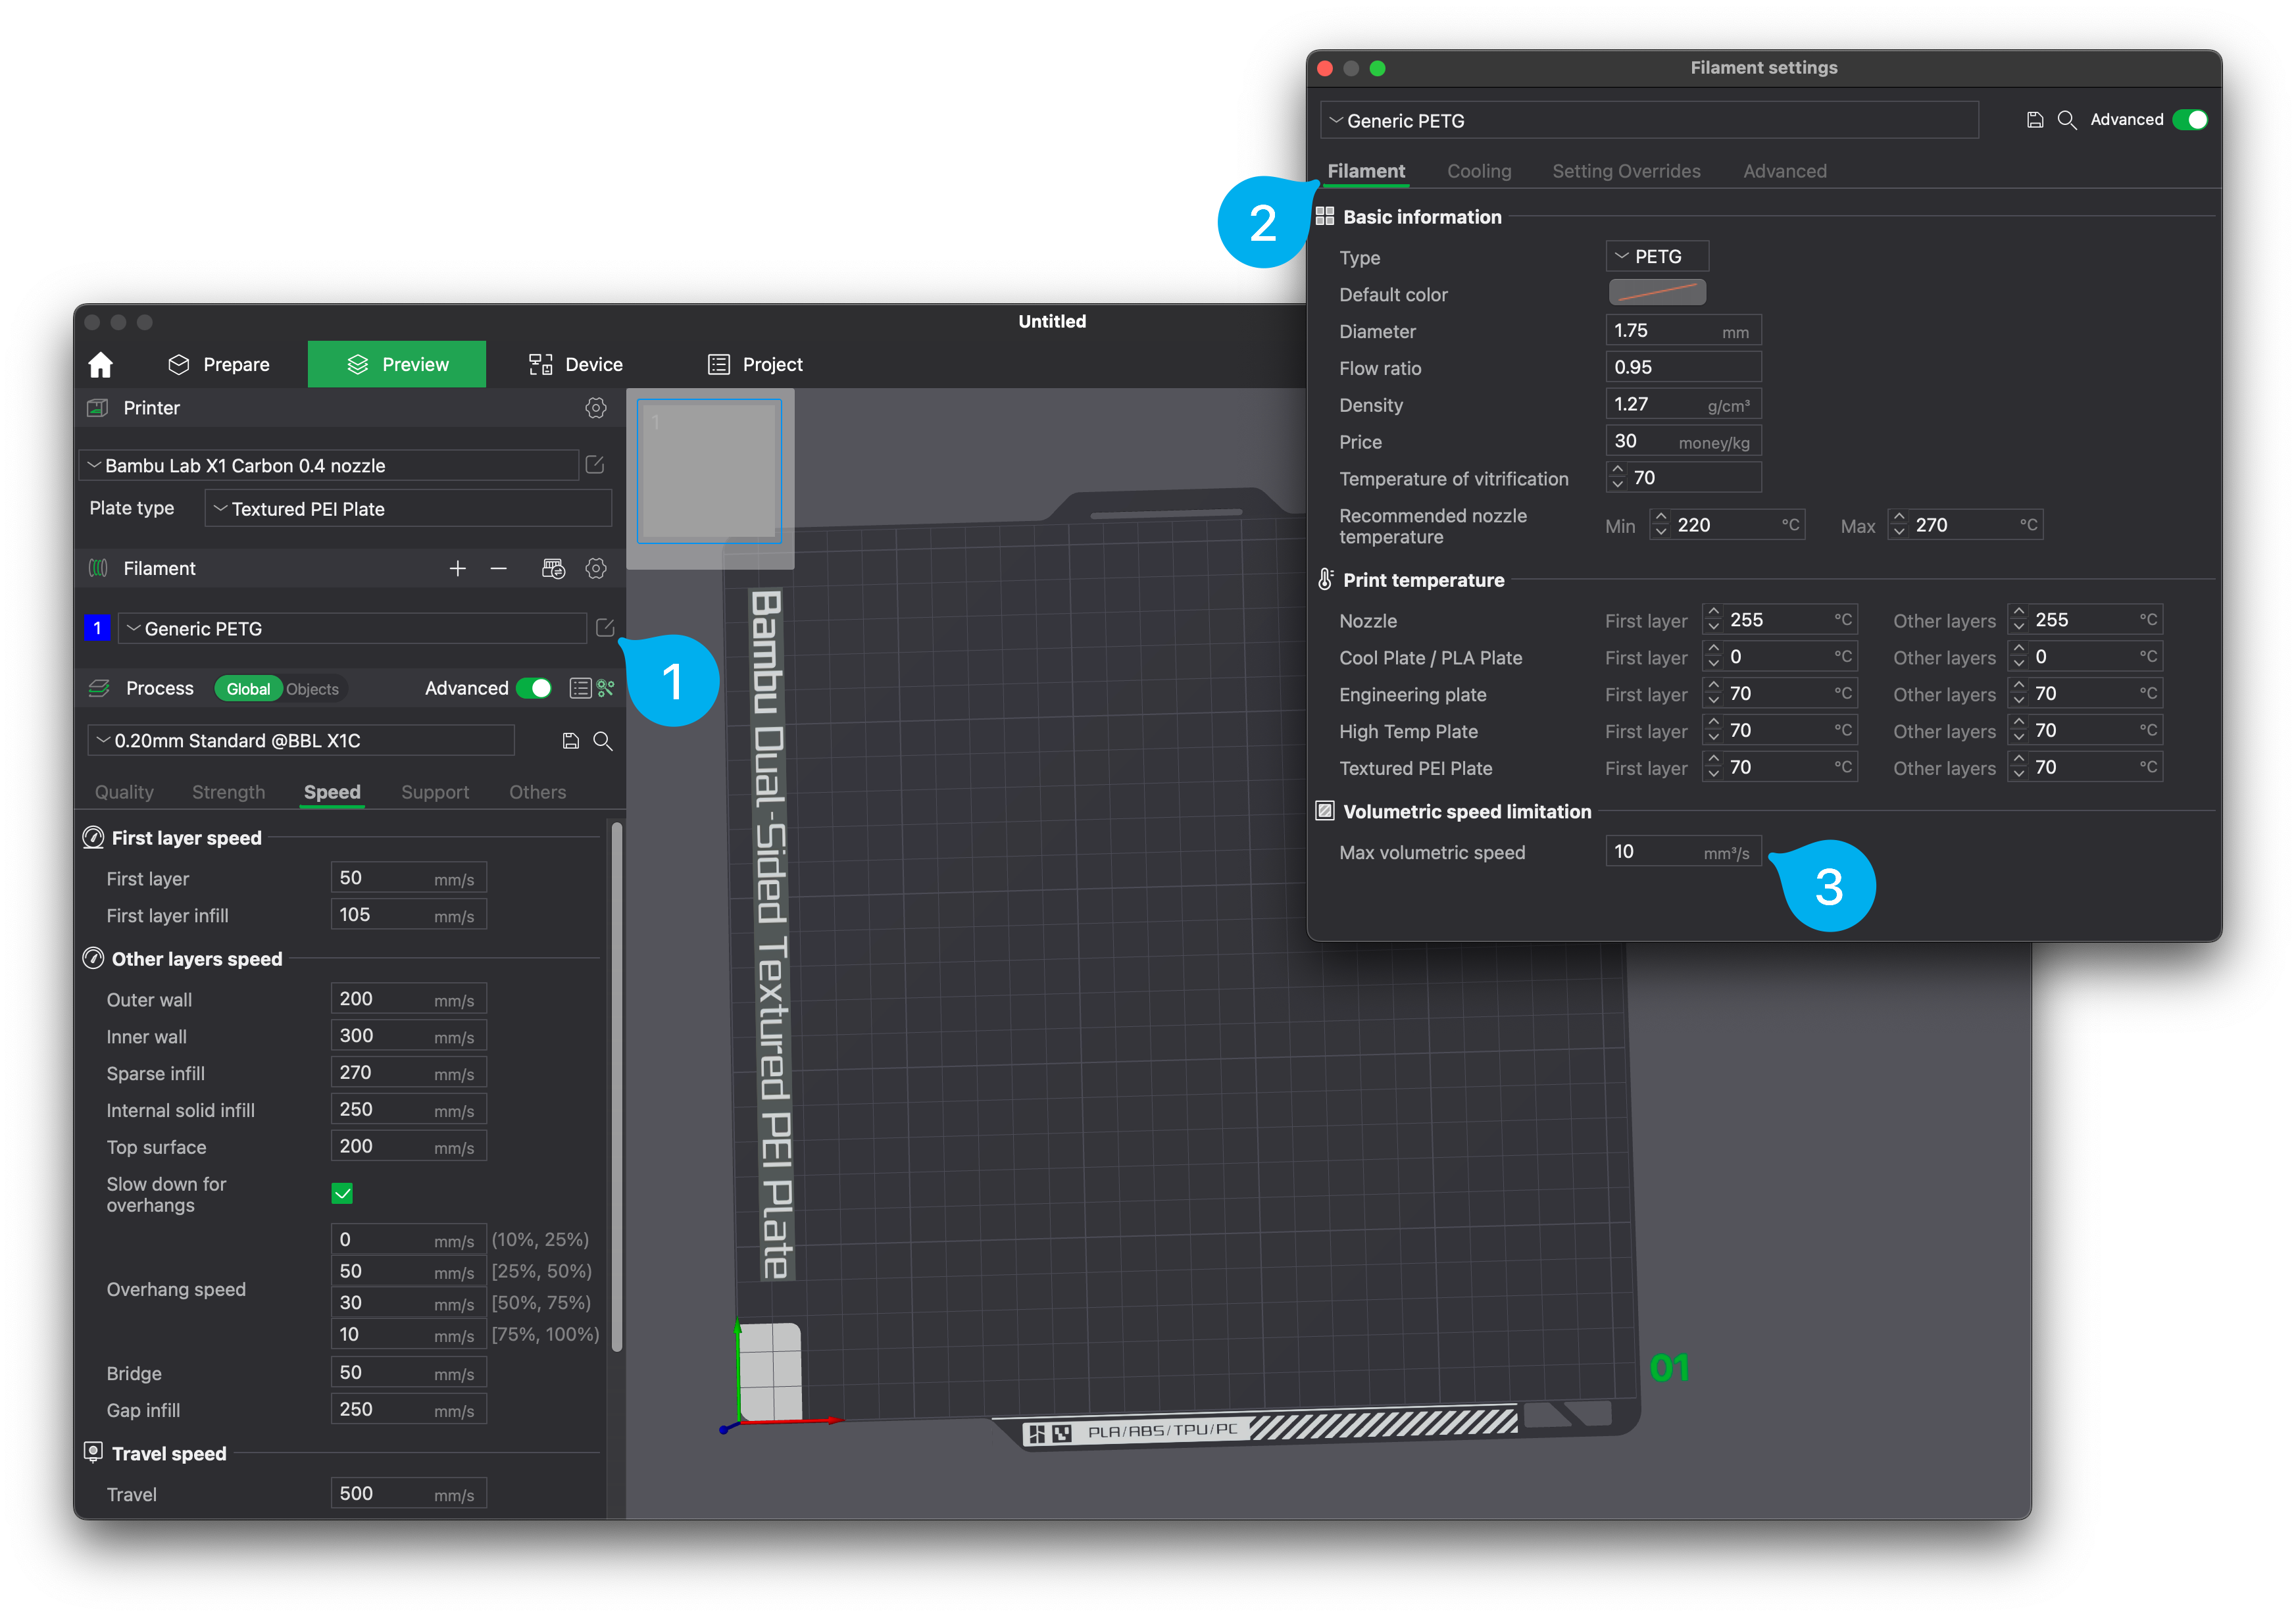
As you can see, most of the speed settings between profiles are quite similar in Bambu Studio, and the main speed limitation used is the Maximum Volumetric Speed set under the Filament Settings. In the example below, the Max volumetric speed setting is set to 10mm^3/s.
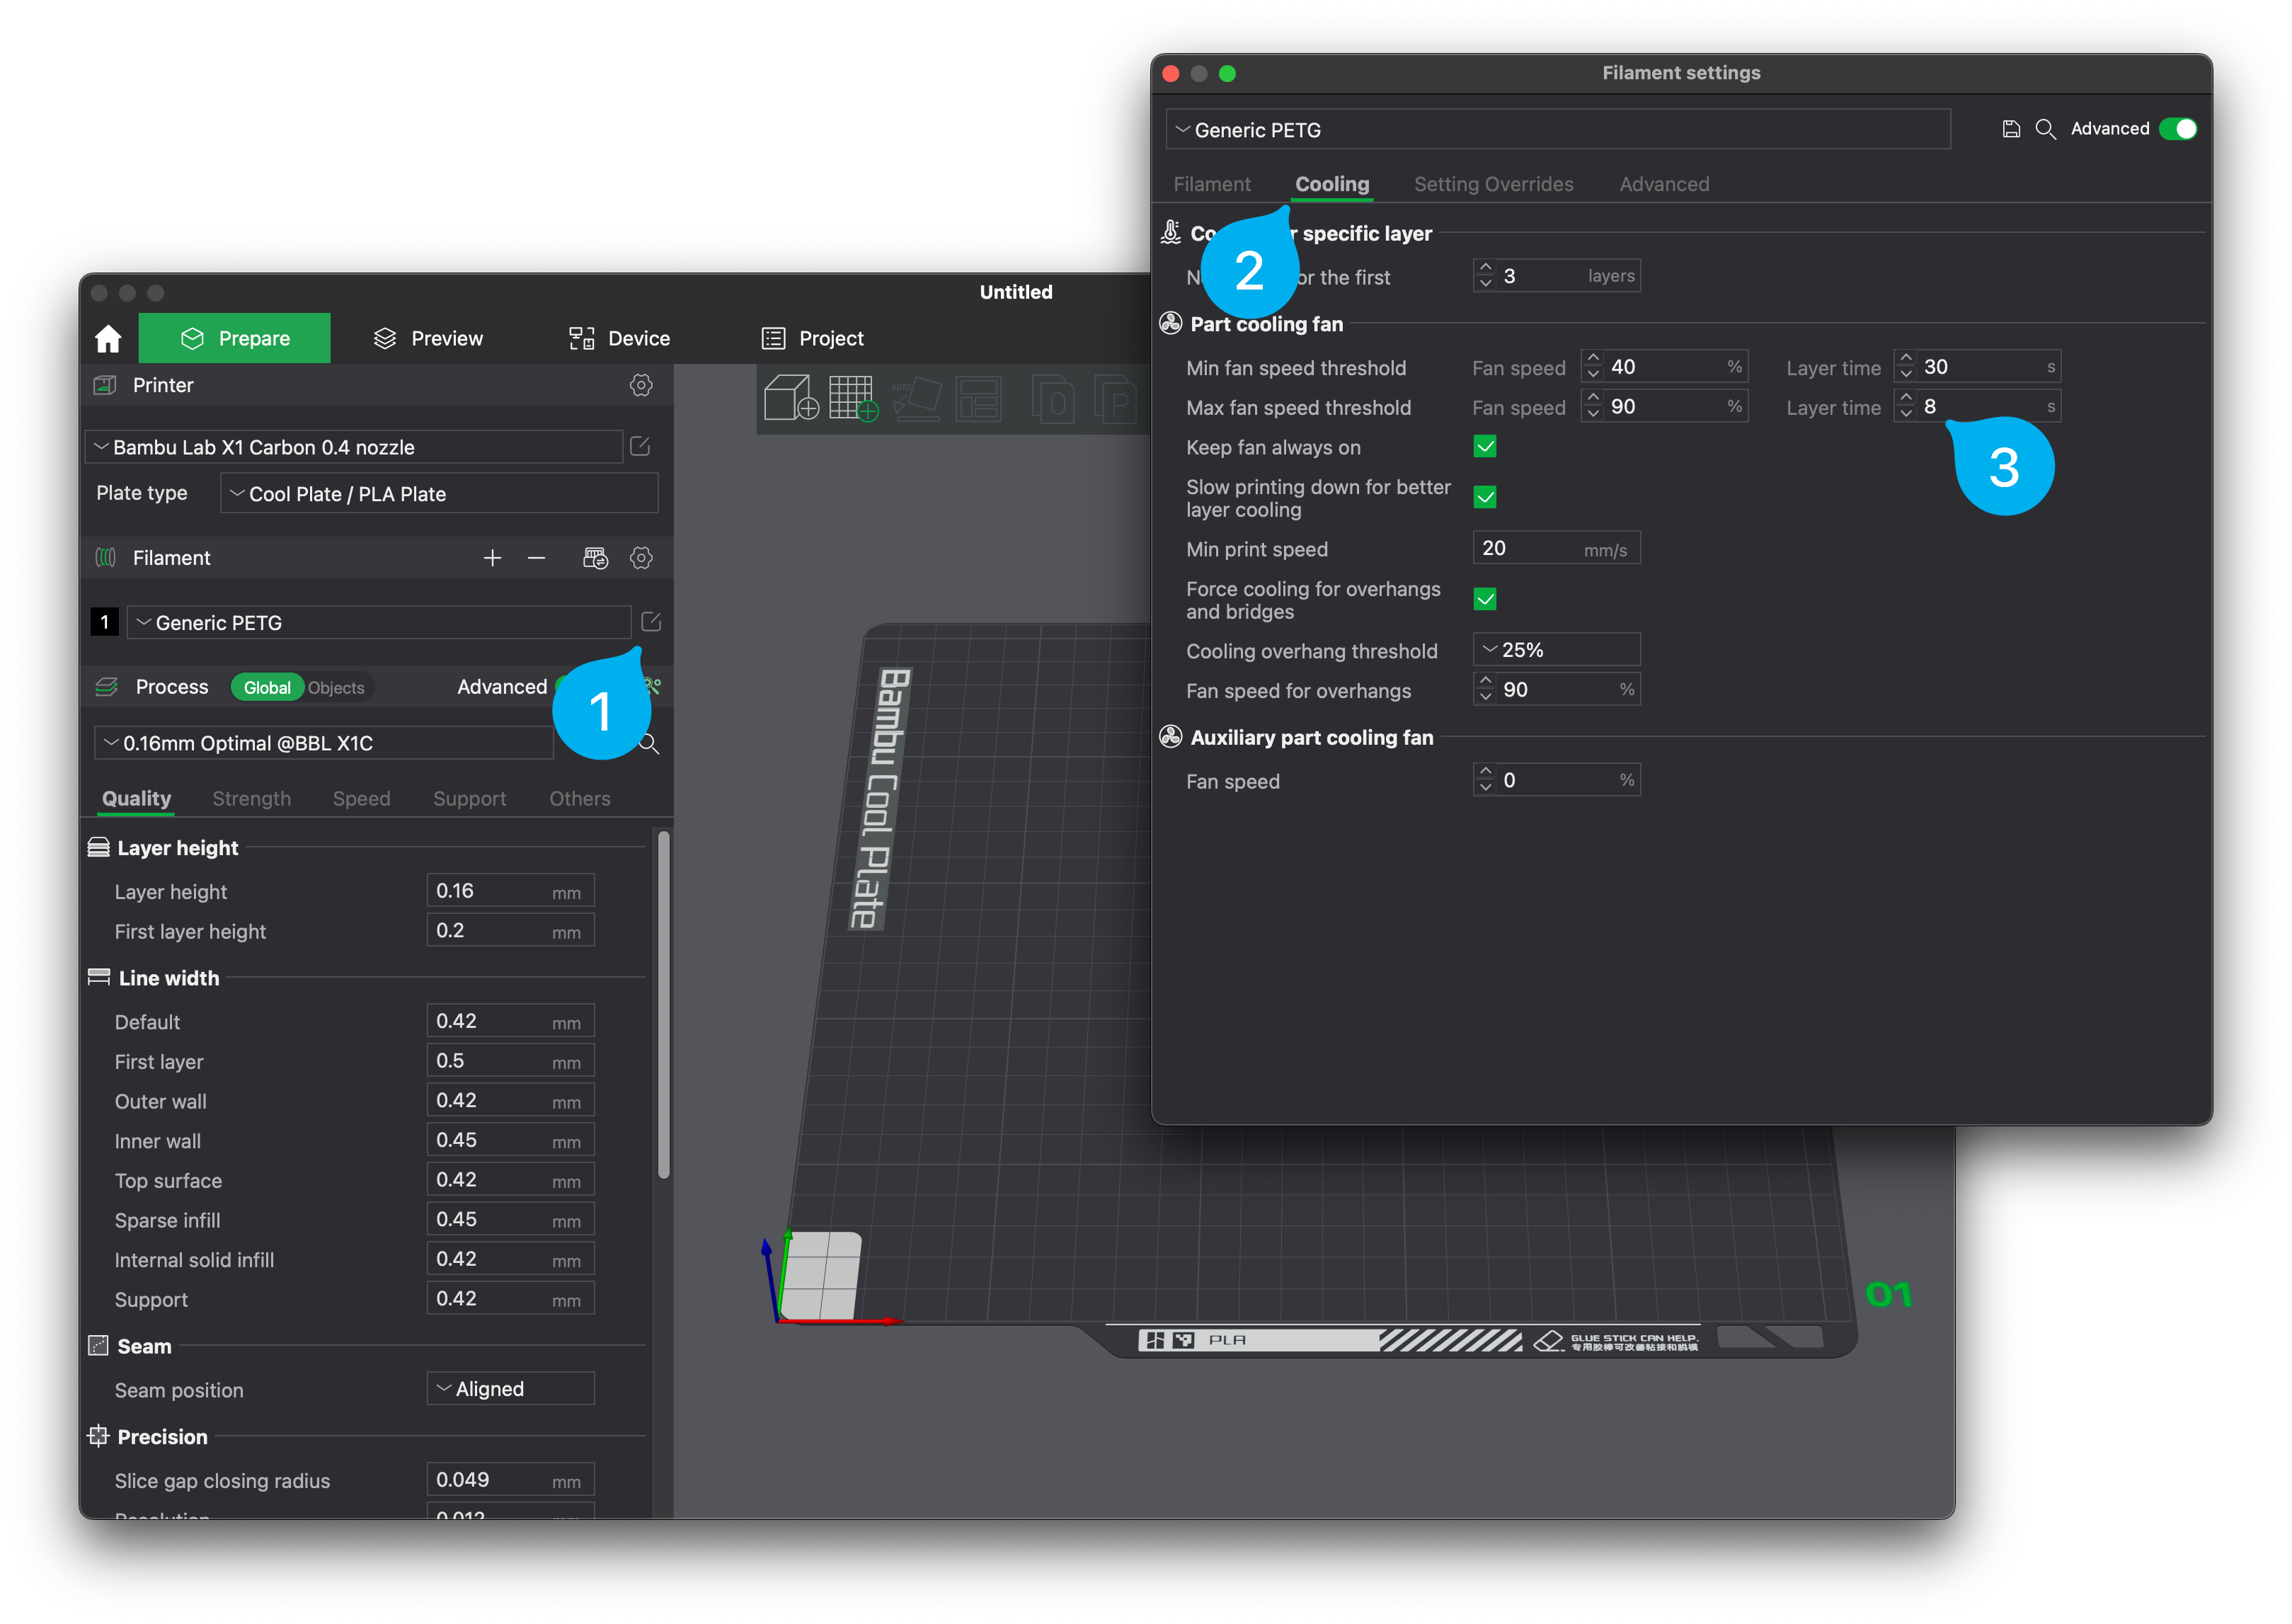
Besides that, another important speed limitation from the slicer settings is the Layer time. This option is available under the Cooling tab of Filament Settings.
In this particular example, you can see that the Layer time is set to 8 seconds. This means that however fast the print speed is set in the slicer, the printer will never print faster than 8 seconds per layer, and will be slowed down to ensure the material has enough time to cool before a new layer is applied.
This issue is not a problem on large models as printing a layer can take longer than that. But on smaller models or objects that have an intricate design, the Layer time option can introduce inconsistent print quality and results.
Speed Limitation Example
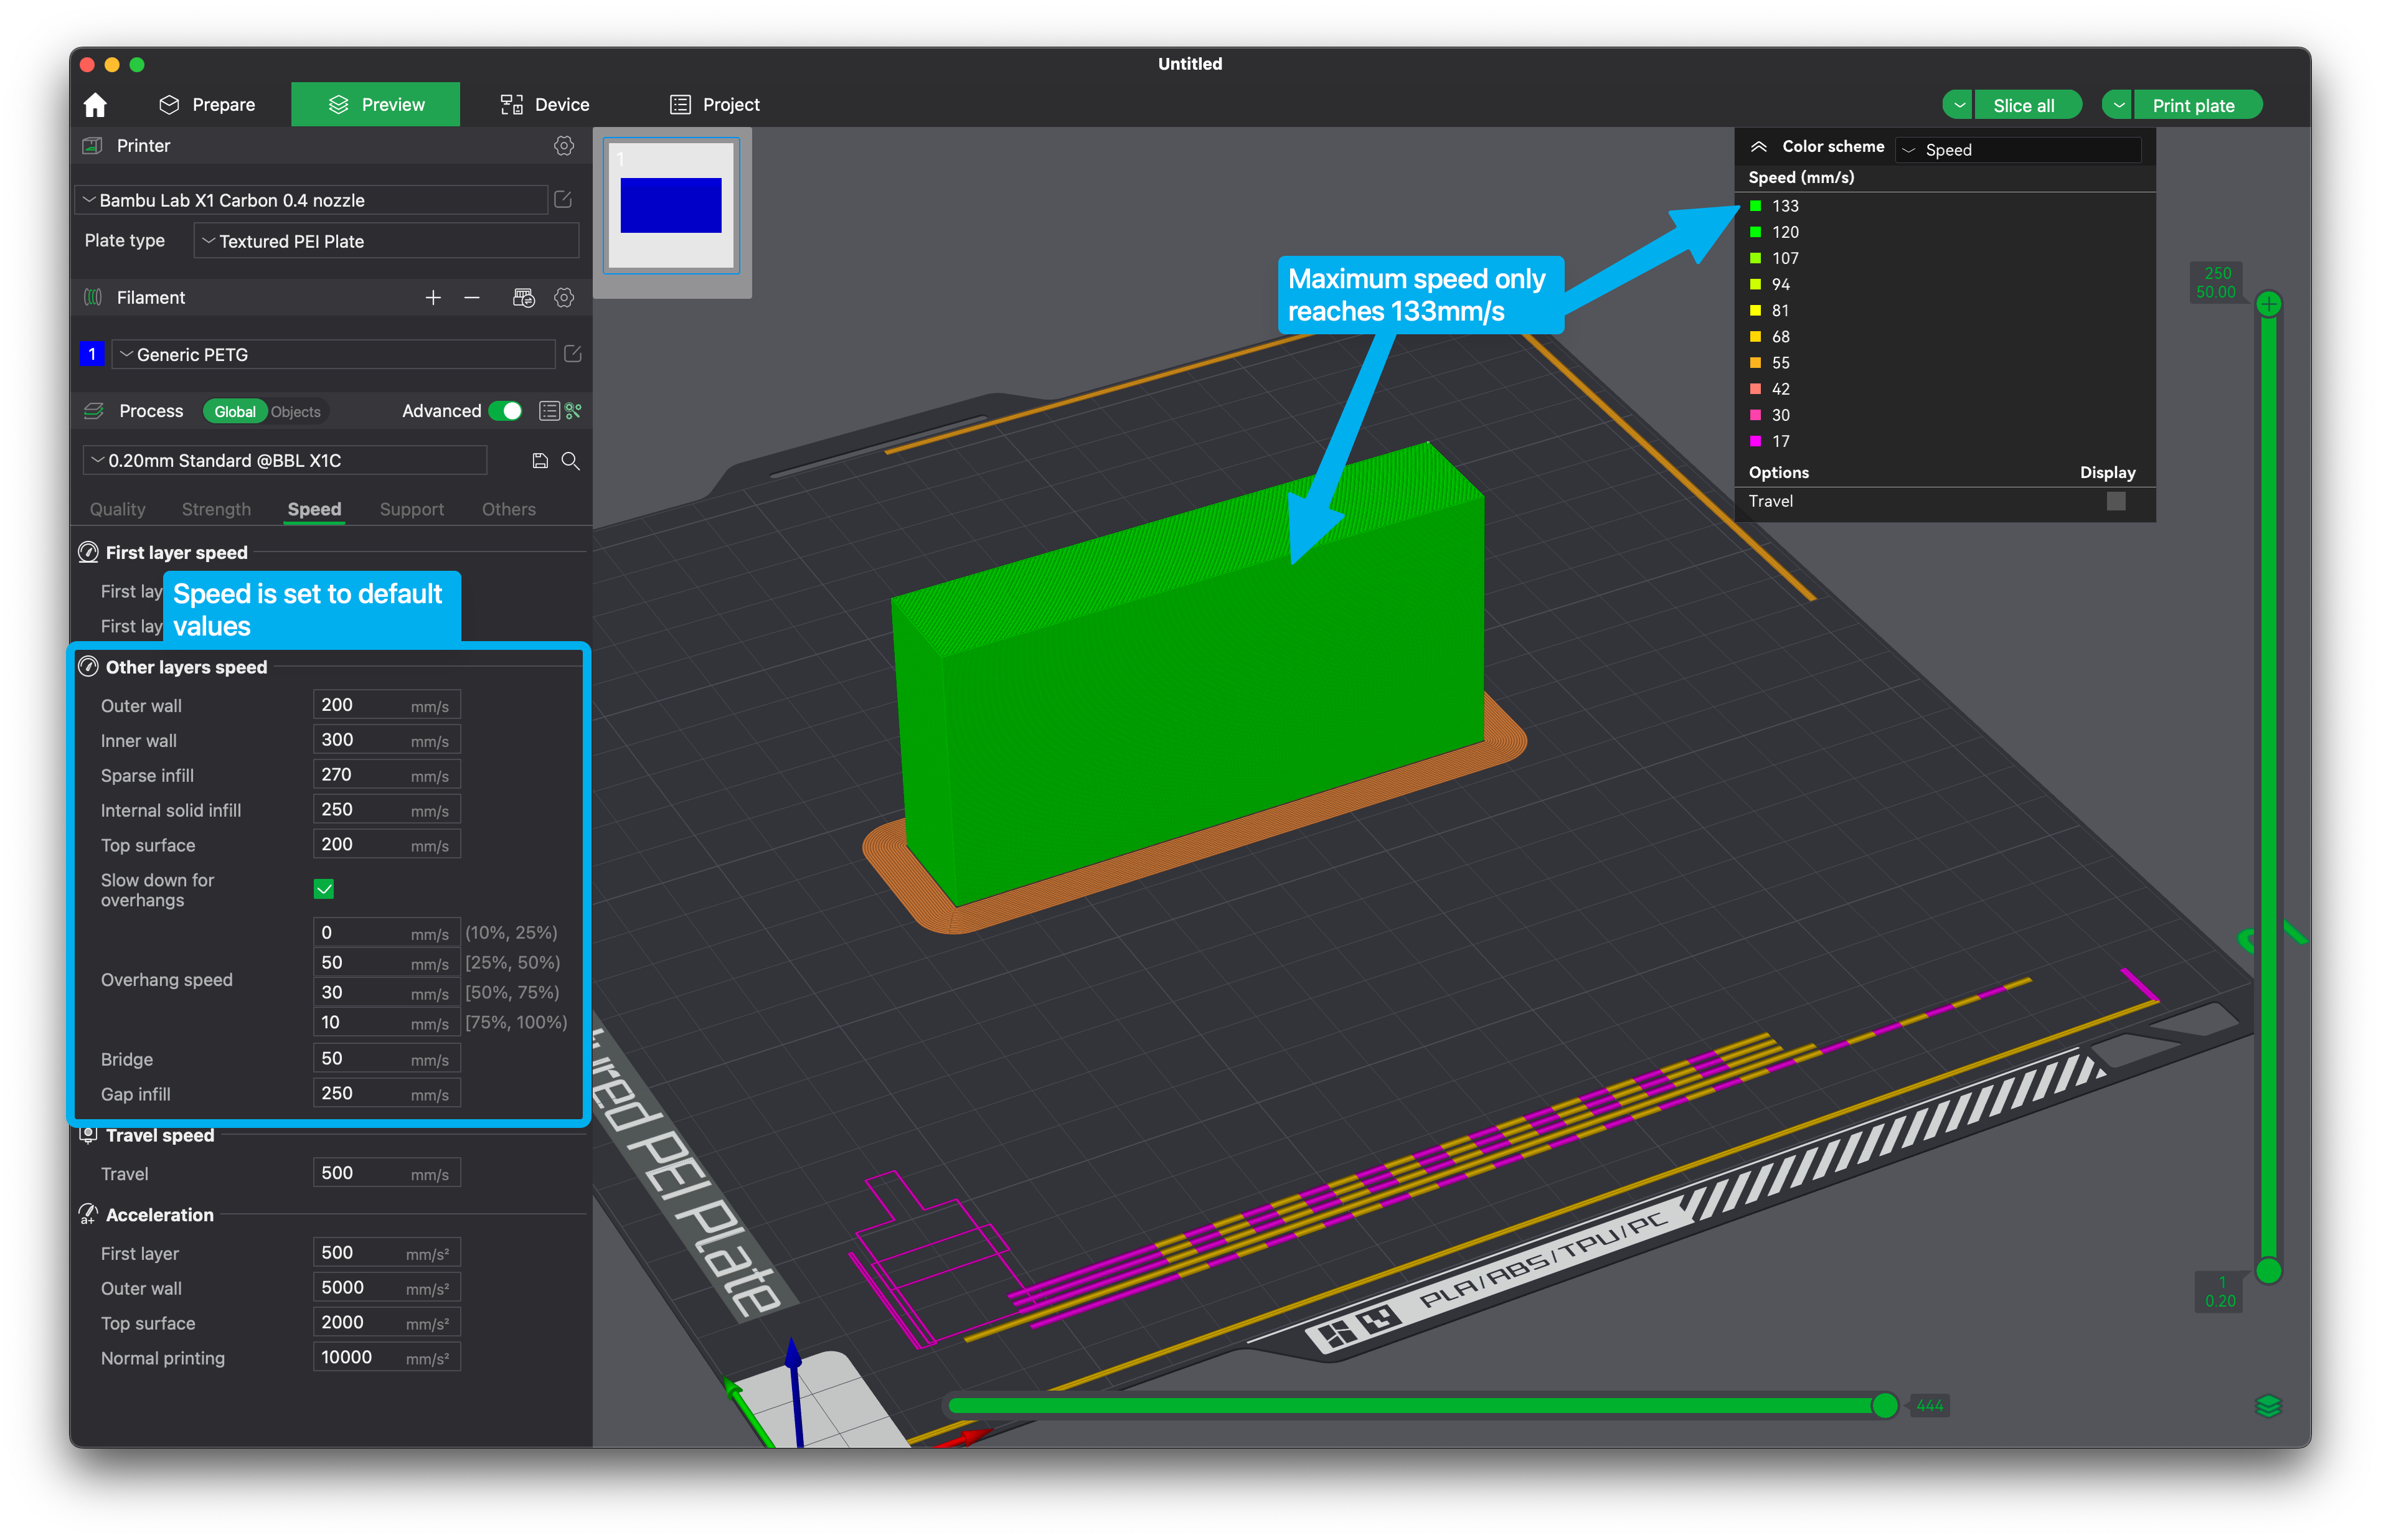
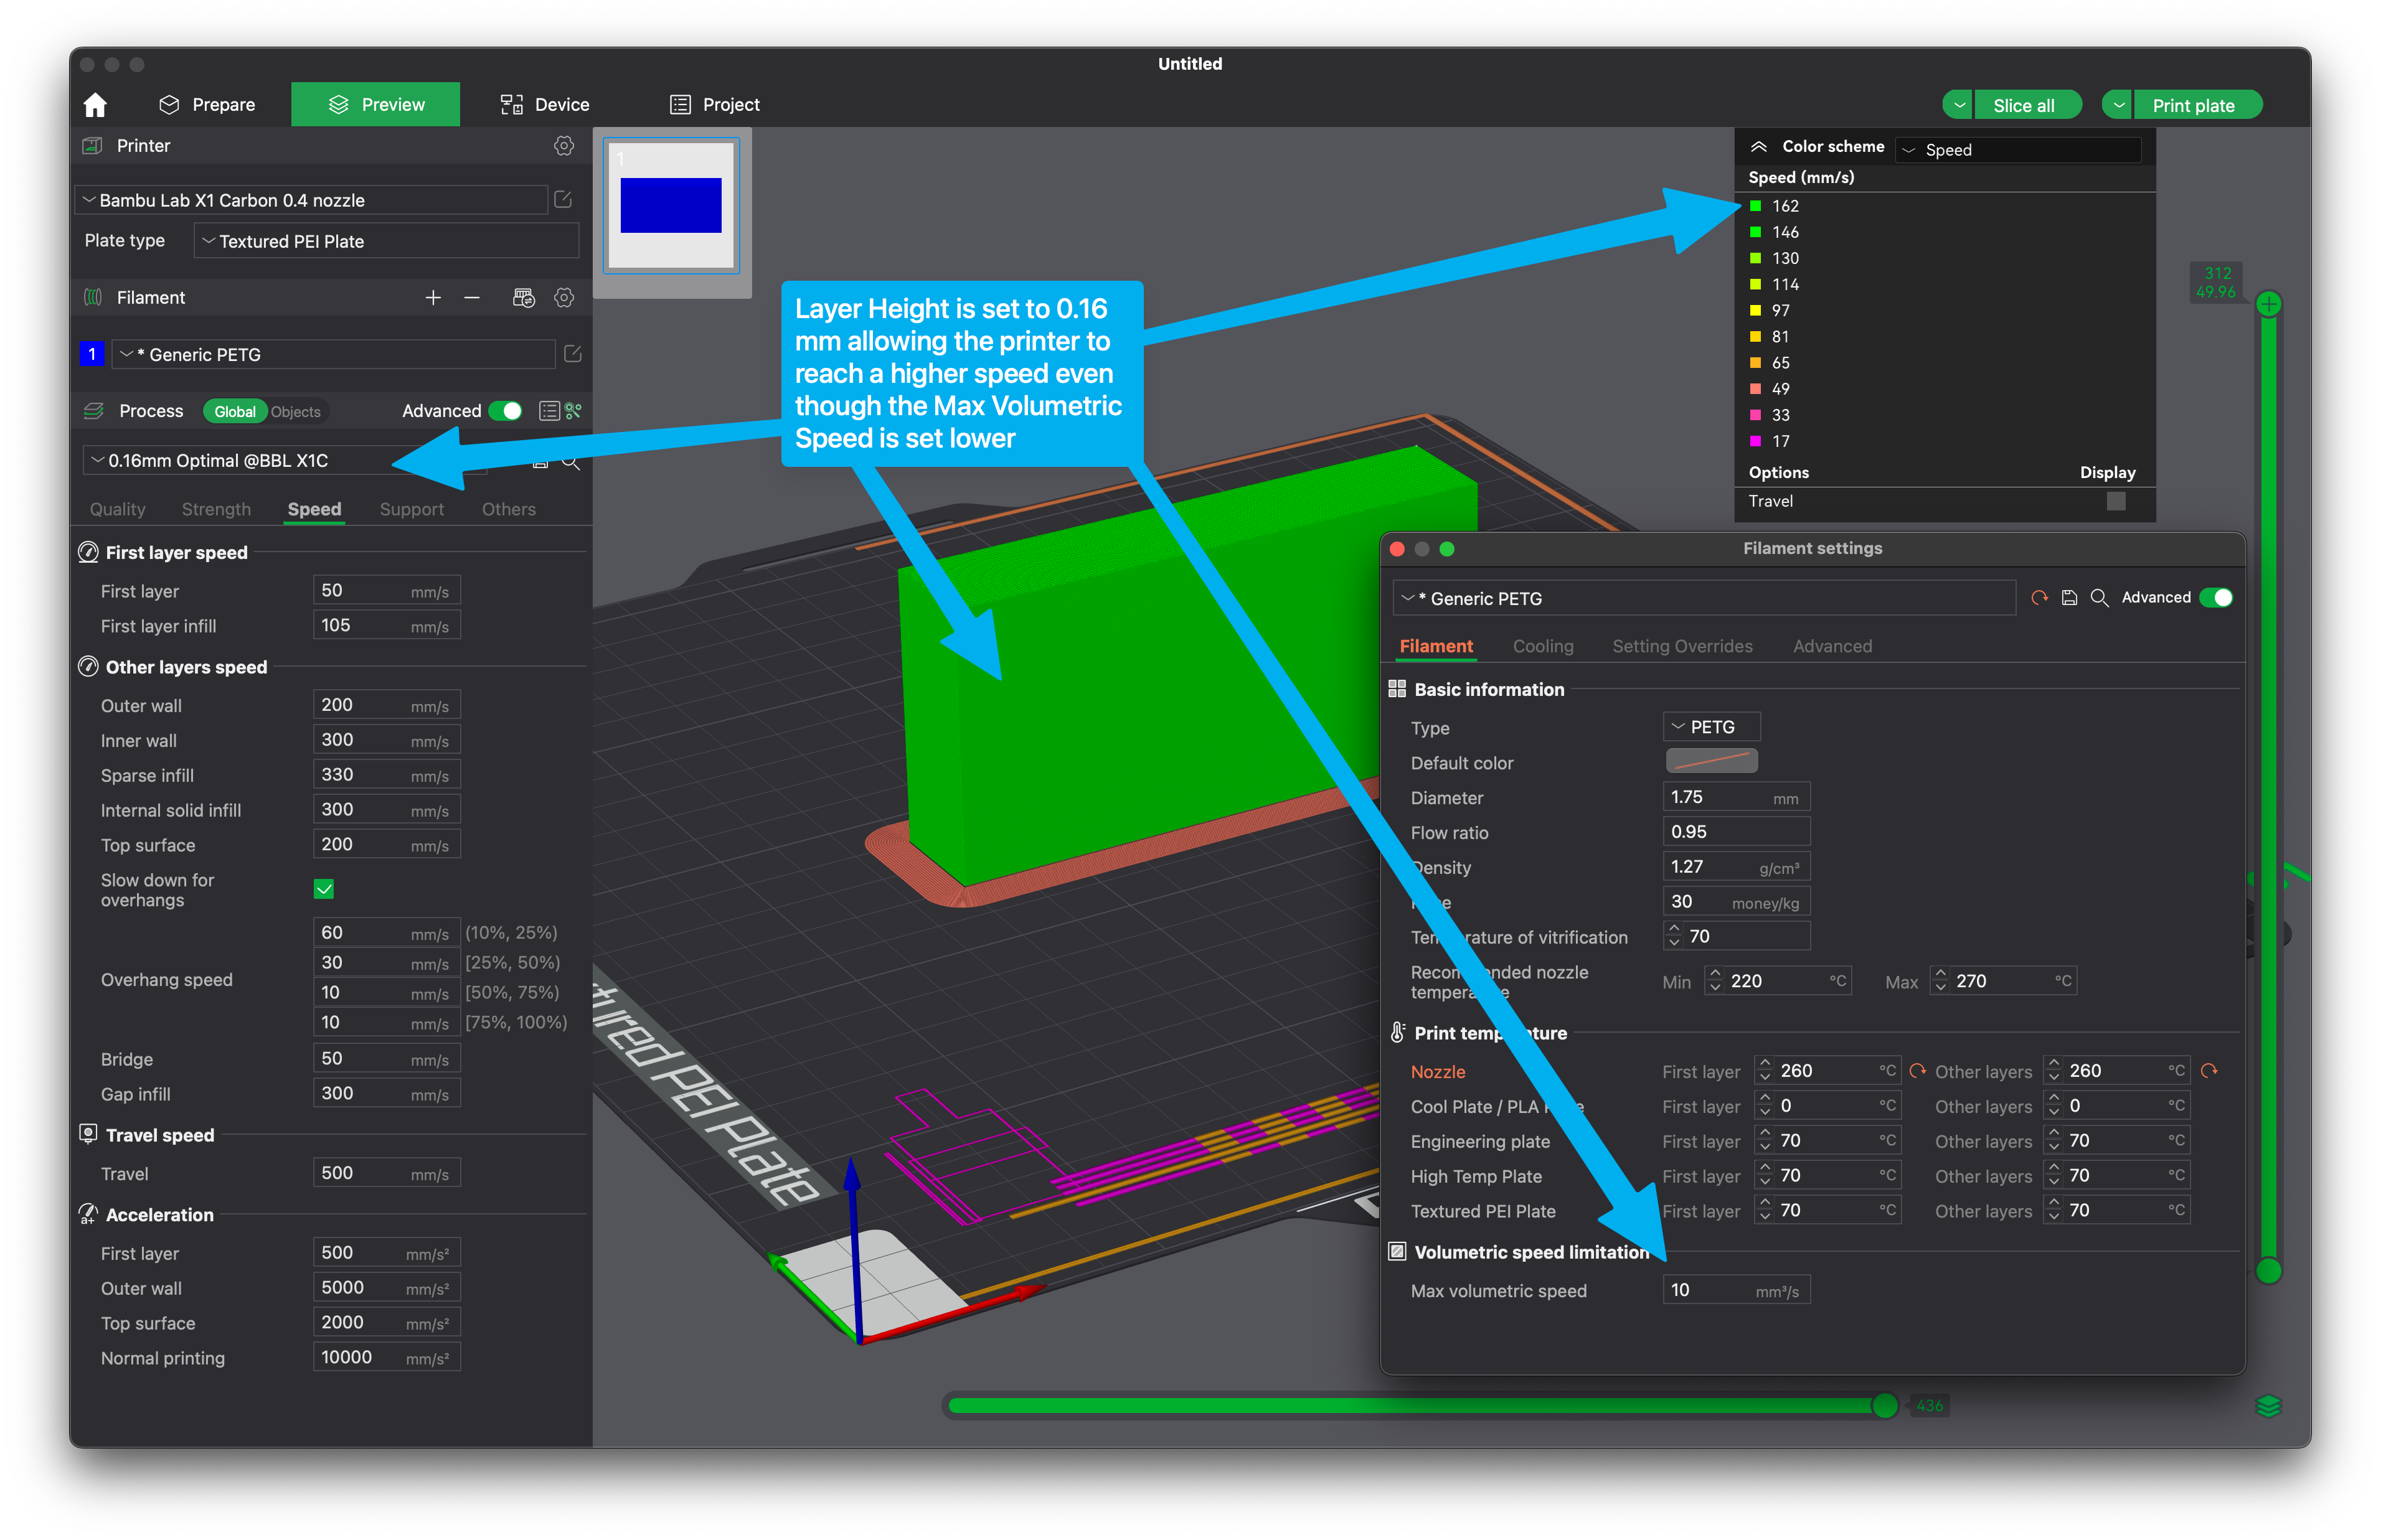
In the example below, I am using the Generic PETG profile with the default settings at 0.2 mm layer height. You can see that the maximum print speed the printer can reach is 133mm/s instead of the 200mm/s set in the Outer Wall setting.
One method to solve this issue is increasing the maximum volumetric speed in the Filament Settings from 10mm^3/s to 15mm^3/s which will allow the printer to reach the set 200mm/s and print faster.
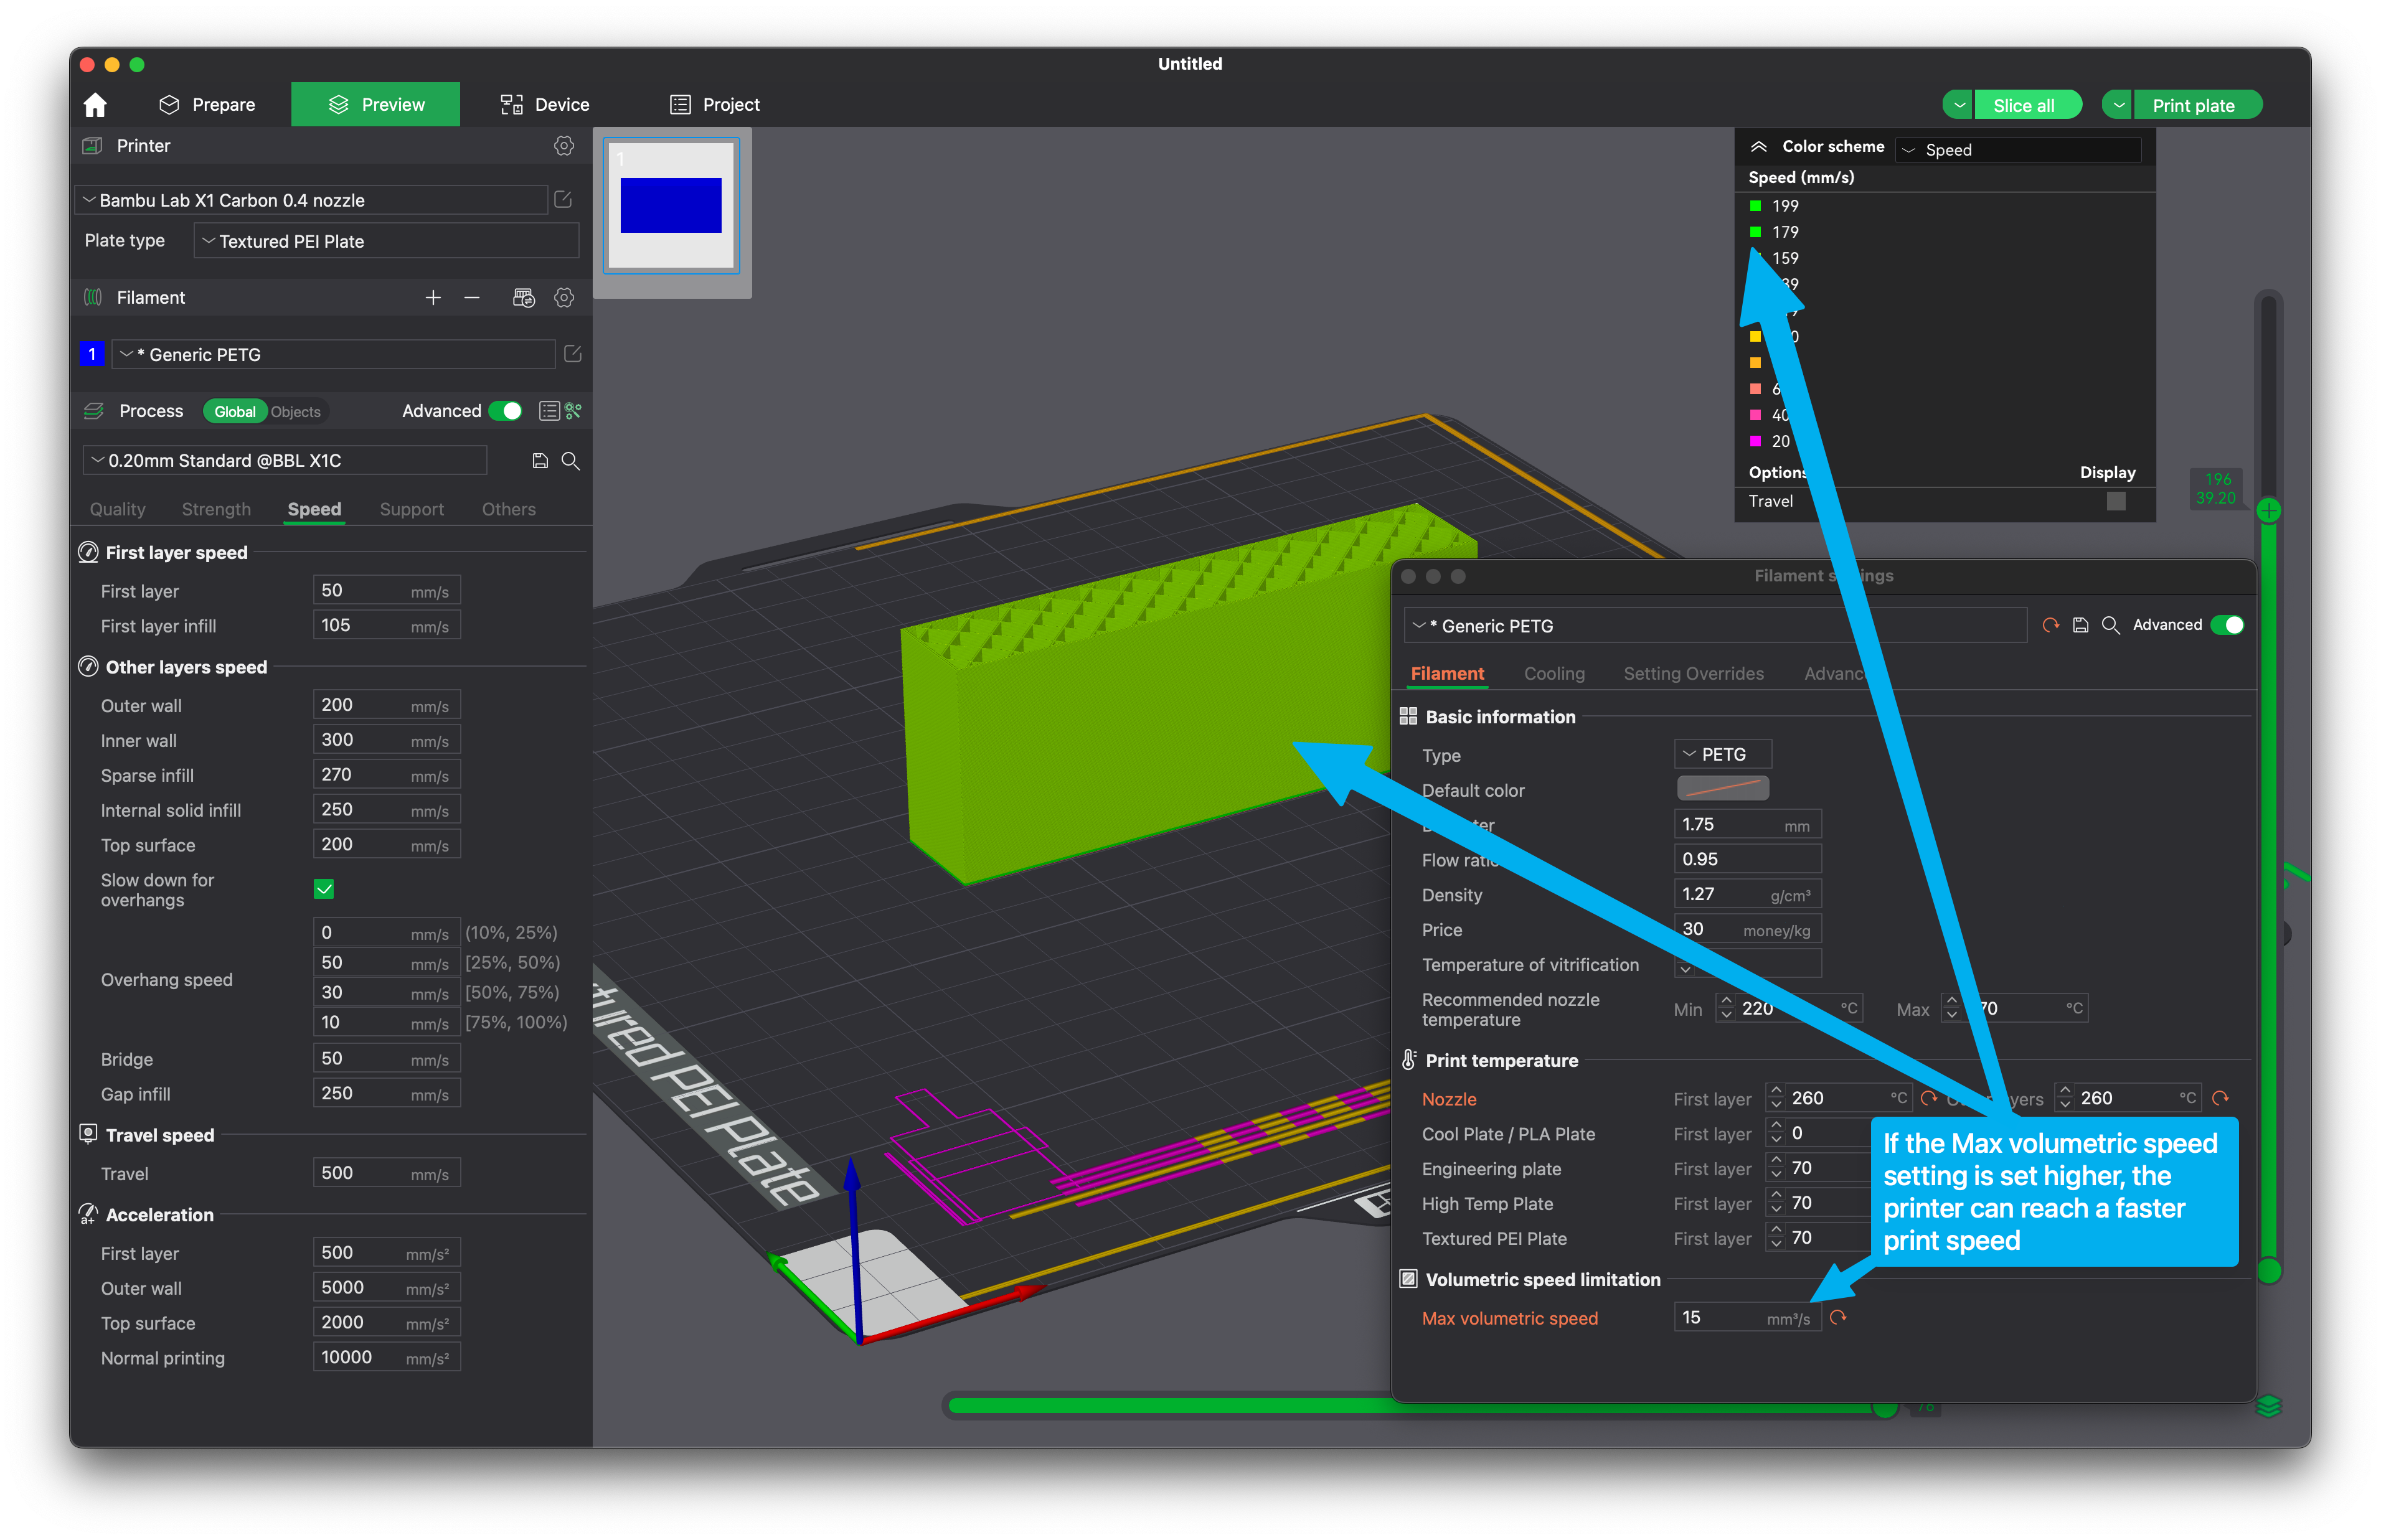
But as you might know, the max volumetric speed can be impacted by multiple slicer settings like layer height, layer width, print speed, and temperature. If your filament is unable to melt fast enough with a higher Max Volumetric Speed setting, then your other option is to lower the layer height, thus lowering the flow rate.
In the example below, I just lowered the layer height and the model can now be printed with up to 162mm/s speed even though the flow rate remains unchanged from the default 10mm^3/s value.
Inconsistent flow rate example
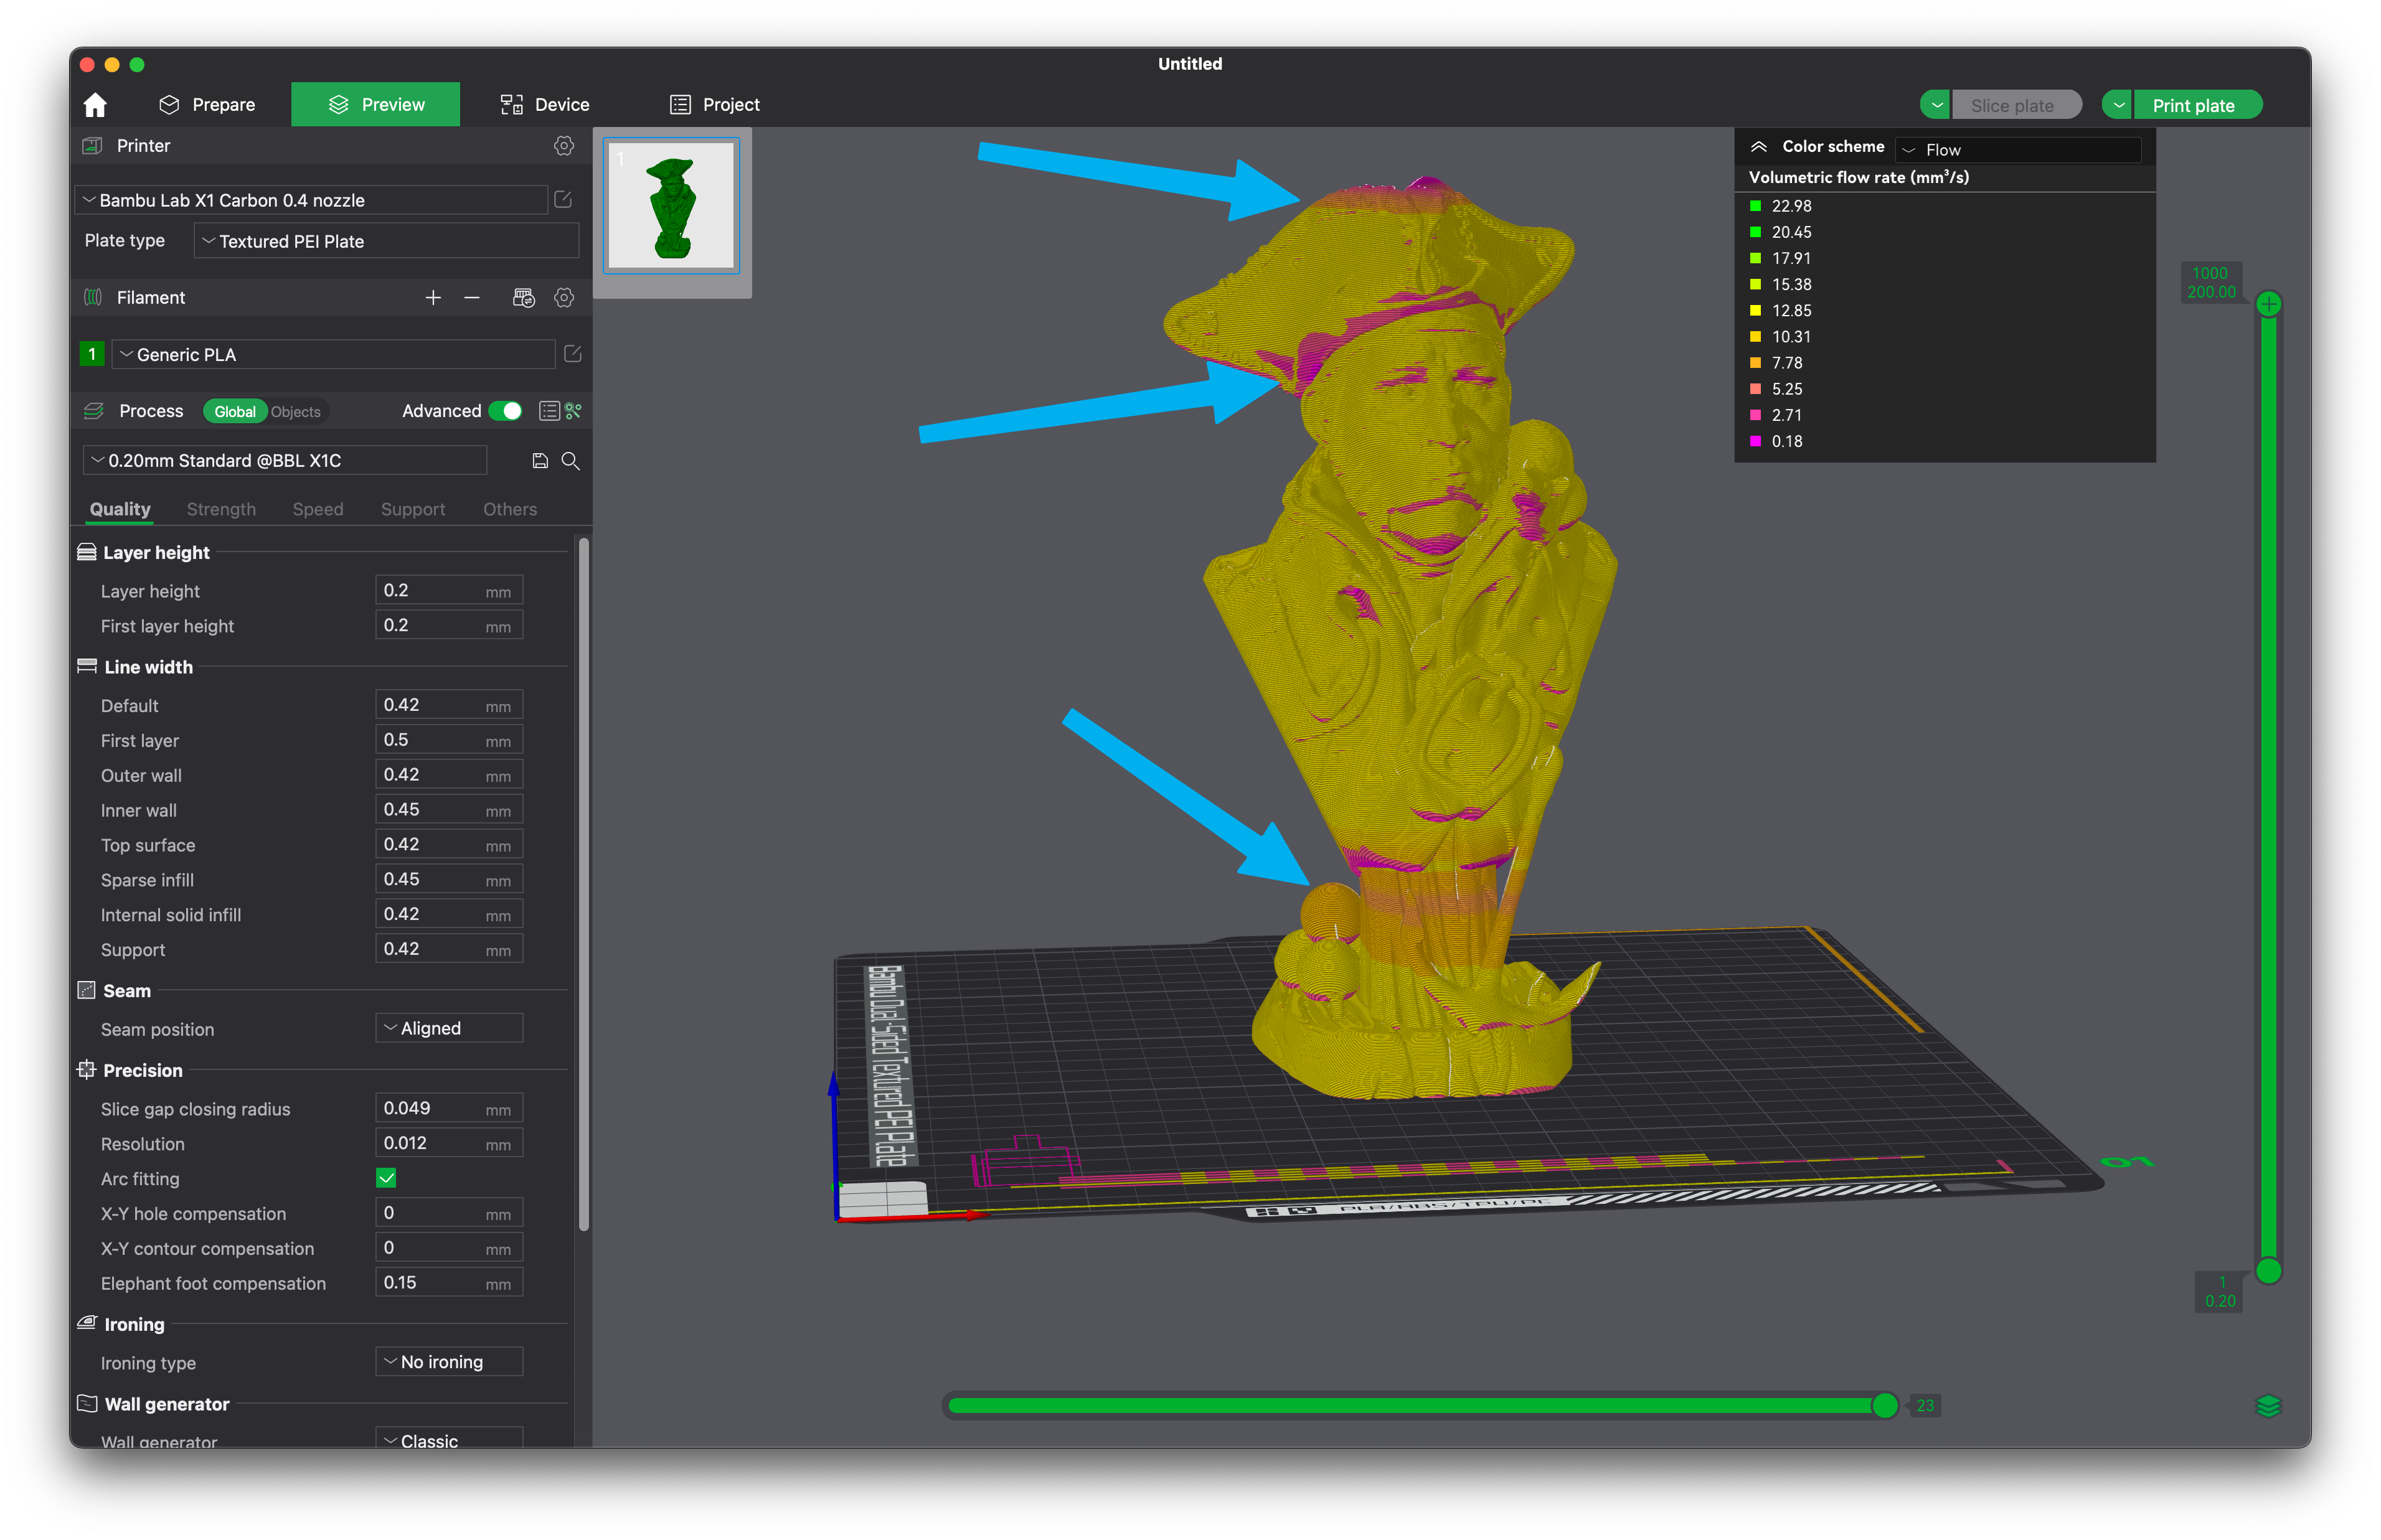
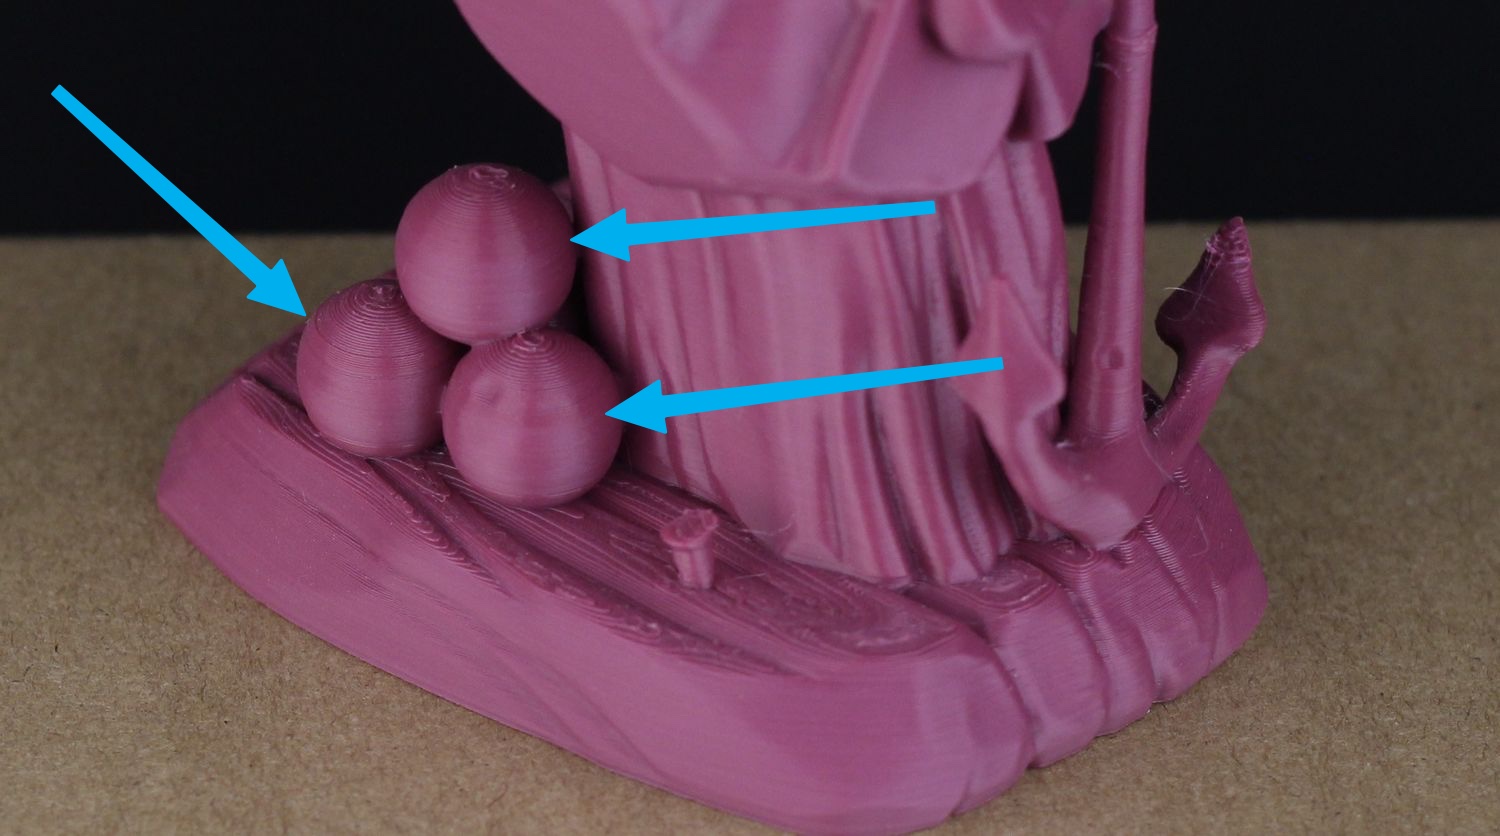
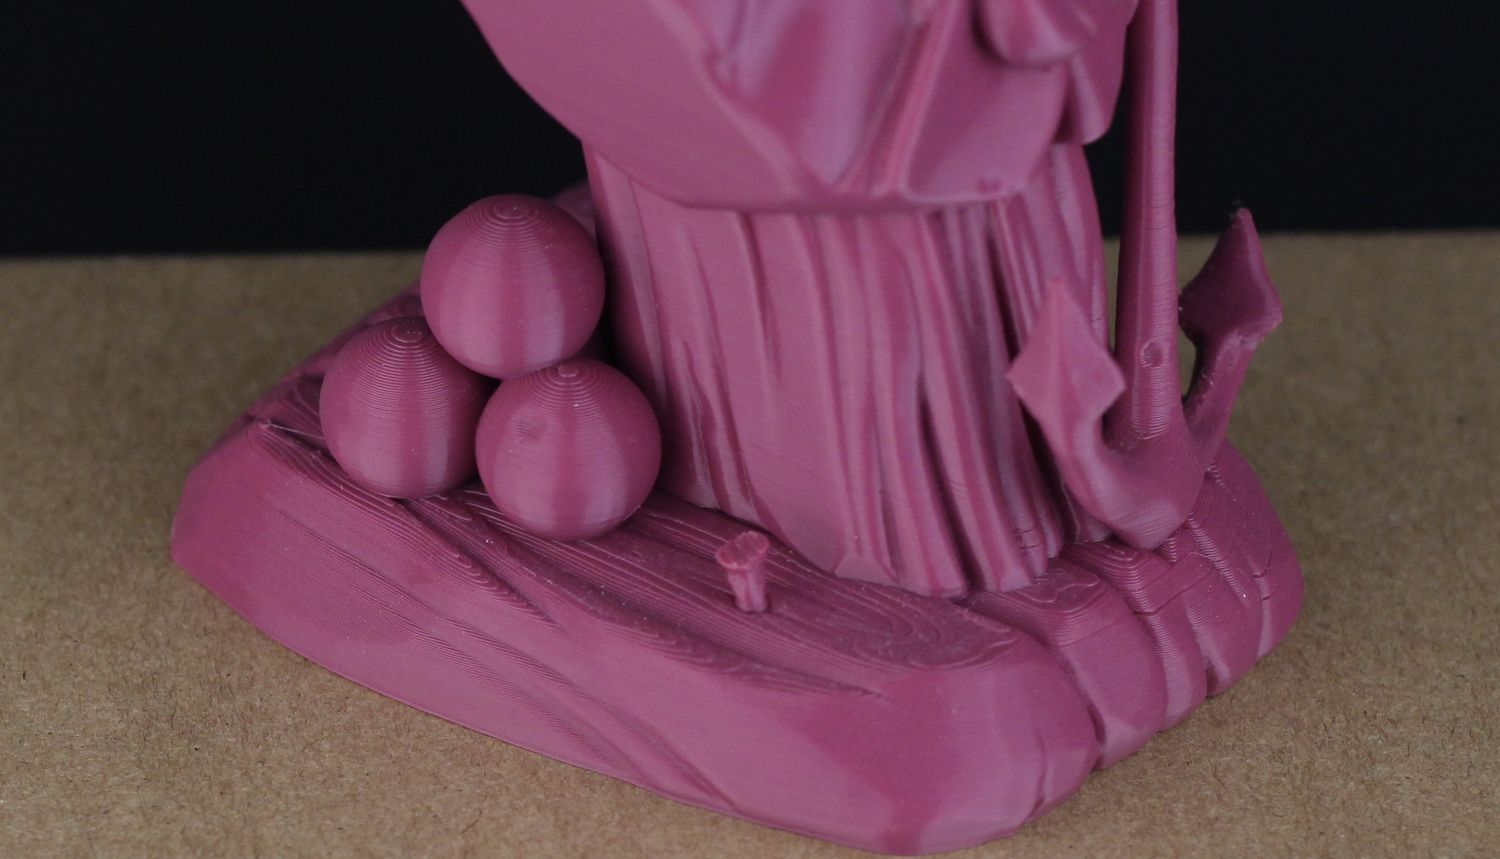
Here is another good example with A Pirate and his Rat from Eastman where the printed model can get an inconsistent wall finish when printing with the default Generic PLA profile which has a 12mm^3/s Maximum Volumetric Speed. As you can see, there are sections in the print where the flow rate changes, and the color of the model also changes.
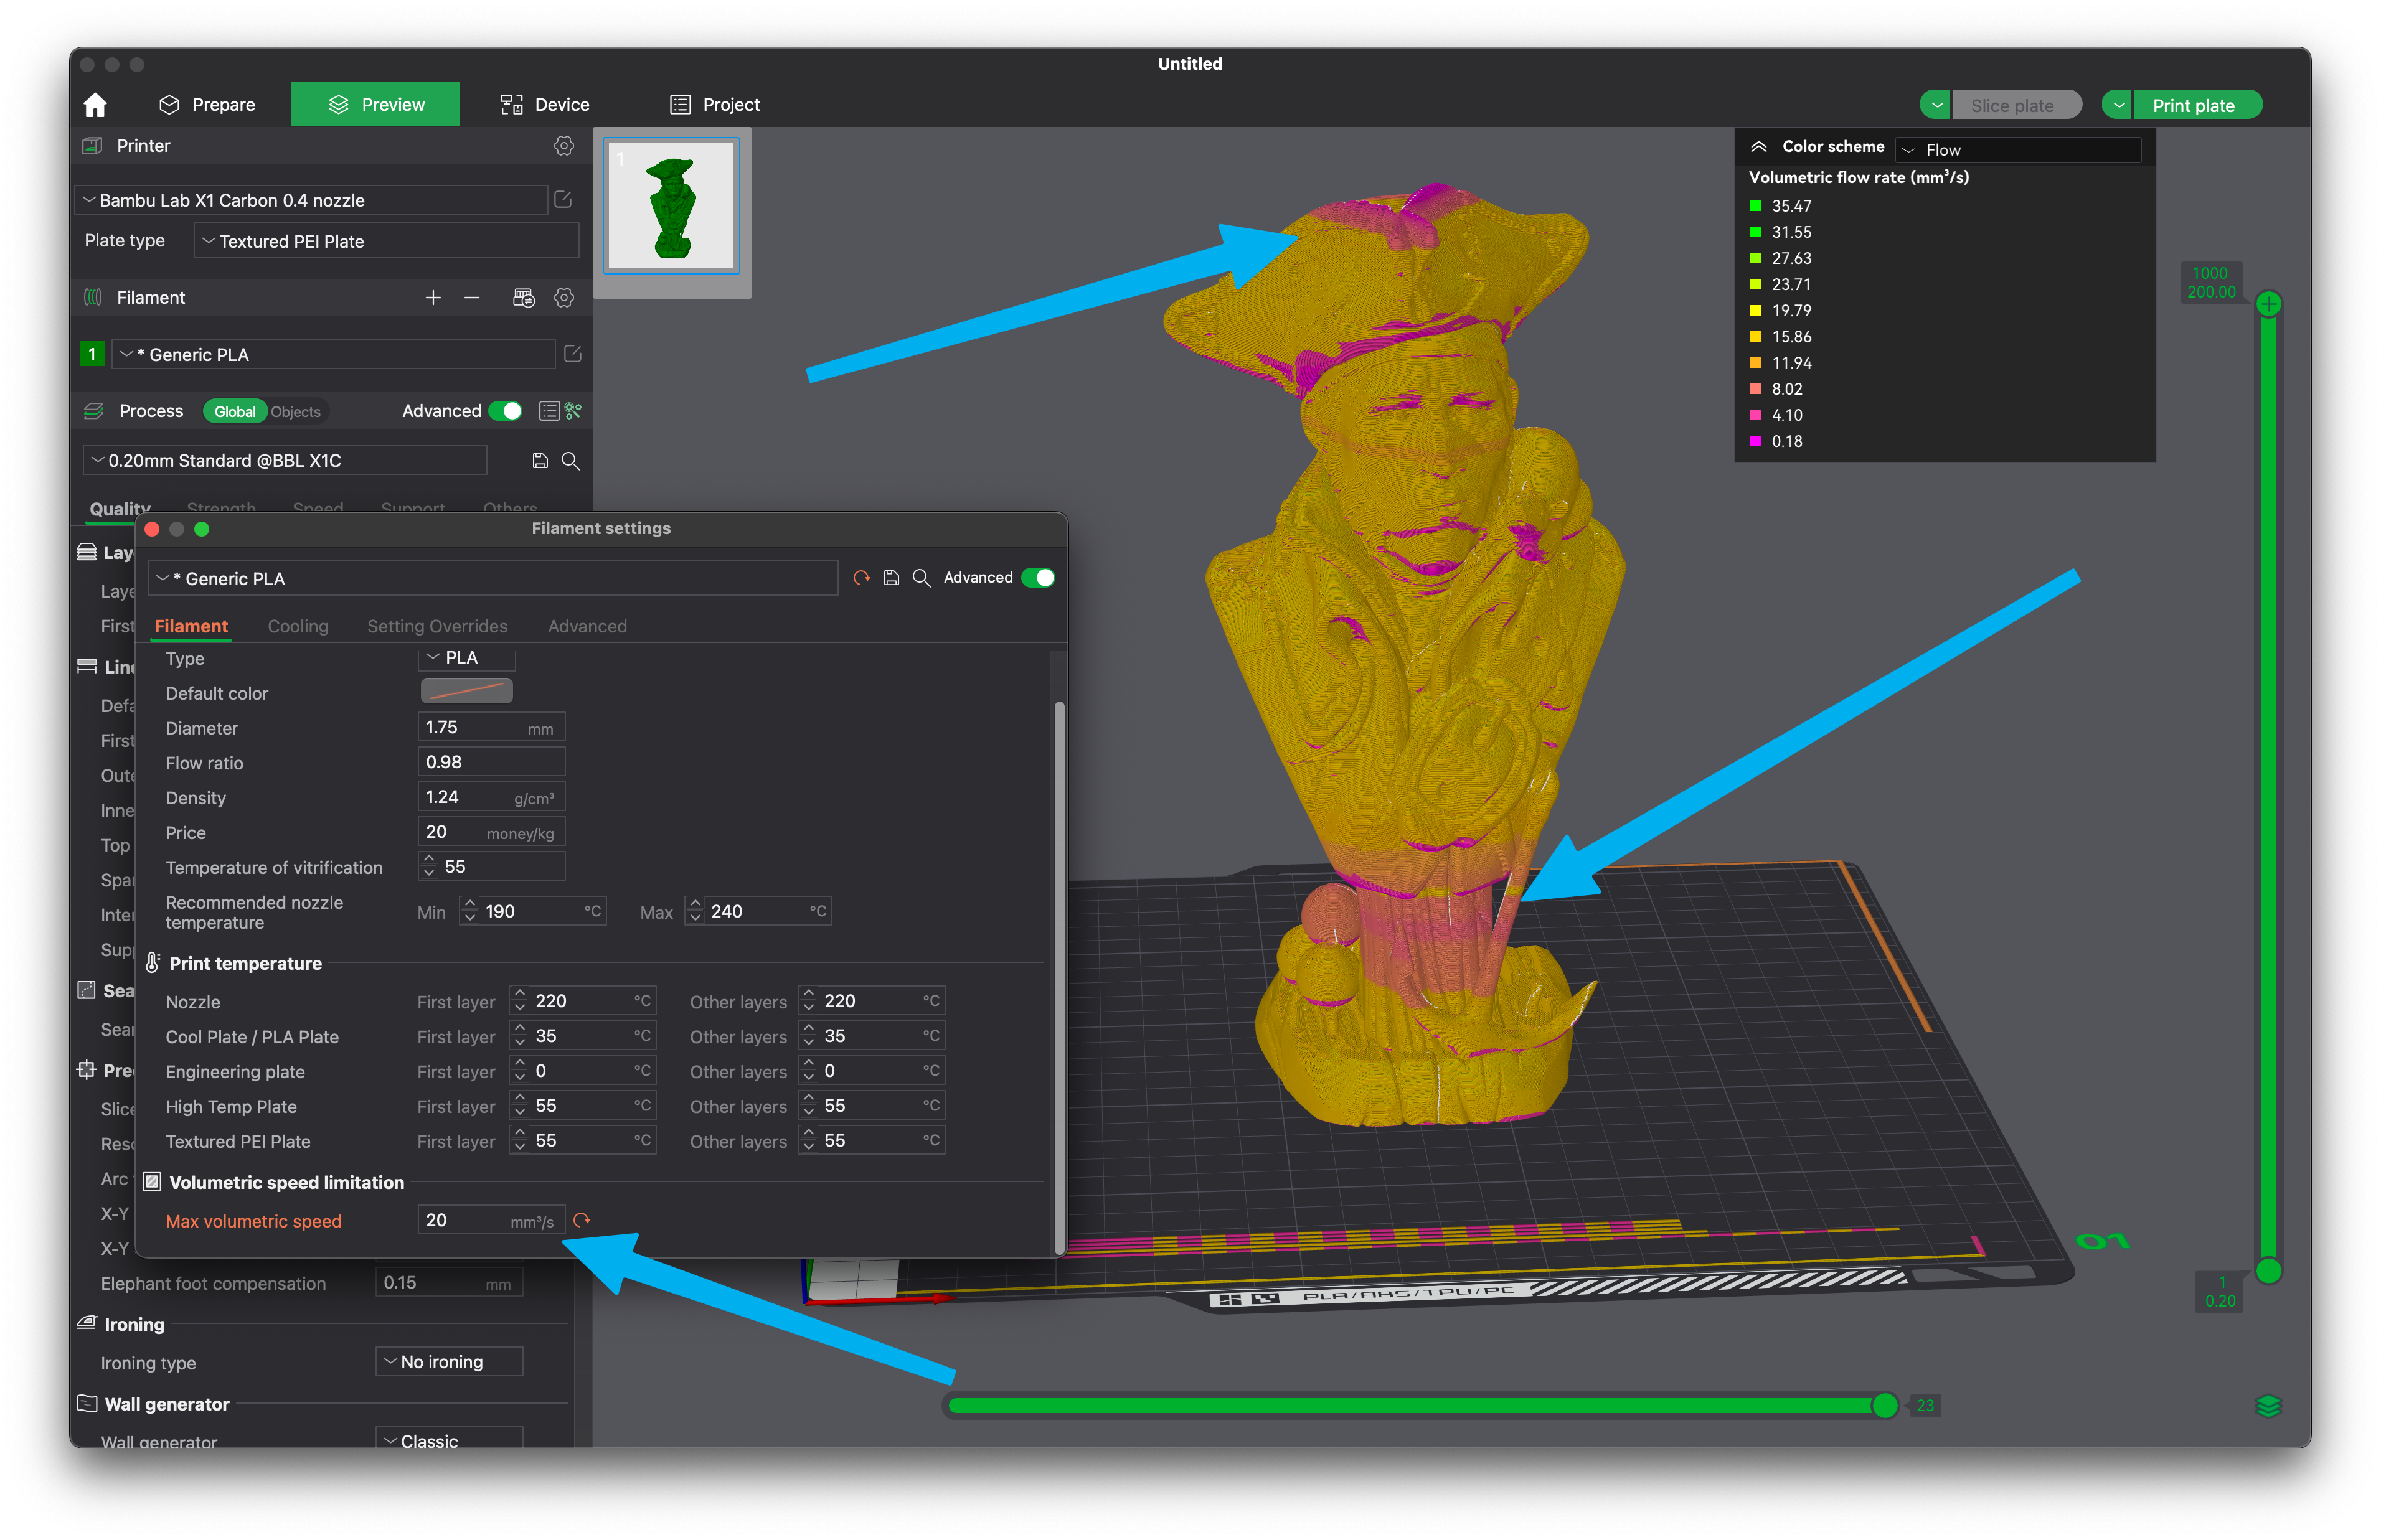
Changing the Maximum Volumetric Speed from 12mm^3/s to 20mm^3/s does not solve the problem completely. Even though we have increased the speed, some inconsistency in the finish of the print will still occur and that’s because of the minimum layer time which is still set to 8 seconds.
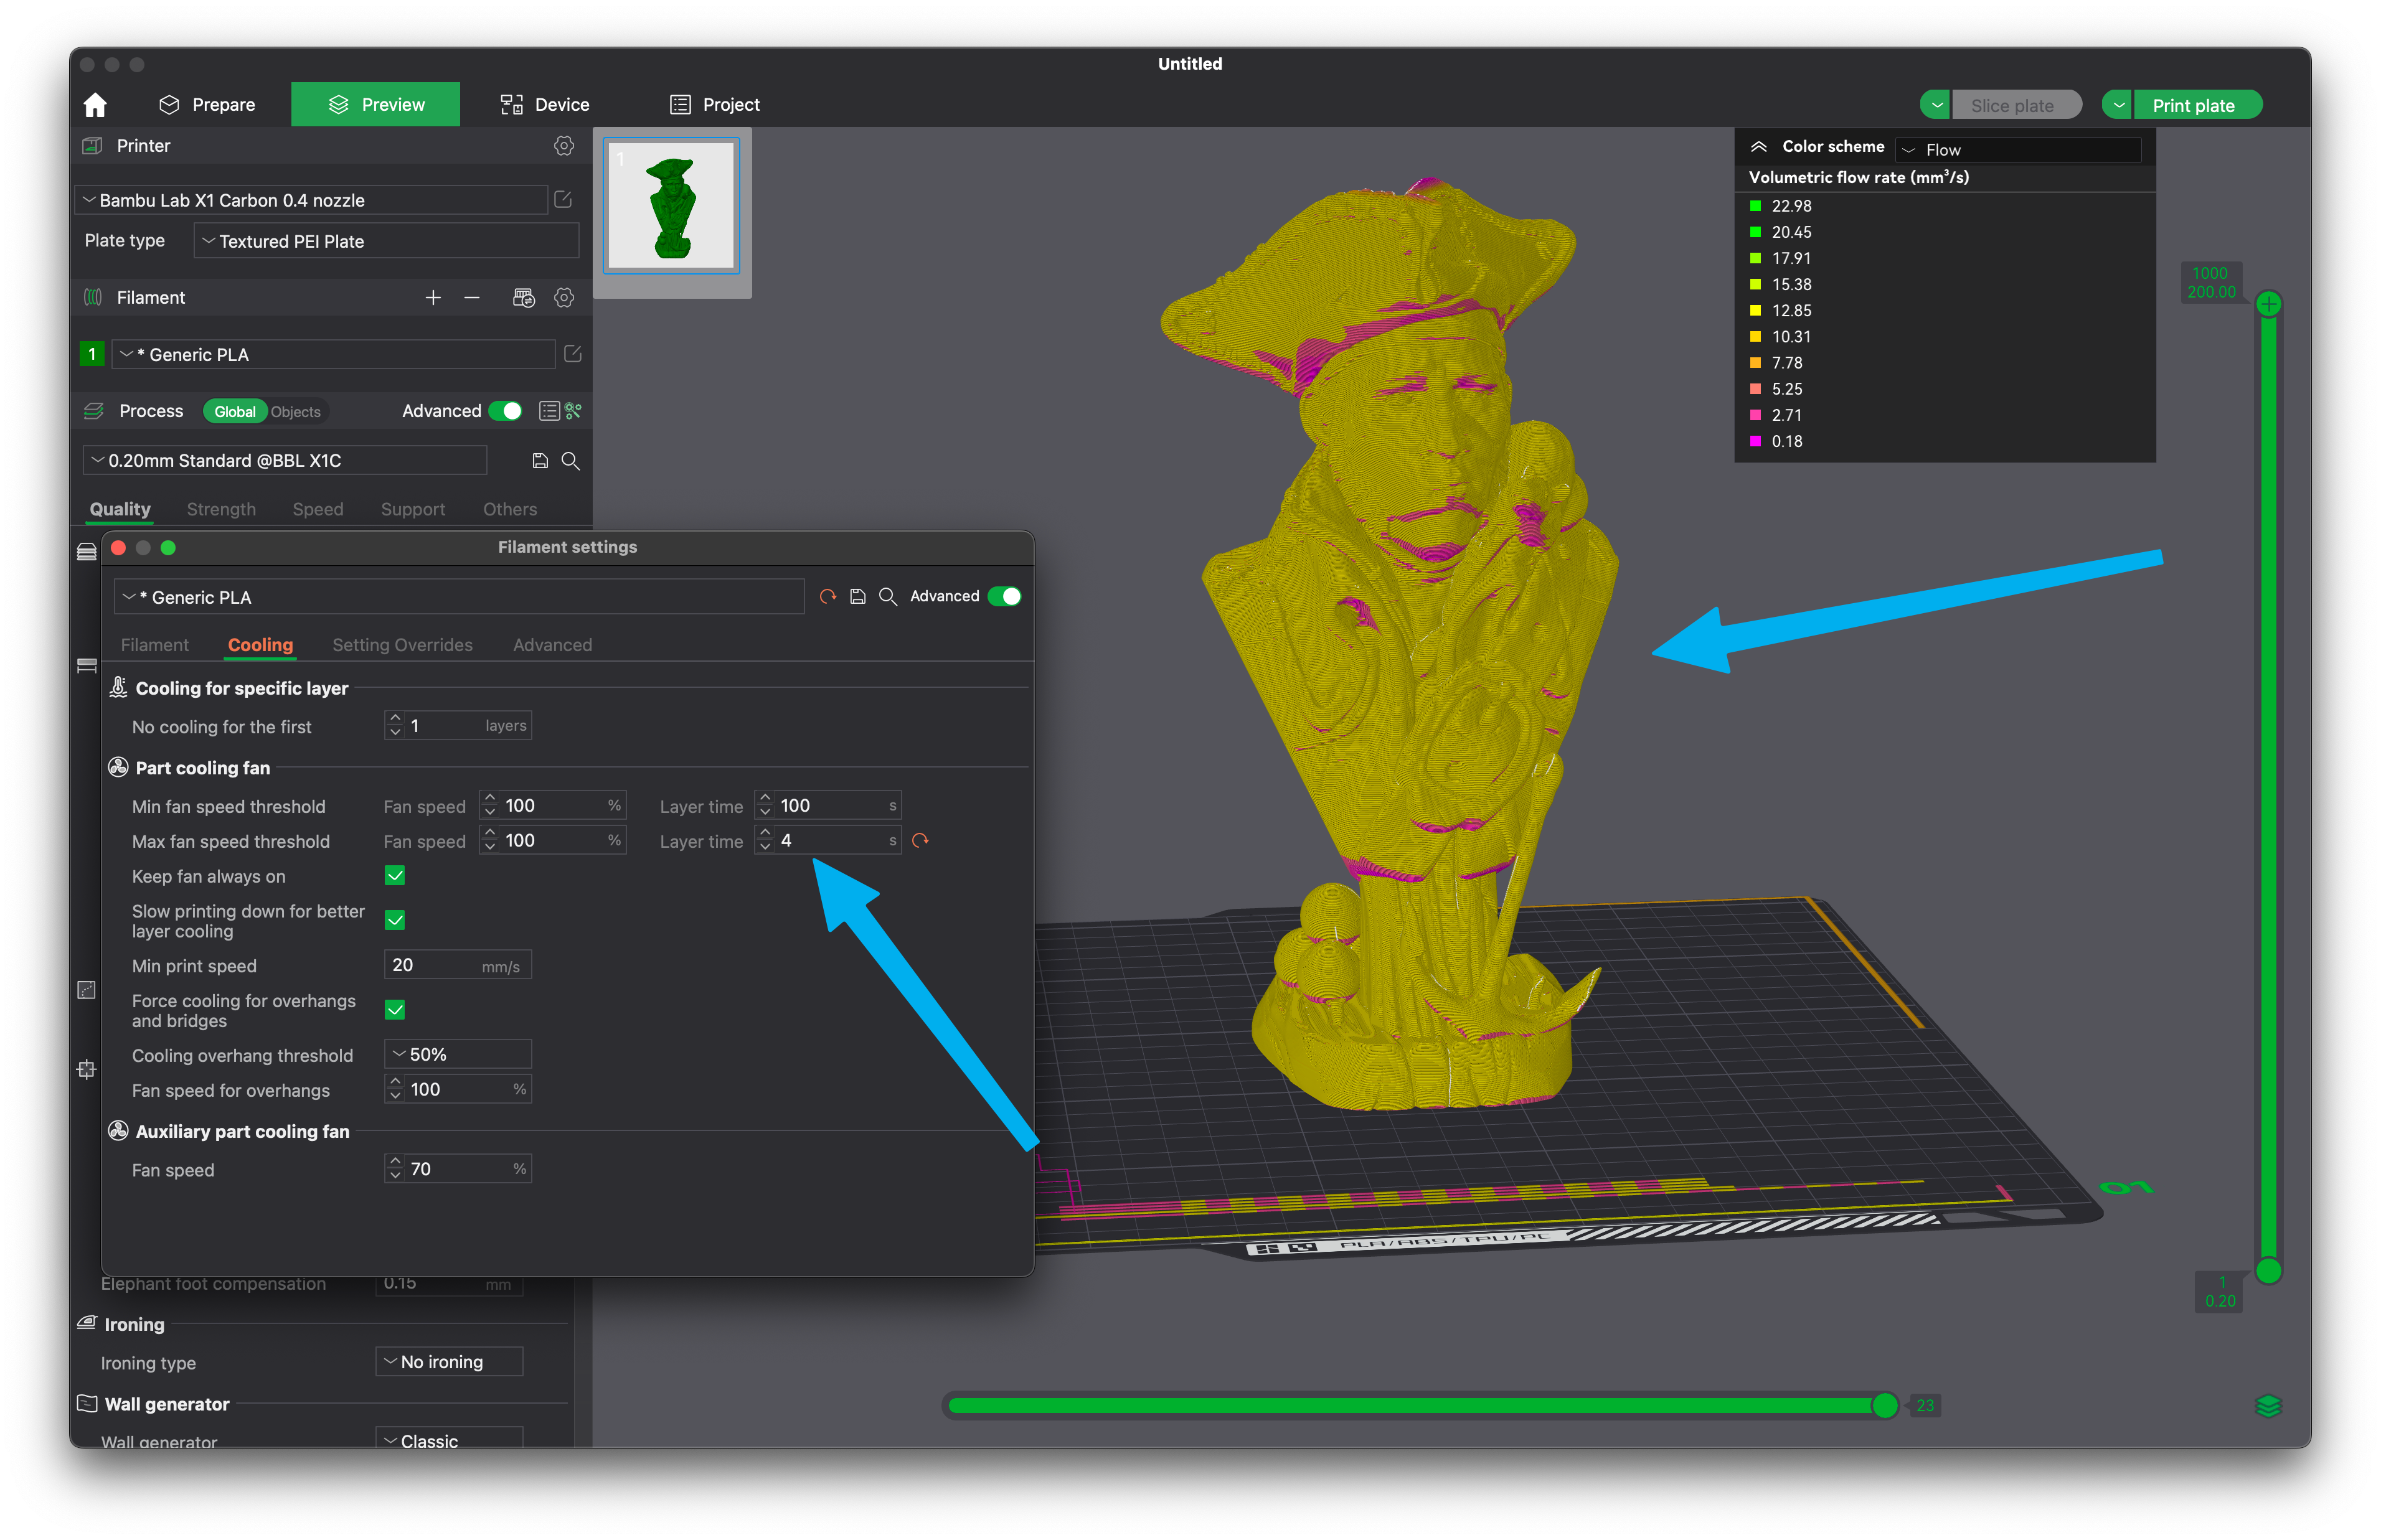
Lowering the minimum layer time to 4 seconds solves this problem and the inconsistent flow rate on the external walls of the print is gone. Of course, you still have the purple sections where the printer slows down for overhangs, but that is expected as you want to print the overhangs slower for the best results.
Balancing the Maximum Volumetric Speed setting with the Layer Time setting is crucial if you want to get a perfect wall finish, as you need to take into consideration the cooling capabilities of your machine. A higher Layer time will allow the layers to cool better and will give you an overall better result but most of the time having a consistent flow rate in the slicer will get you a better result if cooling can keep up.
In the picture on the left, you can see how the inconsistent flow rate can manifest itself if the settings are not right and the flow rate and layer time change during printing. The round objects present the most obvious inconsistency, but if you look closer, the inconsistent finish can be seen on the bust support too.
The picture on the right does not show those inconsistencies as it was printed with a correct Volumetric maximum flow rate and layer time.
Wall finish variation example
Let’s take another example, with the Phone Stand by Mr.(Pr)interesting. Sliced with the default Generic PLA profile, you can see a lot of inconsistencies caused by a combination of flow rate limits and Layer Time.
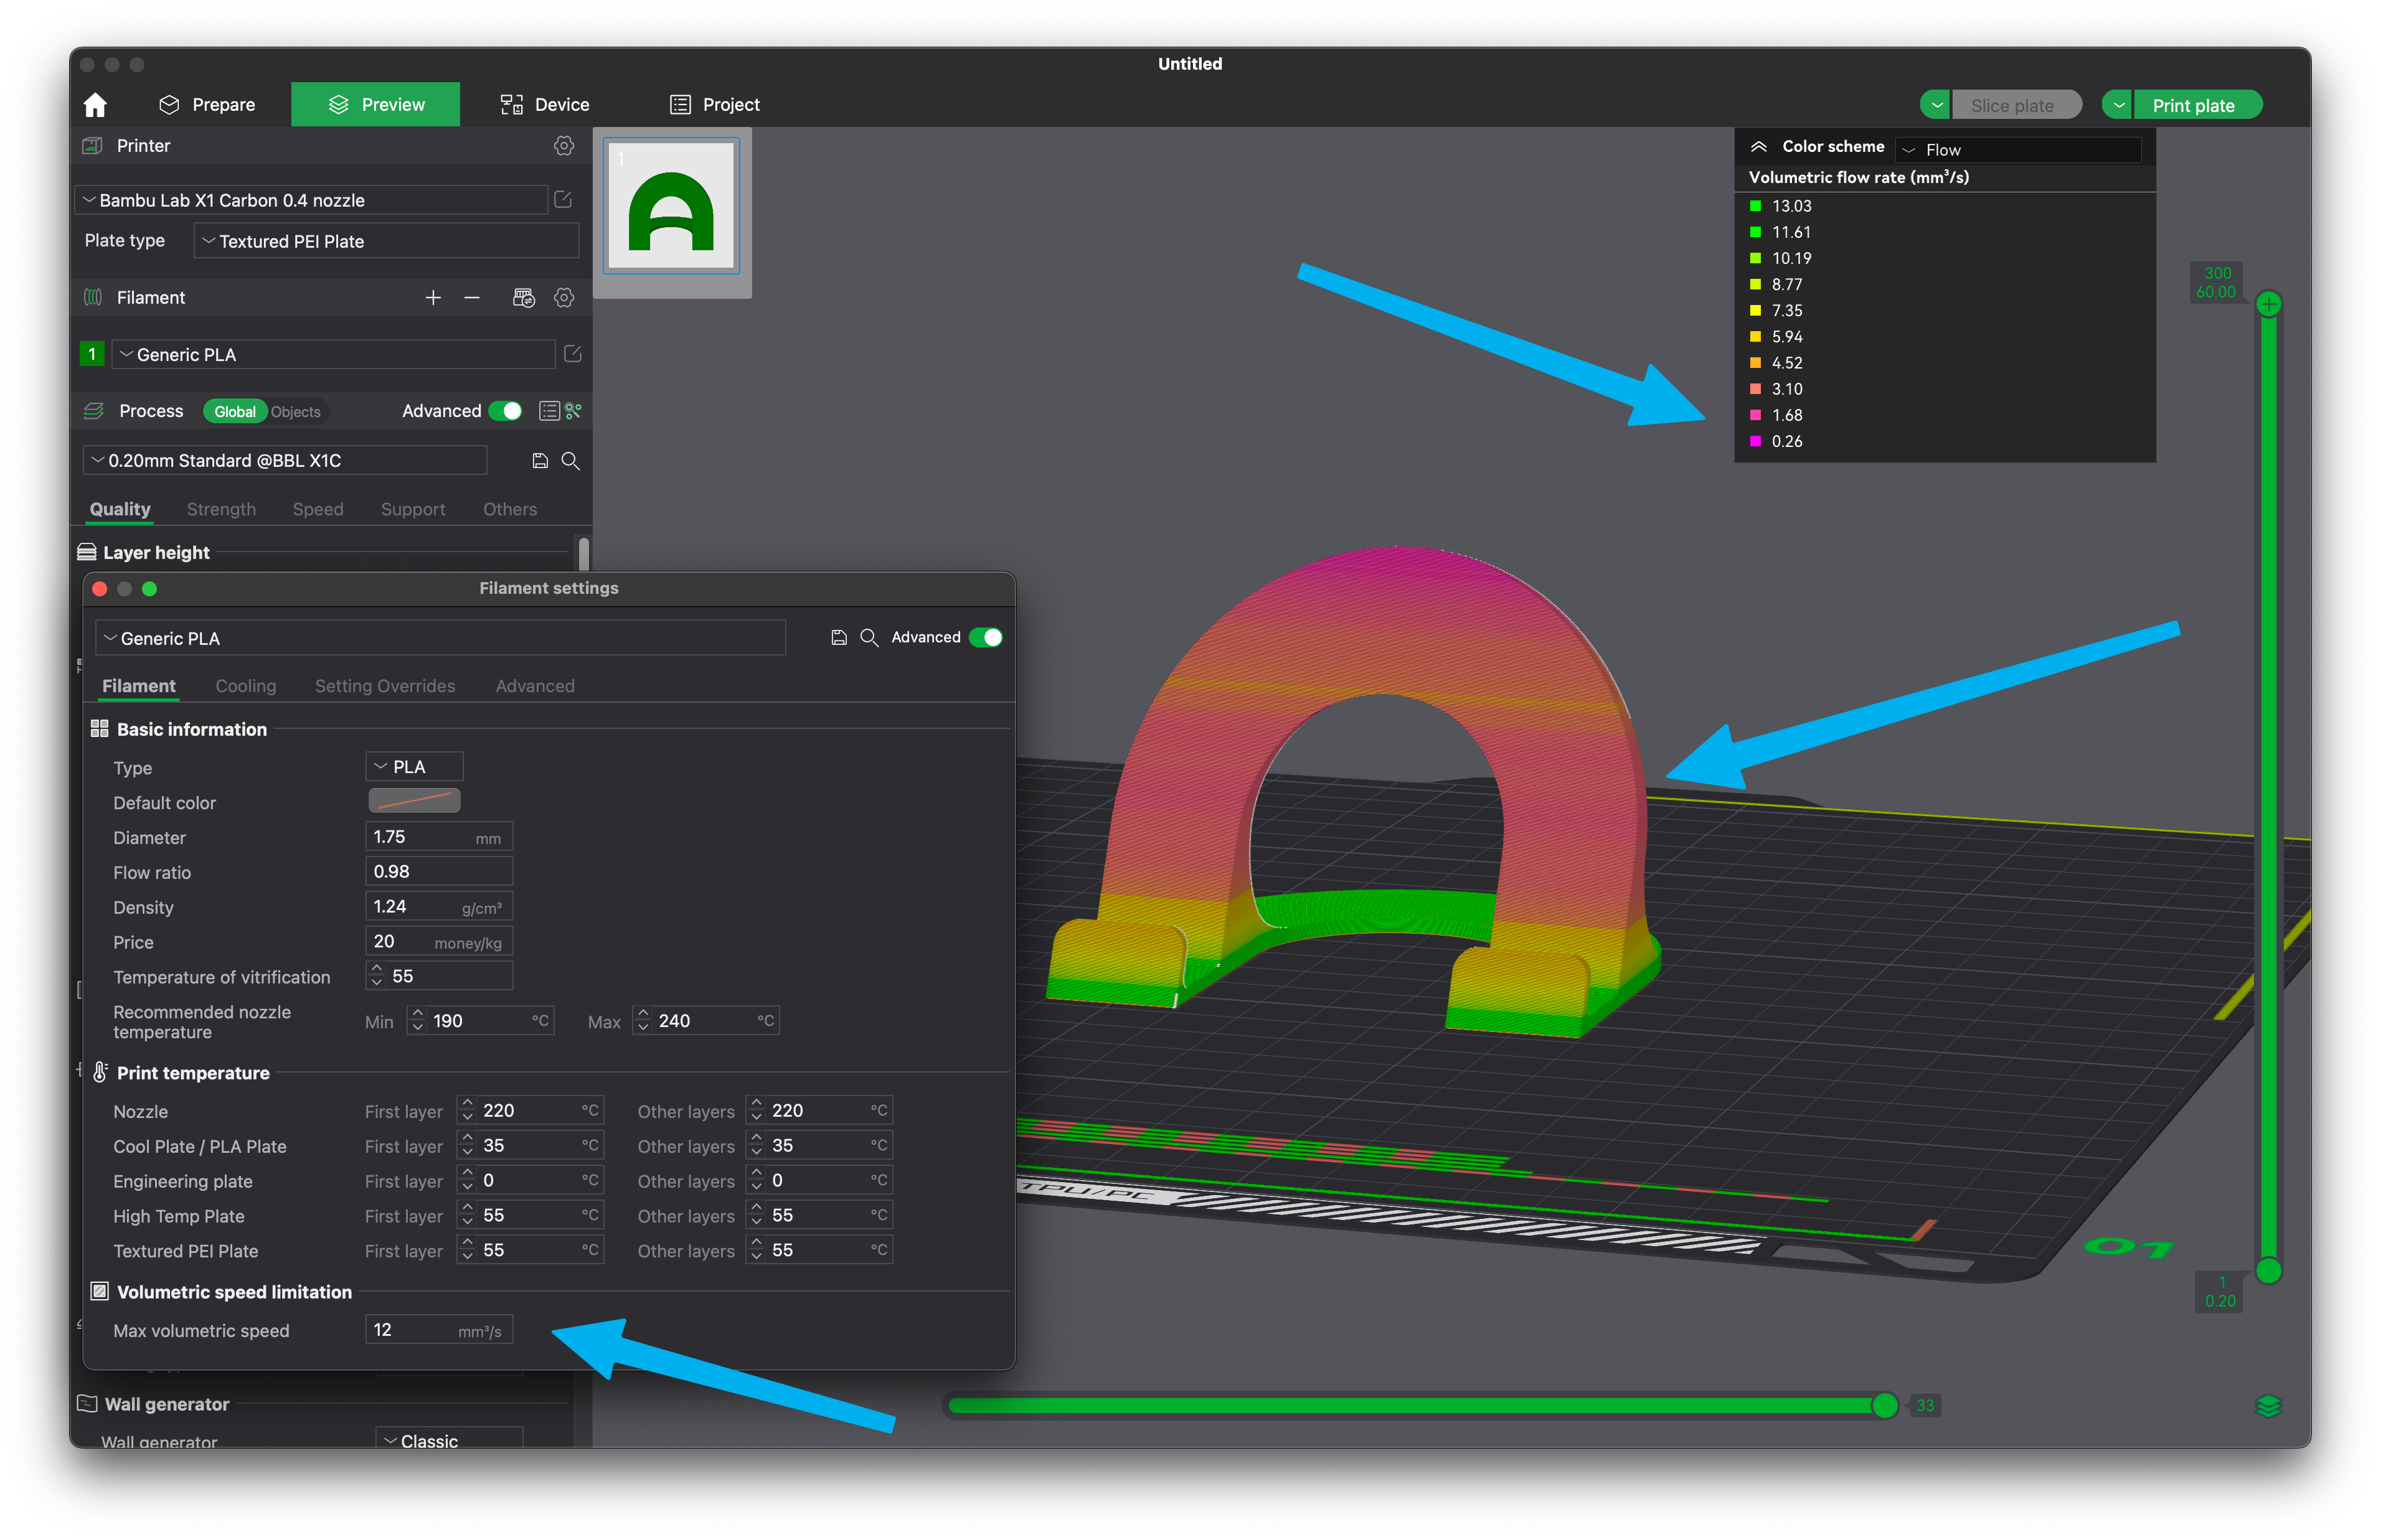
To solve the problem and get a more consistent print finish, we need to adjust both the Max Volumetric Speed setting and the Layer time. In this case, setting a layer time that is too low will not provide a good result as the layers cannot cool down fast enough due to the size of the model.
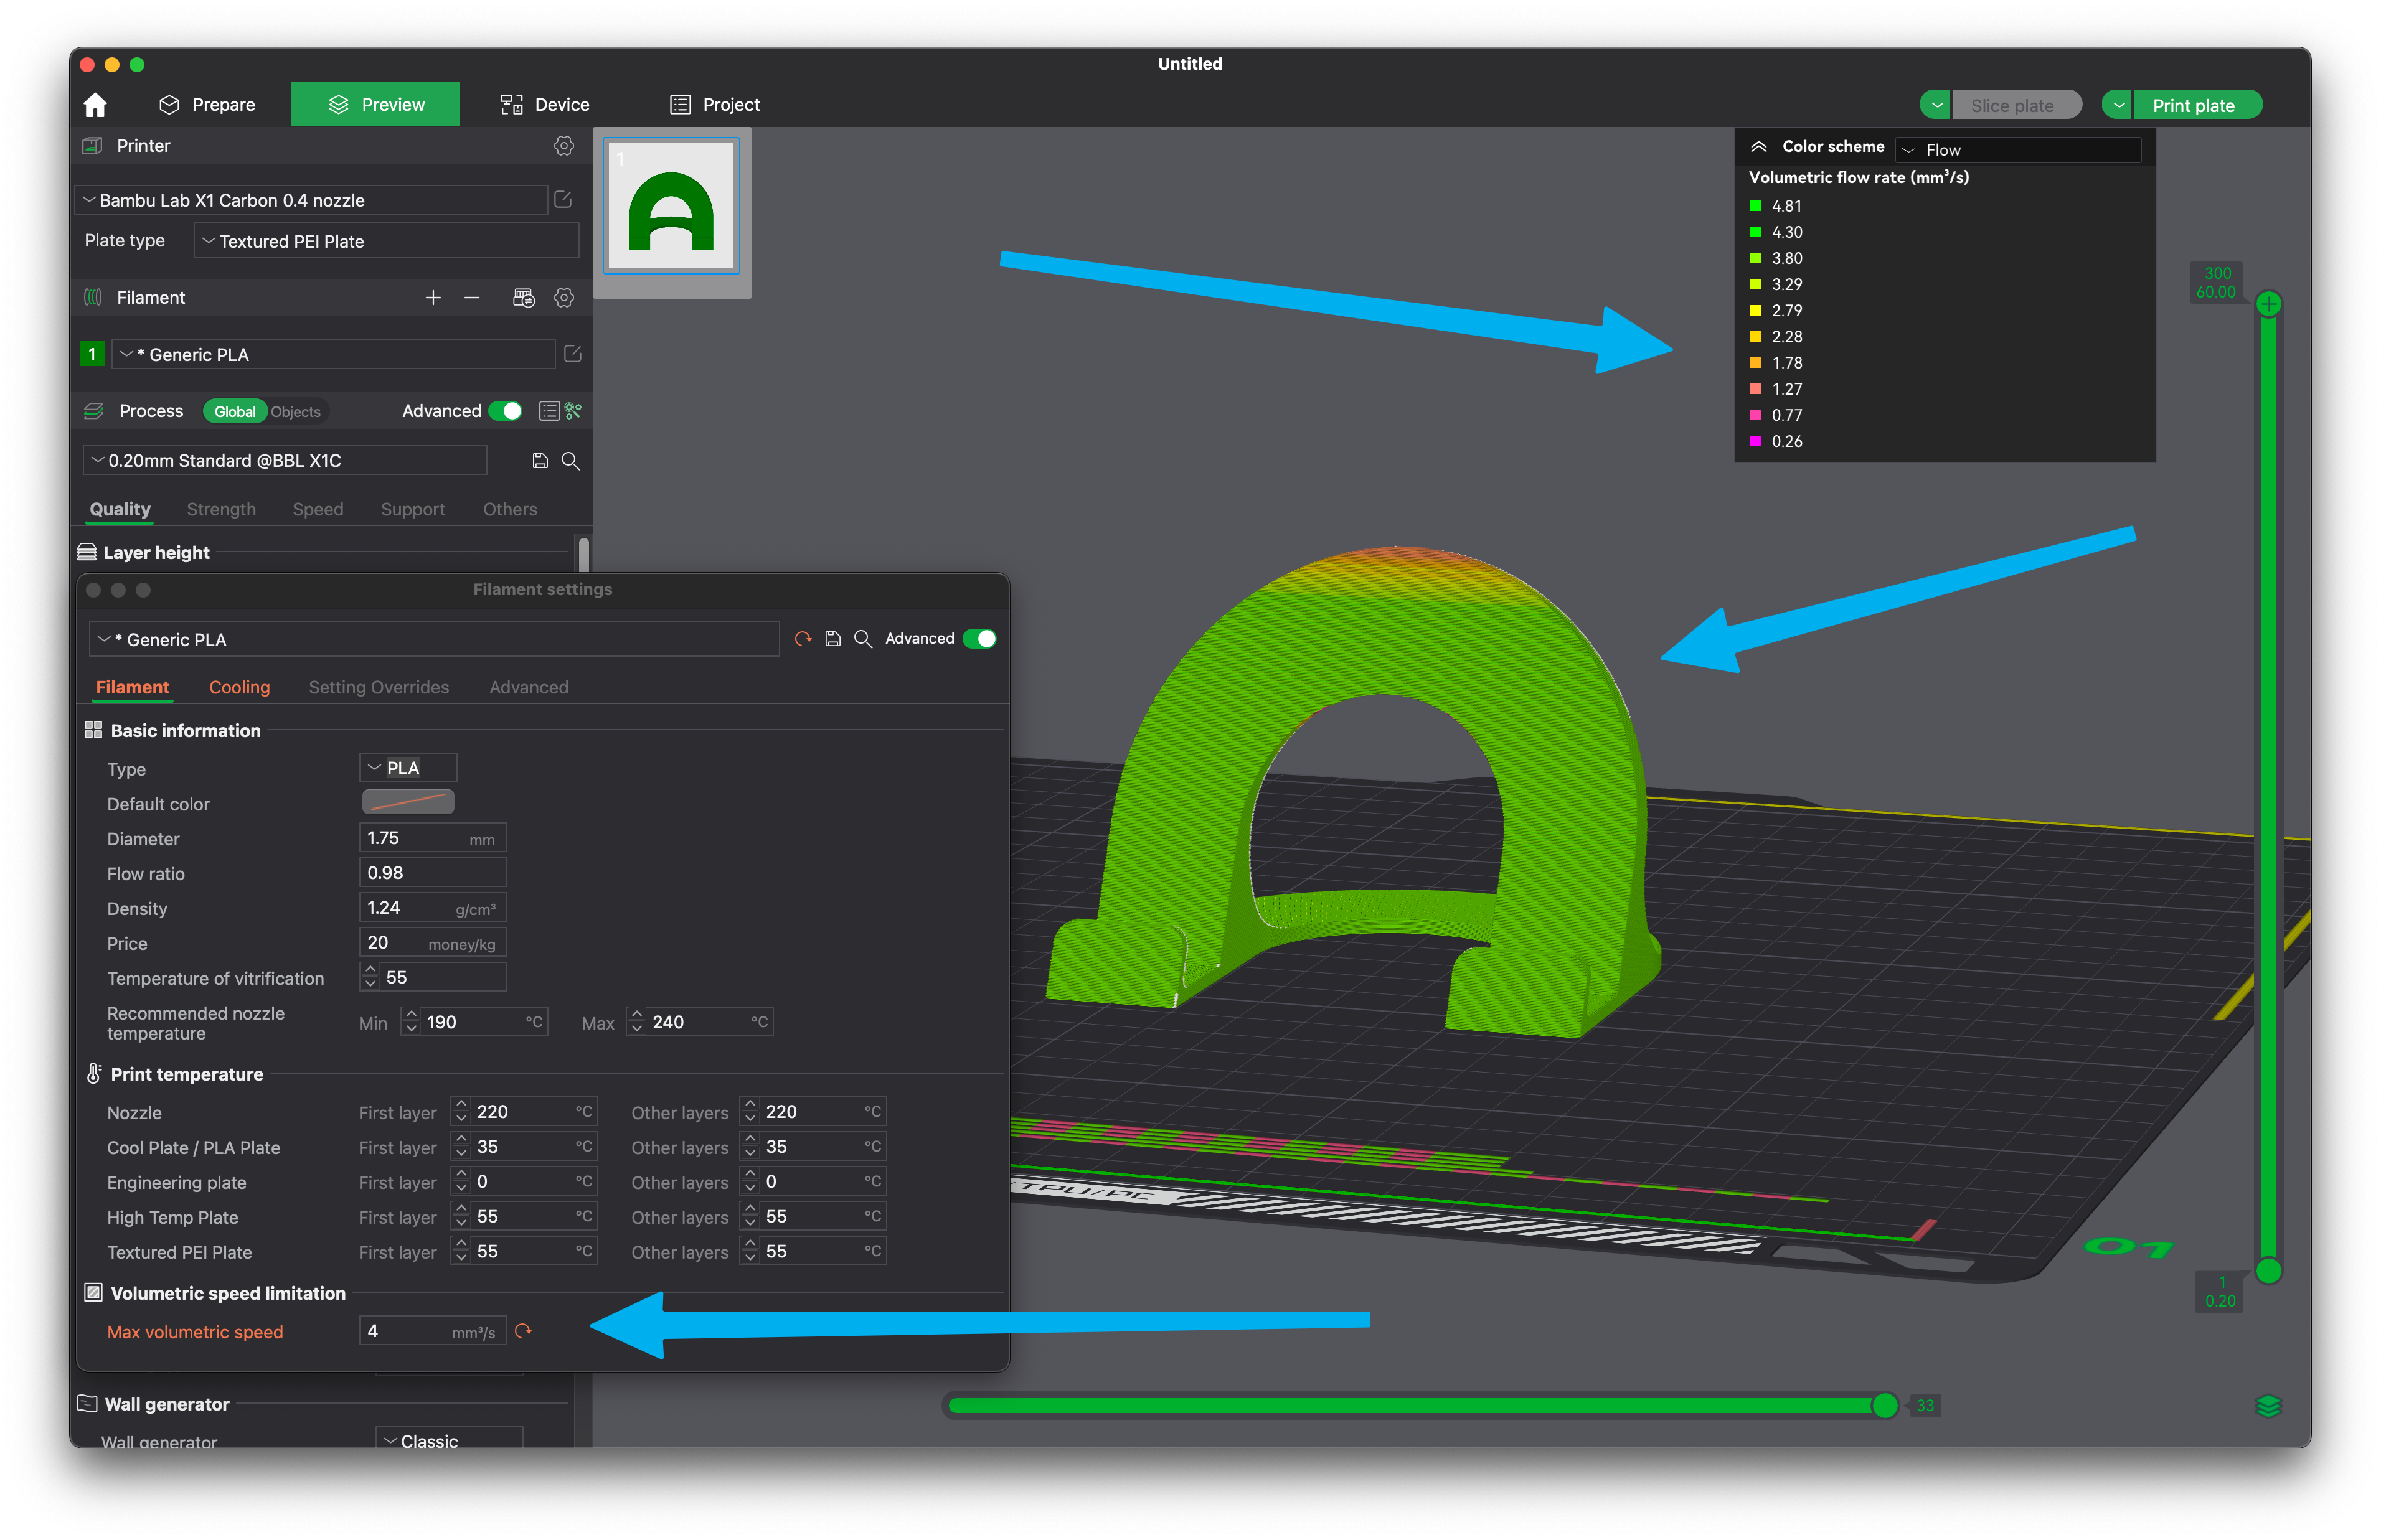
For the results shown above, I have set the Max Volumetric Speed to 4mm^3/s and a 5-second Layer time which generates a much smoother and consistent finish. Of course, this will slow down the print speed quite a bit, but if you are looking for the best possible print quality, it’s a compromise that you would need to do in this case. Printing this single model on the Bambu Lab X1 with the settings mentioned takes ~1 hour.
Of course, if you print a higher number of models, then the issue goes away as there is enough time to cool down the layers and you also don’t need to limit flow rate. The example below uses the default values of 12mm^3/s and 8 seconds, and you can get rid of the small inconsistency at the top by slightly lowering the Layer time to maybe 6 seconds. With these settings, you can get the same quality as above but get four models printed with just double the time in ~2 hours.
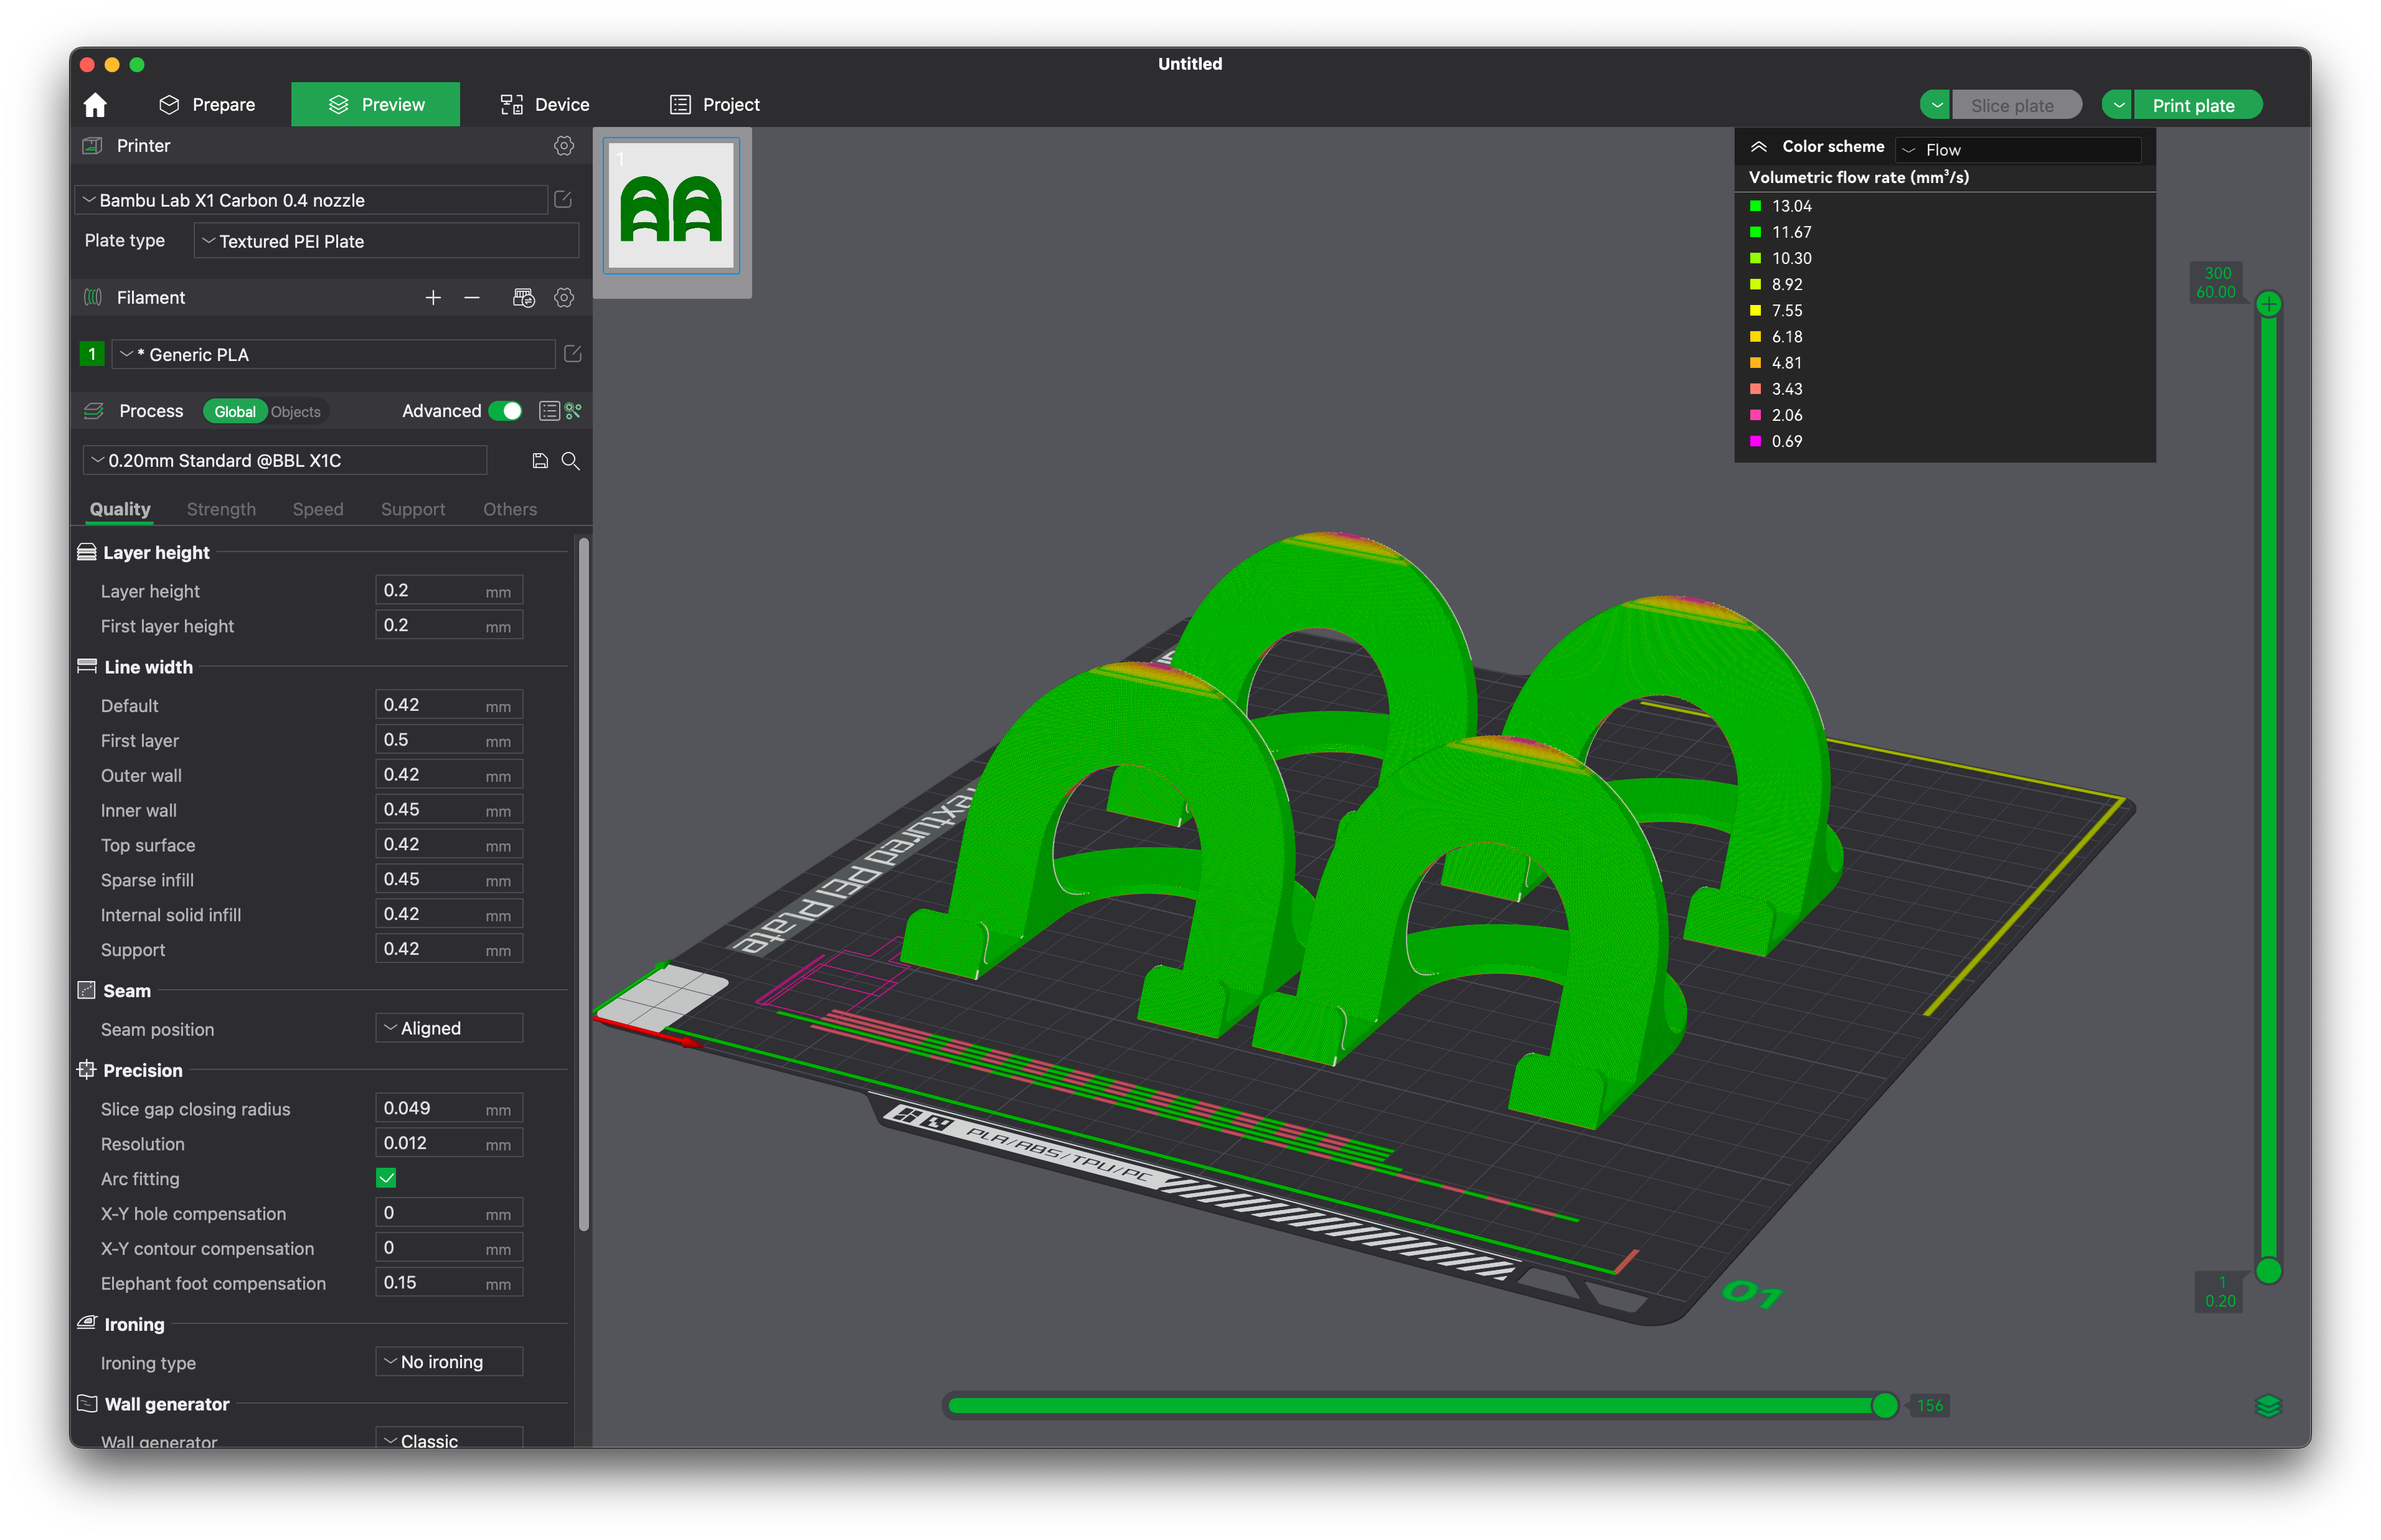
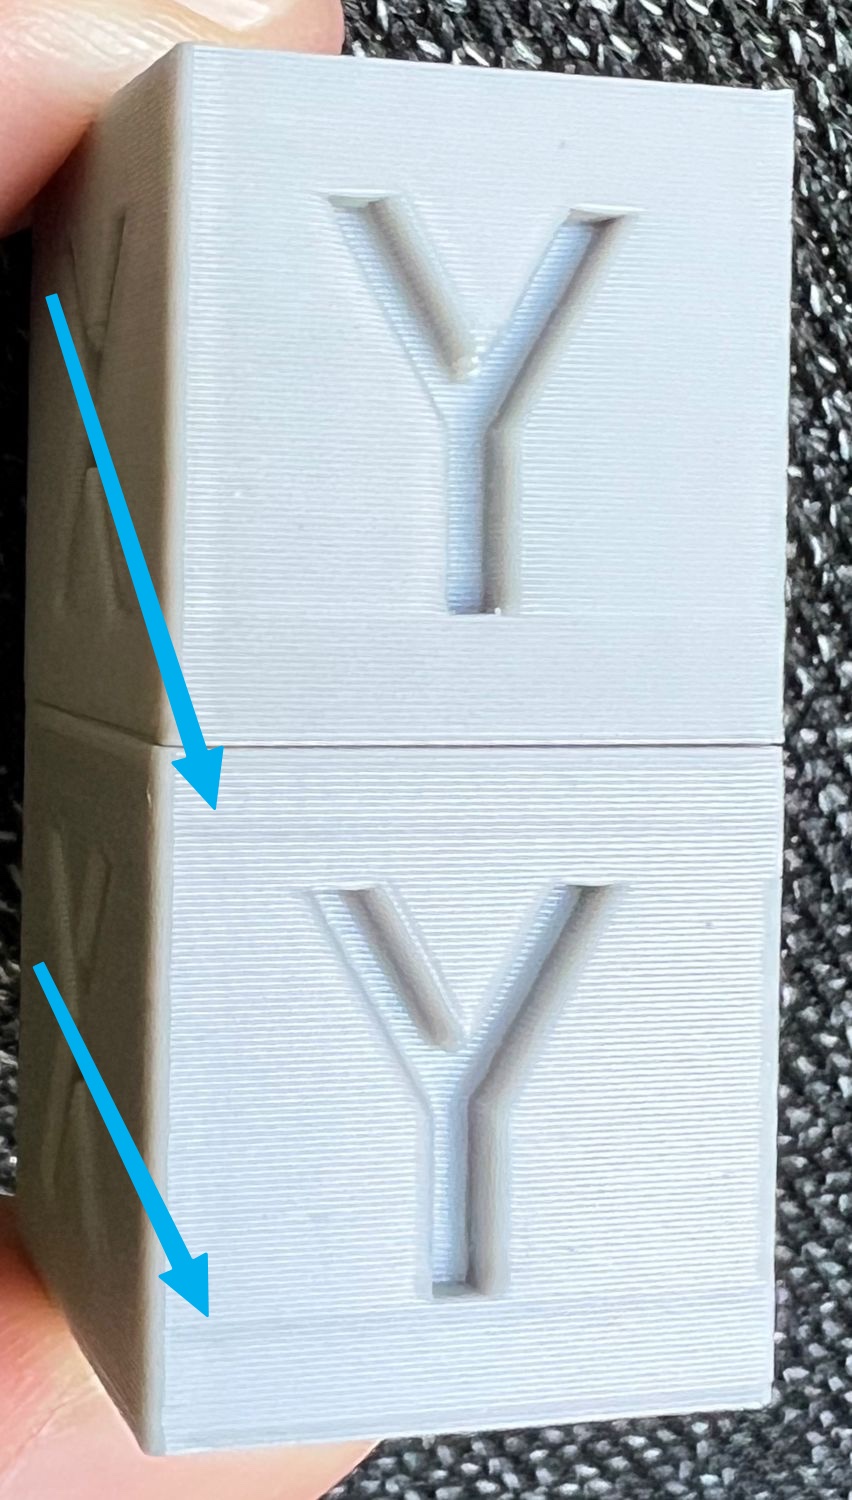
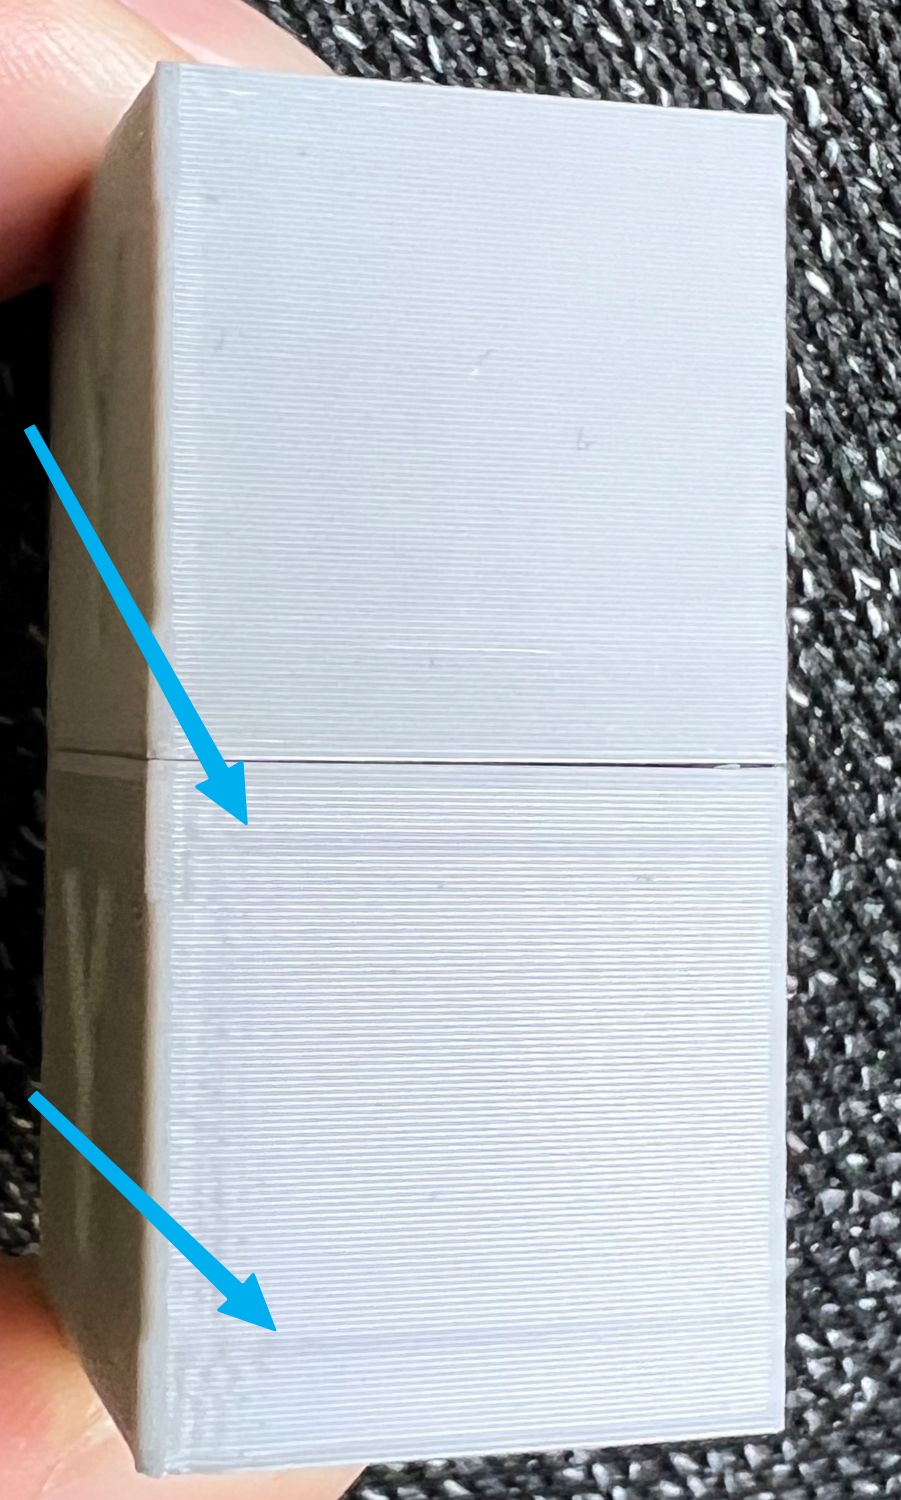
Finally, I have another example with the good-old calibration cube. I have seen multiple people using it as a test piece and that’s fine, but the size of the cube is too small to get correct results from a fast 3D printer. In the image below, you can see the flow change across the walls of the cube.
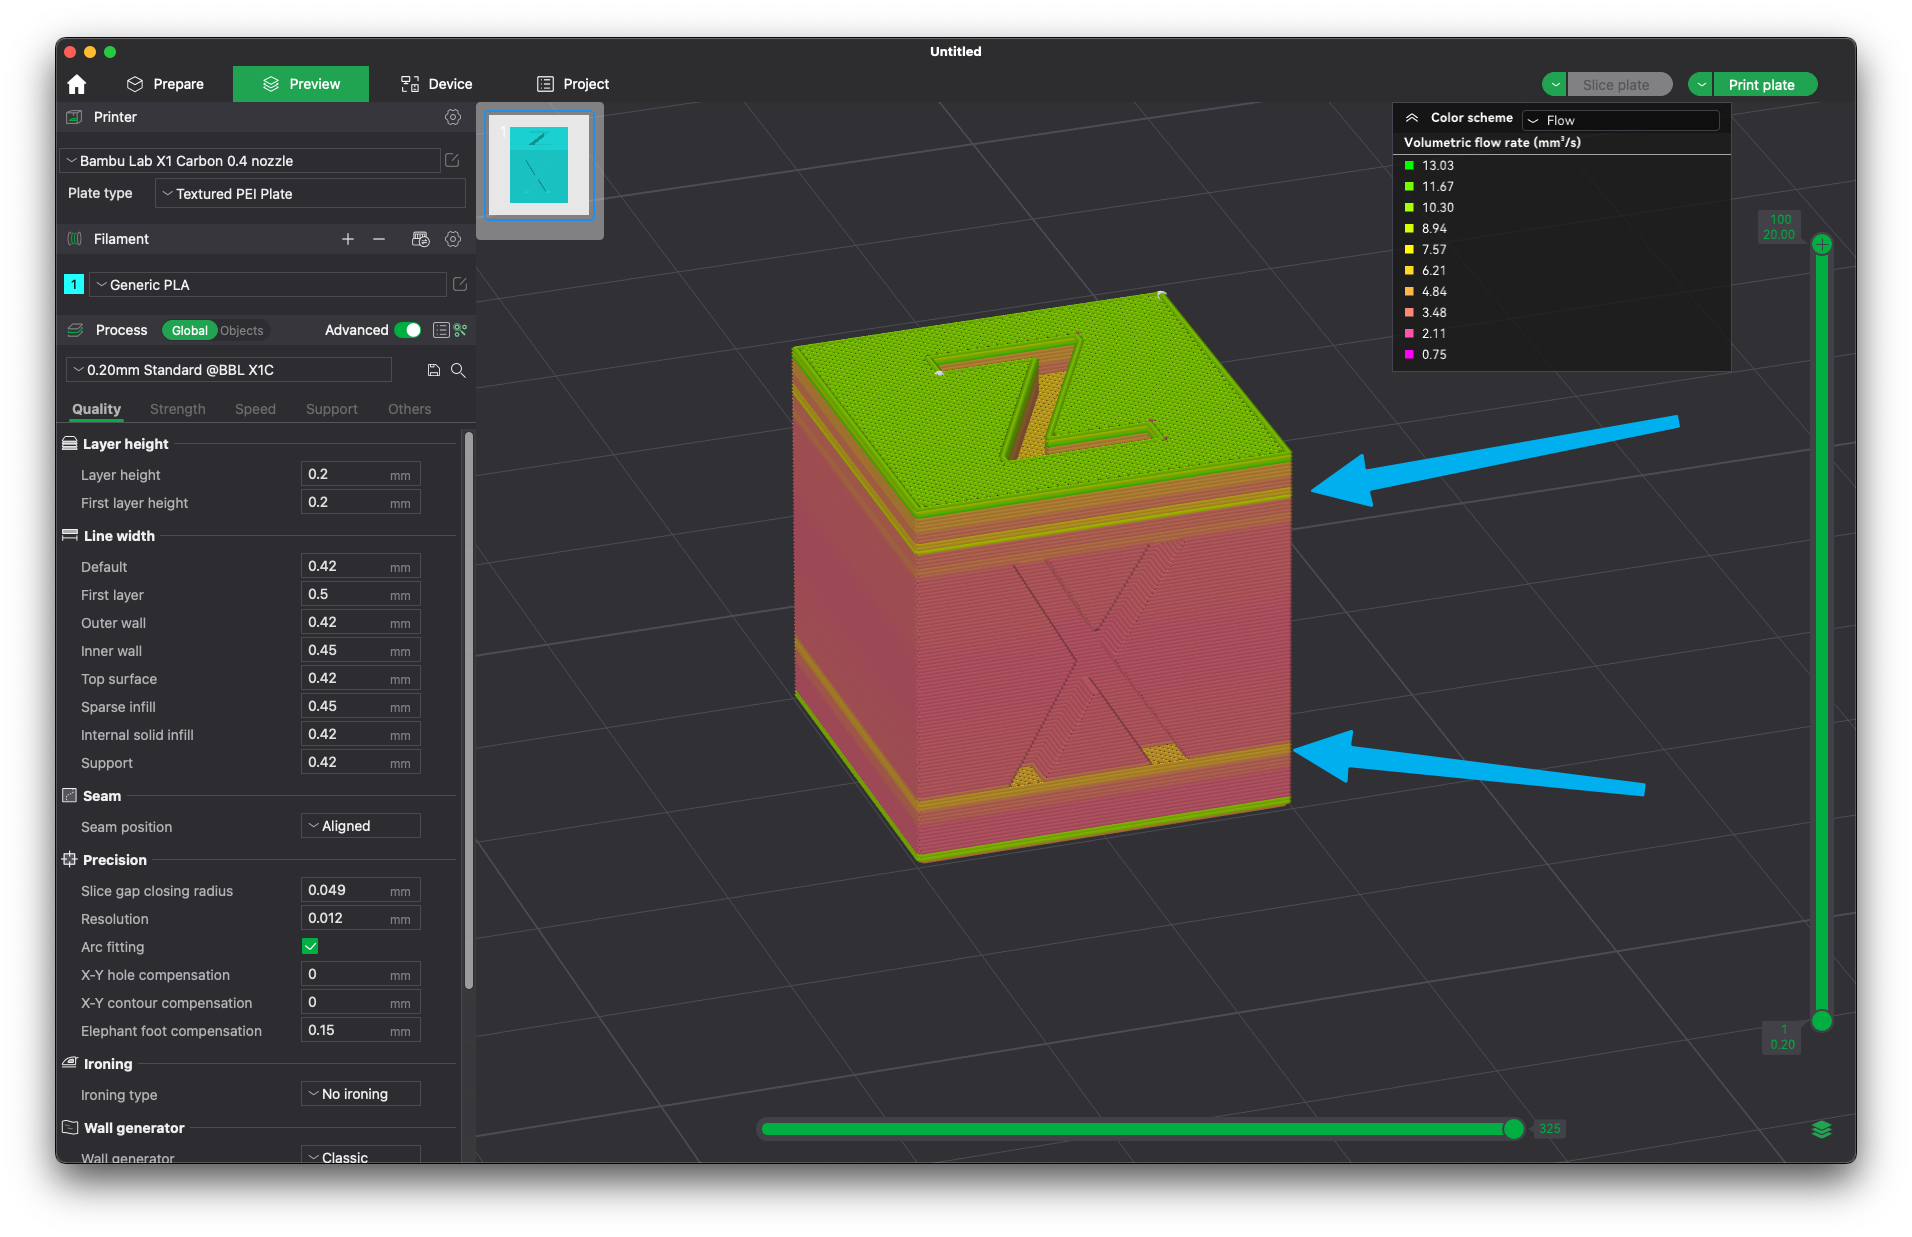
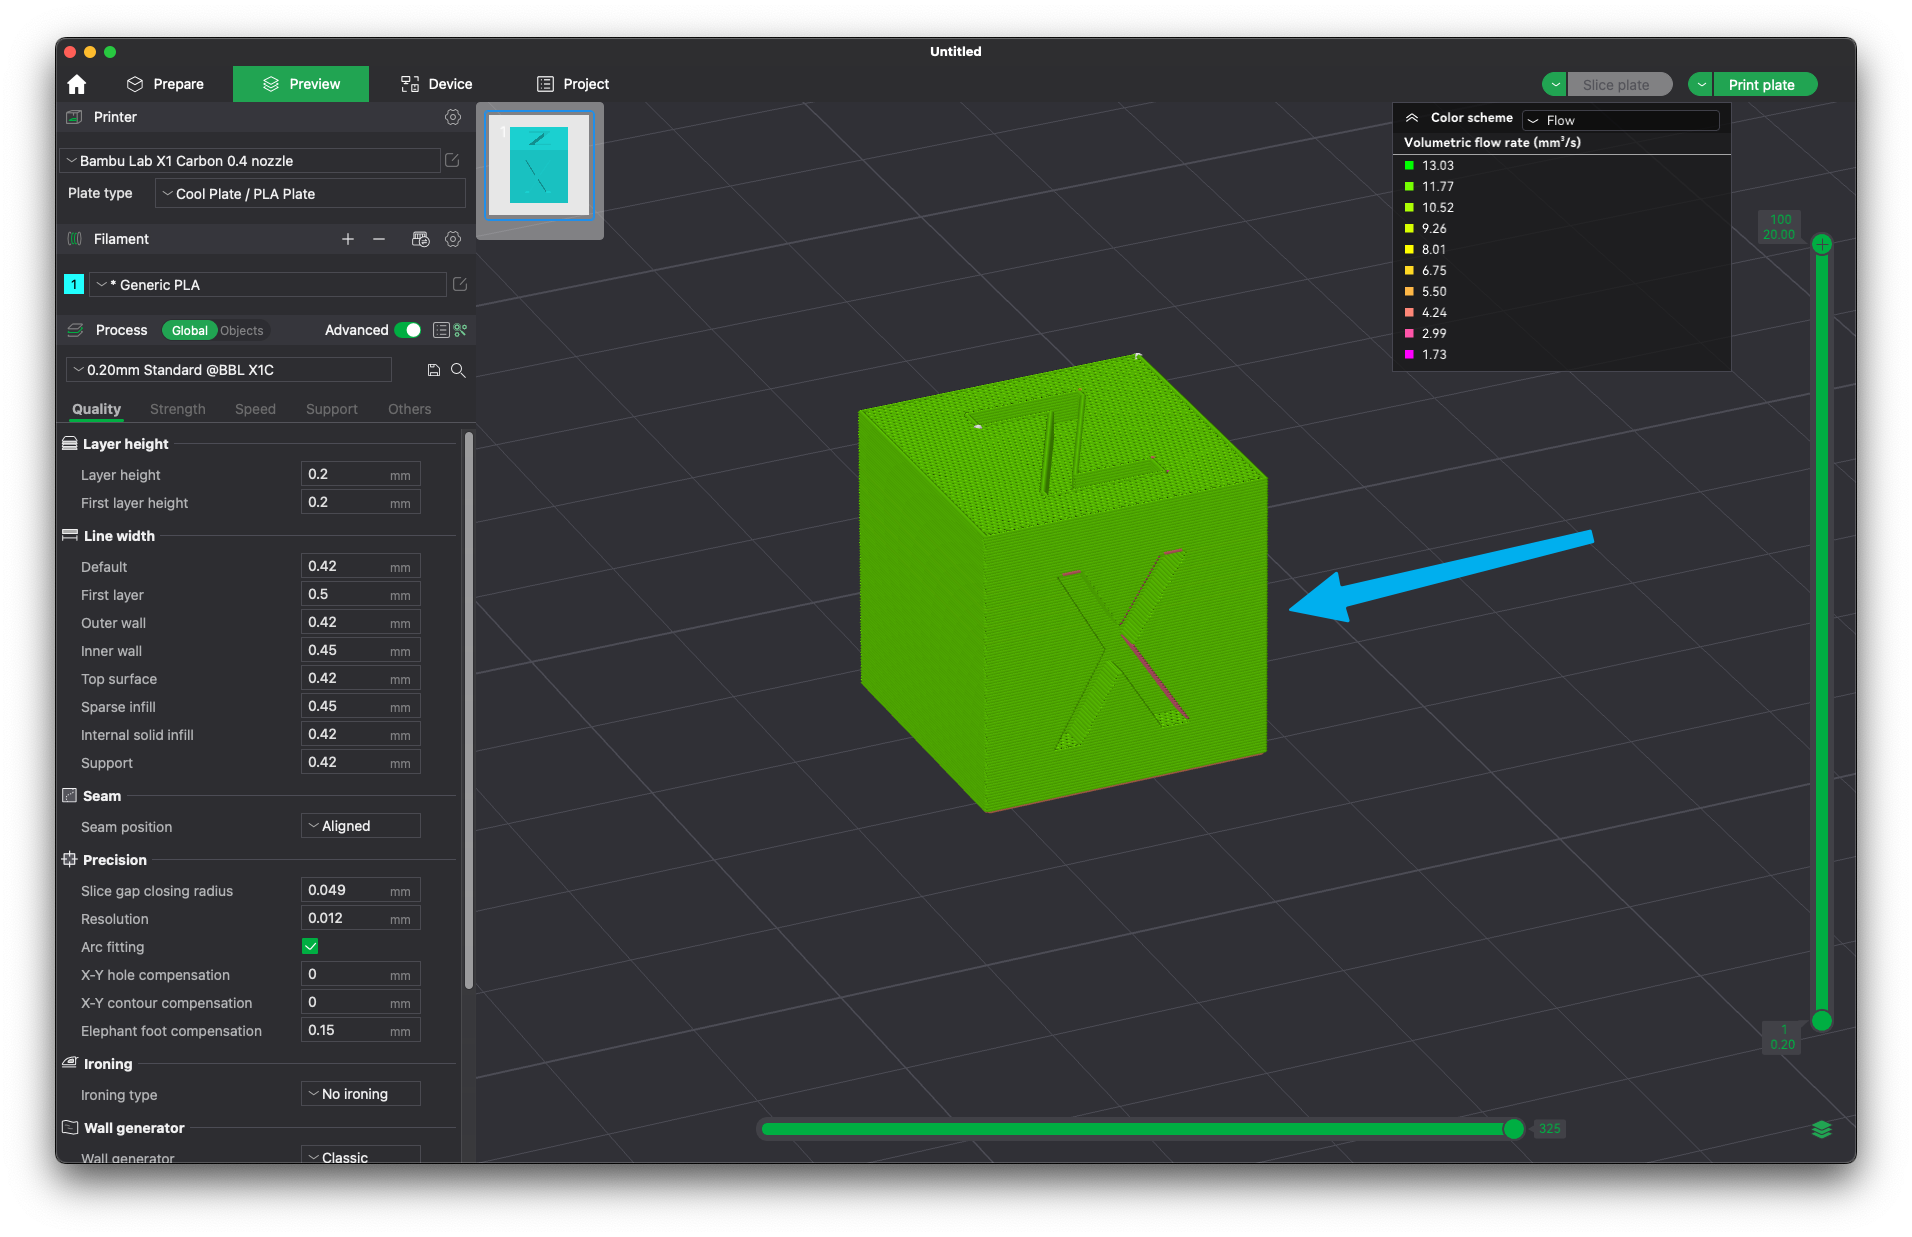
Printing this cube with the default settings can lead you to believe there’s a problem with Z banding or inconsistent extrusion, but this is not the case. If the Minimum Layer Time is adjusted to 1 second and the item is placed closer to the AUX Fan (in this case on the Bambu Lab X1) you can get a close-to-perfect result in half the print time.
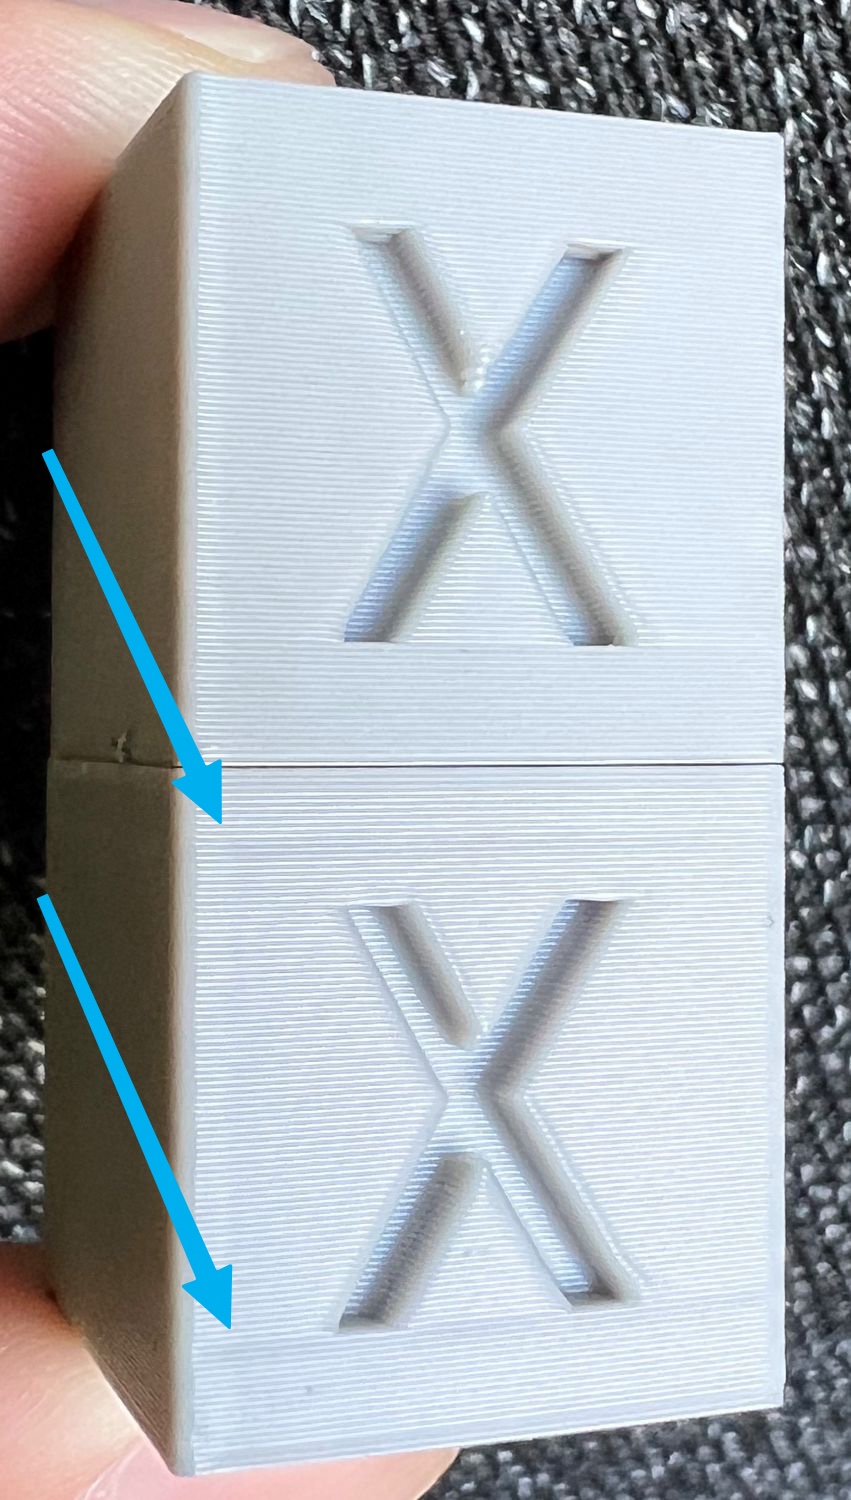
I also printed the cubes mentioned above, but it’s a bit harder to take good pictures of the issues. Even so, you can see that the bottom cube has a more inconsistent finish and it shows the flow rate changes which we saw in the slicer preview. The top cube does not have the same inconsistencies and was printed in half the time.
Max Volumetric Speed Calibration
When it comes to calibrating Maximum Volumetric Speed, Orca Slicer is very easy to use. Just select the Max flowrate option in the Calibration tab. Then, select a range and stepping that works best for you and start the print.


After the test is finished, you can visually check the test and see what is the number where the filament stops extruding as expected and select a value that is ~2 steps lower for best results. Considering that the maximum volumetric speed for the Bambu Lab hotend is around 20-22mm^3/s, I would not try to do the test over that value. Even if you might find that you can squeeze a bit more flow from a specific filament, I don’t think it’s worth the trouble

Most of the time, I don’t use a fixed max volumetric speed set accurately in the slicer, but I adjust it based on the needs and the settings used for a specific model. What I look for is for the flow rate to be uniform as mentioned at the beginning of the article, but I also try to use settings that don’t push the flow rate over the expected volumetric capabilities of the filament.
I would rather use a lower layer height that allows the filament to use a lower maximum volumetric speed and a consistent speed, rather than push the hotend to the limits and slow down during the print in some situations when the limits are reached.
Temperature Tower Calibration is Useless
I can see a lot of people using the Temp Tower method to calibrate the temperature of the filament when printing. It’s recommended in the Orca Slicer documentation, and I also recommended using it when calibrating your printer with IdeaMaker.
Unfortunately, calibrating the temperature using a model like the Temp Tower is not the right way to do it with a fast printer like the Bambu Lab X1 or P1P. The size of the model does not allow the hotend to reach its maximum flow rates, the maximum acceleration speeds set in the slicer are also not reached during the test, and as you can see in the image below, the flow rate varies a lot which can lead to incorrect readings.
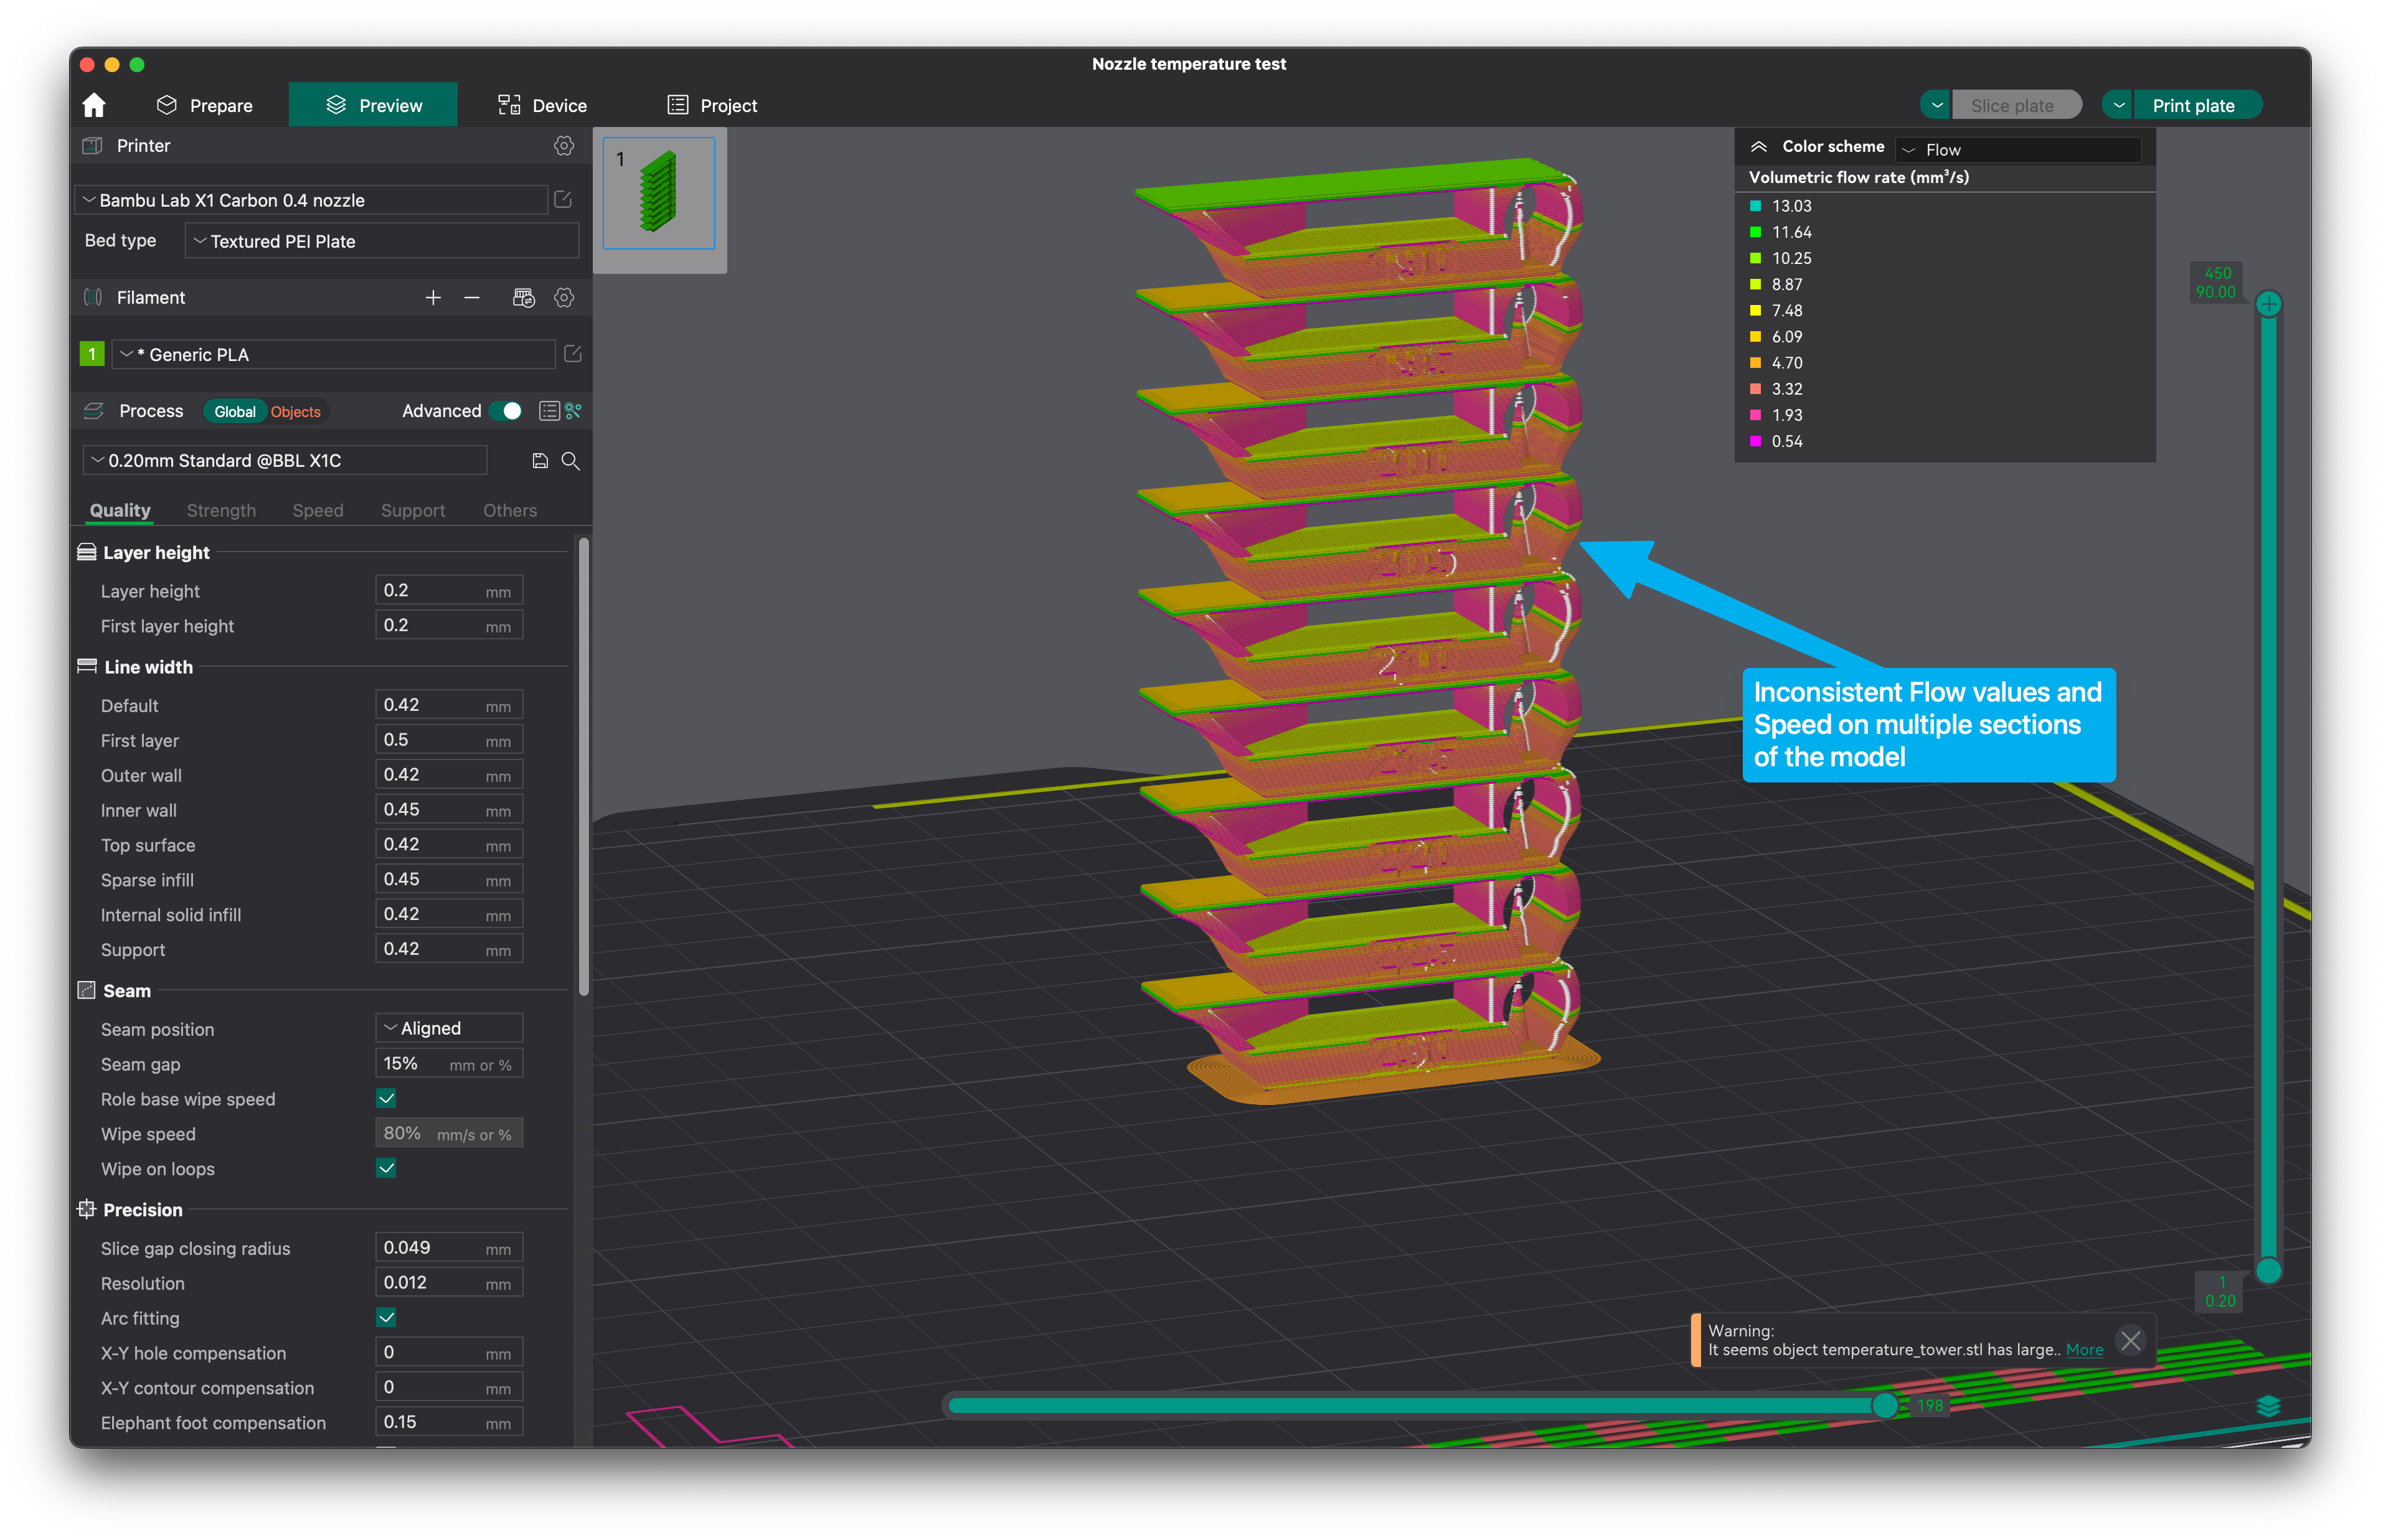
If you decide to calibrate your temperature using the model above, you will be calibrating your printer for a slower print speed which could be easily surpassed during printing. This can lead to the hotend reaching the maximum flow rate set in the profile and if the temperature you decided to use is too low, you will get under-extrusion or a clog. Besides that, layer adhesion will also suffer due to the factors I mentioned above.
Another example is if you do this calibration for Silk Filament. You would notice that when printing the test model above, your selected temperature might be fine and the “shine” of the filament is as expected. But if you print a larger model, the shine turns matte, and layer bonding is worse.
In my experience, it’s best to always calibrate the values for the print settings you will be using most of the time. If you print a lot of small objects similar in size and complexity to the calibration tower, then the test might be fine. But if you will be printing large models that really allow the printer to reach maximum acceleration, my favorite way of “dialing in” the right temperature is to use the default slicer temperature and increase it with ~10C then watch the print quality.
Most of the time, this solves all the problems that might be related to print temperature. At the same time, it’s not recommended to use a very high temperature compared to the default one in the slicer profiles, because at that point you are just trying to push more heat inside the filament which most of the time it’s not fully absorbed by the filament.
This brings us back to my previous suggestion: to maybe lower the layer height and allow the filament to melt well enough inside the hotend before it is extruded at high speed instead of getting inconsistent heating, wall finish, and even inconsistent layer bonding for the models printed
Wrapping Up
I hope this article is helpful to learn more about how to get a better print finish for the entire model, while also keeping a higher print speed, which seems to be the hot topic for 2023. If you have other tips and tricks that could help, feel free to leave a comment and share your experience.
Liked it?
|
|






Great writeup! I am trying to finery e my settings for generic silk pla and was wondering about the adjustments for printing something like a vase with a lot of holes. I tried different volumetric flow adjustments and min later times but can’t seem to get flow and speed in the green
I’ve been trying to absorb all the discussions about settings. I’m very confused about Minimum layer time. I’ve printed many small objects since I got my Bambu, I’m 100% sure that it does not take 8 seconds to print layers, especially towards the end of a print when it’s finishing off details. It absolutely prints these layers in under 1 second.
So what am I missing?
I see people on YouTube printing gorgeous models that look flawless. I want that and I’m willing to work for it.