Dragon Hotend vs Copperhead Heat Break + E3D V6 Heat Sink – Temperature Performance
A lot of people asked me how does the Dragon Hotend compare with the Copperhead Heat Break + E3D V6 Heat Sink setup I tested in the Copperhead heat break review. So, I tested the Dragon Hotend again, and this time I measured the temperature in the heat break.
Dragon Hotend setup
My Dragon Hotend is the High-Flow version which has a bigger melting zone, and it can be compared with a Volcano when it comes to melting filament.
Because of that, the heat break on the Dragon Hotend is a bit smaller compared to the regular version and it might get hotter.
Copperhead Heat Break + E3D V6 Heat Sink setup
In the case of the Copperhead Heat Break + E3D V6 Heat Sink setup, I used the good-old V6 heat sink and I paired it with the Copperhead Rep Rap heat break. The rest of the setup is listed below.
Please note that I did not use any kind of thermal paste. I did this to keep results as fair as possible, and to be able to compare with my previous tests.
It is highly recommended to add thermal paste on the cold end of the heat break for best performance.
Dragon Hotend vs Copperhead Heat Break on E3D V6 Heat Sink – Testing Methodology
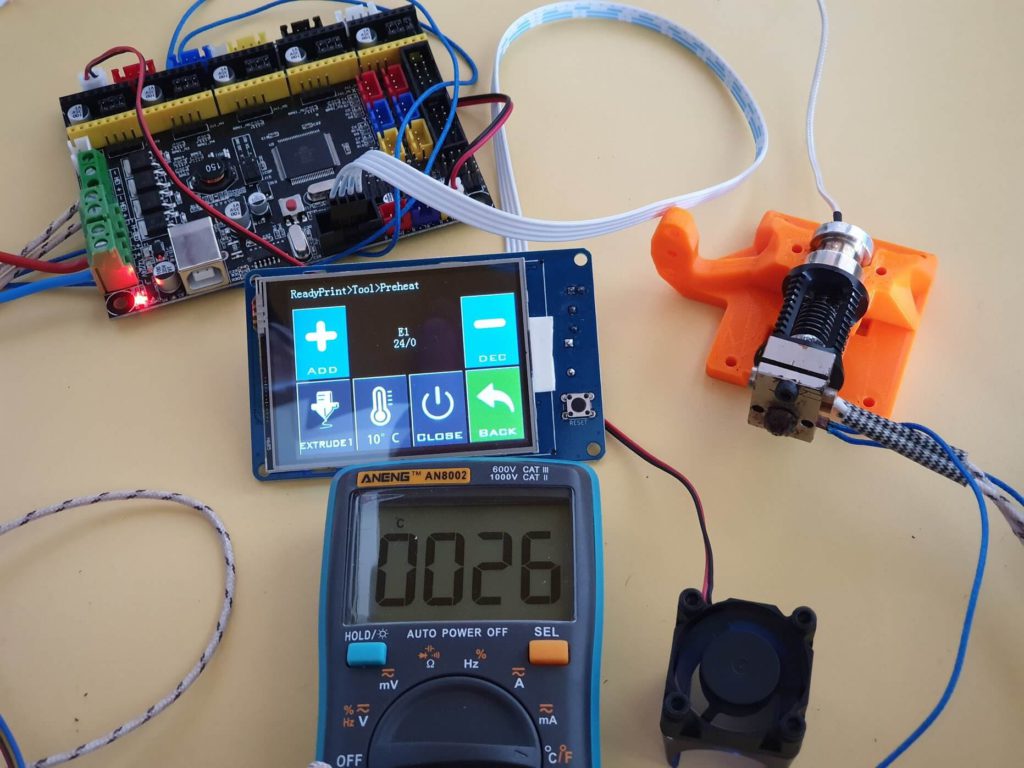
I made a test rig from old parts after the SKR 1.3 upgrade for Sidewinder X1. I used the MKS Gen L clone to power everything, a Volcano heatblock with 40W heater cartridge and a regular 100k thermistor.
The temperature inside the heat break was checked using a multimeter with a temperature probe. The probe was inserted in the heat break just above the transition zone and the end was touching the inside metal wall.
The ambient temperature was 25C.
For each test, the hotend temperature was set then I waited 10 minutes for the temperature to stabilize. After 10 minutes, I checked the temperature from the multimeter probe.
Please note that I tried to keep all variables the same in order to have good results. These are ideal setups, with no airflow constrains or other parts which may influence the temperature (ex: heatbed temperature). Real life temperatures can be a few degrees higher.
I only tested up to 250C. Unfortunately, I was not able to go higher with a 40W heater cartridge (even tough last time it worked). I will add more temperature tests when the 60W cartridge will arrive.
Dragon Hotend temperature results
| Hotend Temperature | Setup | Duration | Heatbreak Temperature |
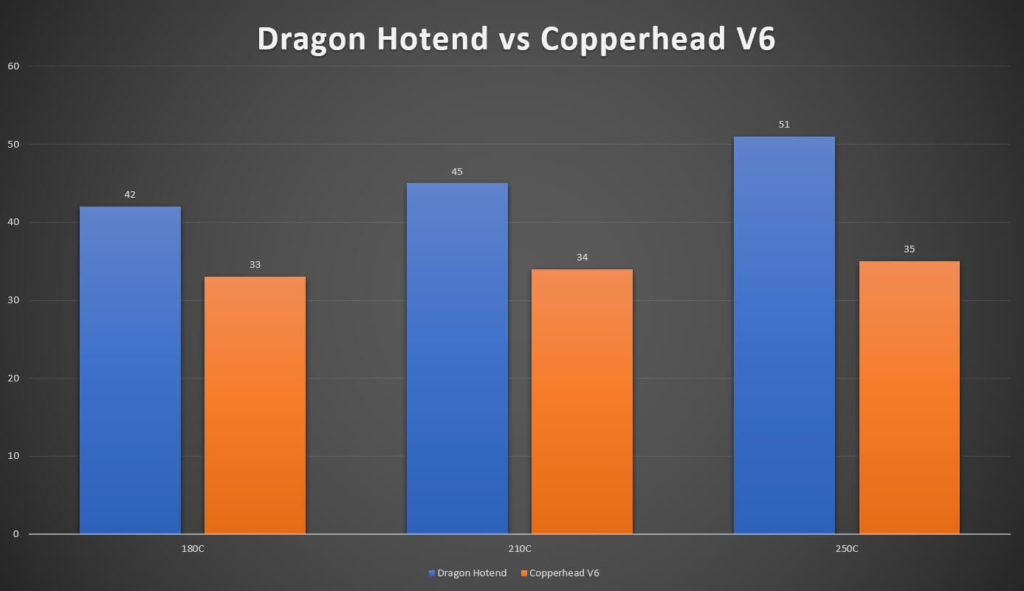
| 180C | Dragon Hotend | 10 minutes | 42C |
| 210C | Dragon Hotend | 10 minutes | 45C |
| 250C | Dragon Hotend | 10 minutes | 51C |
Copperhead Heat Break + E3D V6 Heat Sink temperature results
| Hotend Temperature | Setup | Duration | Heatbreak Temperature |
| 180C | Copperhead Heat Break + E3D V6 Heat Sink | 10 minutes | 33C |
| 210C | Copperhead Heat Break + E3D V6 Heat Sink | 10 minutes | 34C |
| 250C | Copperhead Heat Break + E3D V6 Heat Sink | 10 minutes | 35C |
Dragon Hotend vs Copperhead Heat Break + E3D V6 Heat Sink – Which one to buy?
As you can see from the results above, the Dragon Hotend has a higher temperature inside the heat break compared to the Copperhead Heat Break + E3D V6 Heat Sink setup.
You might get better performance from the Dragon Hotend by using a 40mm fan with higher airflow. In the setup I tested, the 30mm fan was good enough for both and PLA prints should be successful in both setups.
In my opinion, the best hotend setup right now is a V6 style Heatsink paired with a Copperhead RepRap Heat Break and a Volcano heatblock. This setup will give you the best performance for a reasonable price.
There’s also the bi-metal heatbreak alternative from Trianglelab for a lower price but considering the price difference I’d say it’s worth buying the original from Slice Engineering.
Both hotends will perform well in any conditions and you will be able to print PLA, PETG, ABS, ASA, TPU and Nylon.
The Dragon Hotend is easier to get (single order solves it). The Copperhead Heat Break + E3D V6 Heat Sink setup can be an easy upgrade if you already have a V6 and you only need to order the heat break.
If you are interested to learn more about the Dragon Hotend, read my Dragon Hotend Review. I also compared the Copperhead heat break with others, and you can read about it in this article.
Later edit: It seems that this comparison does not make a lot of people happy and some of you think I tricked out the results just to make the Copperhead look better. Well, I didn’t.
Feel free to do your own tests and share the results. These are the results I got under the conditions I listed above. I don’t have an environment where I can control the temperature, and I also don’t have professional tools to measure the temperature. I do my best with what I have.
The Dragon Hotend went through around 200 hours of printing and a few clogs. I needed to unclog it and that might have some impact in the thermal performance of the heat break.
Where to buy?
Dragon Hotend
Copperhead heat break – Use 3DPRINTBEGINNER code for a small discount (affiliated code).
V6 heatsink
Volcano heat block
Liked it?
|
|


