Install Docker on Raspberry Pi: 3D Printing Services in Containers
In this article, I will share how to install Docker on Raspberry Pi, to simplify the installation process for popular 3D printing services like OctoPrint, Mainsail, Fluidd and so on. This article will serve as a base for other guides related to Docker and 3D printing.
I see a lot of people buying dedicated Raspberry Pi’s for a single printer, but a lot of that power is wasted (especially if it’s a newer Pi 4). Why not run multiple printers from the same Raspberry Pi, and simplify your setup?
I’ve been running Docker for about 5 years on my home server, and I’ve been happy with it. I thought I should replicate the setup for my 3D printing needs, and I am going to show you a mostly-automated way of installing Docker on Raspberry Pi.
What is Docker?
Docker is a container service which can be installed on various types of computers and allows running multiple services at the same time, while simplifying deployment and maintenance.
When running your applications and services in Docker contaiers, less resources will be used compared to a standard virtualization setup. These applications and services run independent of the operating system which makes creation and removal of these containers a lot easier without affecting the base OS. Besides that, it’s easy to move or copy containers from one Docker server to another when needed.
Running Docker on Raspberry Pi will allow you to quickly create a VPN container to securely connect to your OctoPrint instance. You could also easily create multiple instances of Octoprint to control multiple printers using the same Raspberry Pi.
You could also have a Mainsail/Fluidd with Klipper and Octoprint, all at the same time. The possibilities are endless, but before we can install the mentioned services, we need to setup Docker and Docker compose.
Prerequisites for Docker on Raspberry Pi
To install Docker on Raspberry Pi, we need the following:
- Raspberry Pi (Raspberry Pi 4 with 4GB is strongly recommended for best performance with multiple Docker containers).
- Fast 16 GB MicroSD card or higher.
- Good power supply for the Pi – Any adapter works if it’s capable of delivering at least 2.5 A of power
- DietPi installed
Install Docker on Raspberry Pi with DietPi
To run Docker, we need an operating system installed on the Raspberry Pi. I chose DietPi because is one of the lightest linux distributions out there, which has most of the services removed to use as little resources as possible. I’ve been using it for a few years, and it’s been great.
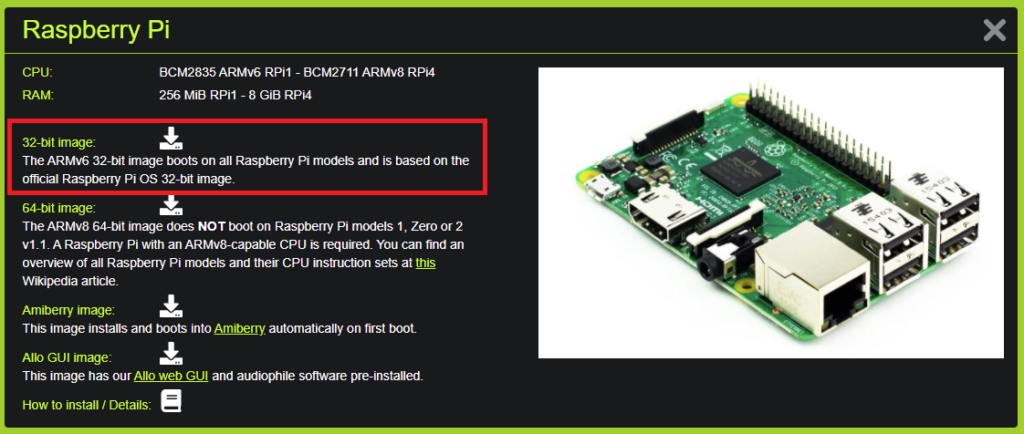
Download the DietPi image and unzip the archive
Download and install Win32 Disk Imager.
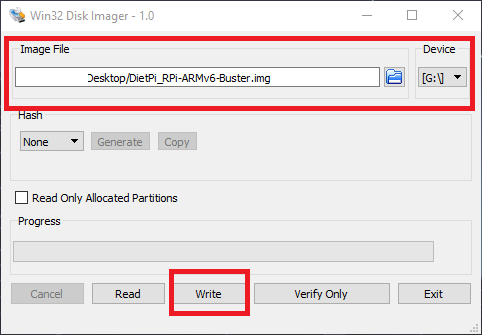
Open Win32 Disk Imager, load the .img file unzipped in the previous step and select your SD card drive letter. Click on Write to begin installing DietPi on the SD card. This process will take a few minutes, depending on the speed of your SD card.
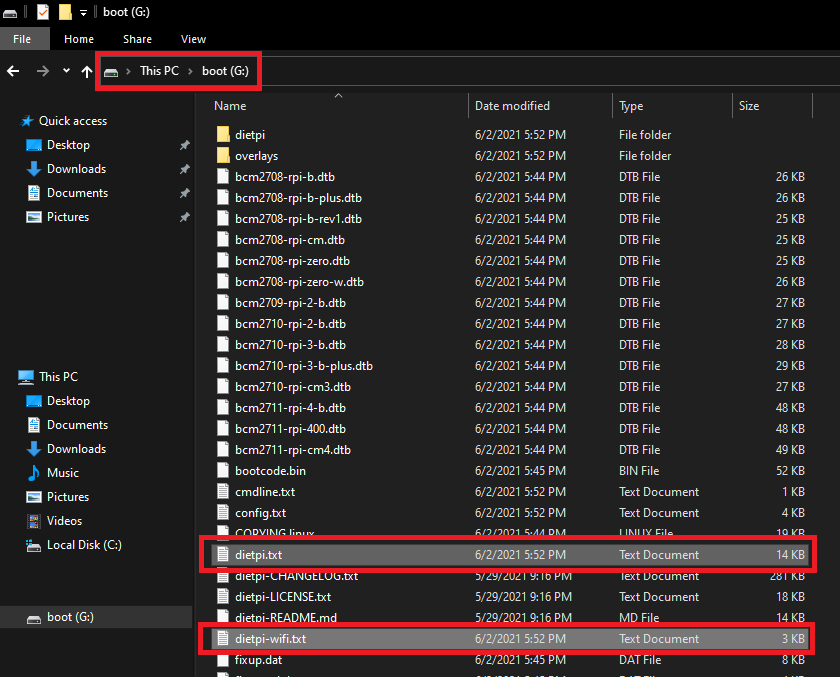
After the DietPi image has been written to the SD card, we need to modify some of the files in the boot partition to automate the installation.
dietpi.txt changes
In the Network Options section, enable Wi-Fi:
AUTO_SETUP_NET_WIFI_ENABLED=1In the Non-interactive Firstrun Setup section, enable Auto setup as shown below.
AUTO_SETUP_AUTOMATED=1In the Software to automatically install section, add the following lines:
AUTO_SETUP_INSTALL_SOFTWARE_ID=134
AUTO_SETUP_INSTALL_SOFTWARE_ID=162
This will enable the automatic installation for Docker and Docker Compose. After modifying the files as instructed, save the changes.
dietpi-wifi.txt changes
To automatically connect to your Wi-Fi network, you need to enter the Wi-Fi credentials, as shown in the example below.
- WiFi SSID: required, case sensitive
 aWIFI_SSID[0]='YourWi-FiName'
- WiFi key: If no key/open, leave this blank
 aWIFI_KEY[0]='YourWi-FiPassword'
When finished, save the file.
Now, you can take out the MicroSD card and insert it into your Raspberry Pi. The installation process will begin, and after about 10 minutes, it will be completed.
Check Docker and Docker Compose
Now that the installation process is done, we can quickly connect via SSH to the Raspberry Pi and check if Docker and Docker Compose services are set up successfully. If you don’t know how to connect via SSH, I covered the process here. The default username for DietPi is root and the password is dietpi.
In the SSH terminal, run the following command:
docker run hello-world If Docker has been installed successfully, it will automatically start downloading the hello-world container and install it as shown in the image below:
To test the Docker Compose functionality, run the following command:
docker-compose --versionIf Docker Compose has been successfully installed, the version will be displayed, as shown in the image below:
Wrapping Up
That’s it! You successfully installed Docker and Docker Compose on your Raspberry Pi. In future articles, I will show you how to install various Docker containers related to 3D printing.
Liked it?
|
|







You can leave a comment for this article on the 3DPrintBeginner Forum