Filament Change with IdeaMaker: M600 Command

Since I published my Mingda D3 Pro Review, a lot of people asked me how to use filament change with IdeaMaker. Because it takes a bit more work to do this in IdeaMaker I thought a guide will be helpful, where I can explain in detail the process.
So, without further ado, let’s see how we can use the filament change feature with IdeaMaker for those awesome multi-color prints.
What is IdeaMaker?
In case you didn’t know, IdeaMaker is a slicer software developed by Raise 3D which is developed for their range of 3D printers but it’s also compatible with aftermarket printers.
I covered IdeaMaker in a previous article where I also shared why IdeaMaker is currently my favorite slicer. Make sure you read the article if you are looking to learn more about IdeaMaker and its features.
What is the Filament Change feature?
Filament Change is a feature available in Marlin firmware which pauses the print process and allows you to change the filament, then resume your print. It’s described well in this snippet:
The
Marlin Firmware DocsM600command initiates the filament change procedure. The basic procedure will move the print head away from the print, eject the filament, wait for new filament to be inserted and the user to confirm, load and prime the filament, and continue with the print.M600may be initiated automatically if a filament runout sensor is installed.
Prerequisites for Filament Change with IdeaMaker
3D Printer Calibration with IdeaMaker
In order to get good results when doing filament changes in IdeaMaker, it’s important to have your slicer already tuned. Before starting, check out my 3D Printer Calibration Guide with IdeaMaker and calibrate your slicer profile.
The M600 features should be enabled in firmware
To use the M600 filament change command in IdeaMaker, you should have this feature enabled in your printer firmware. You can easily test this by running the M600 command when connected to the printer. If you get the filament change notification on the printer screen, then you should be able to do filament changes.
On some printers, the M600 command is not supported because of the screen used. For example, the stock Sidewinder X1 and Genius use a MKS TFT28 screen which does not support the M600 filament change feature without a custom firmware on both the board and the screen.
The stock screen doesn’t detect when the M600 command is triggered and there’s no way for you to continue the print after changing the filament.
It’s also worth noting that the M600 filament change command does not work out of the box when printing with Octoprint. I recommend you always use an SD card and print directly from it.
The M600 command should be set in IdeaMaker
Another important thing to check to make sure the filament change feature will work with IdeaMaker is to make sure the M600 command is set correctly in the slicer.
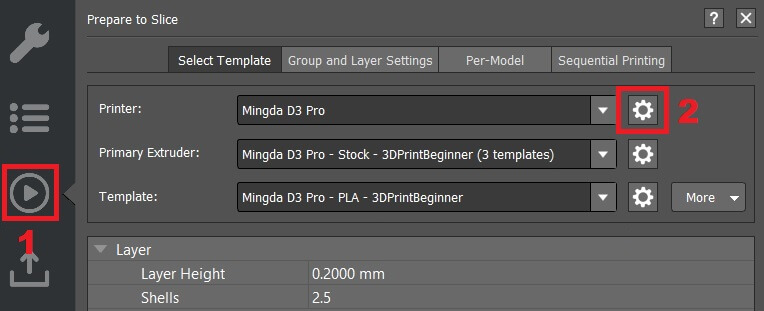
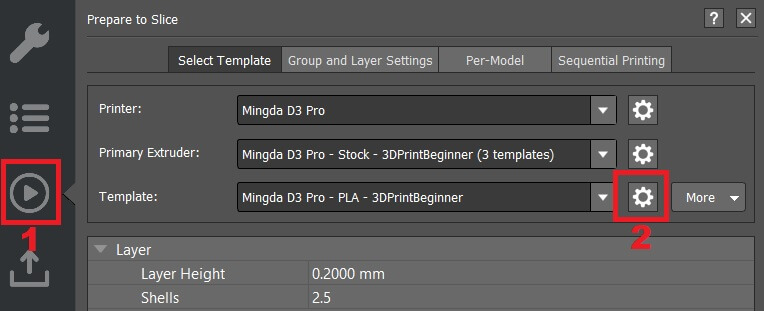
In IdeaMaker, click on the “Play” icon, then click on the setting icon to open printer settings.
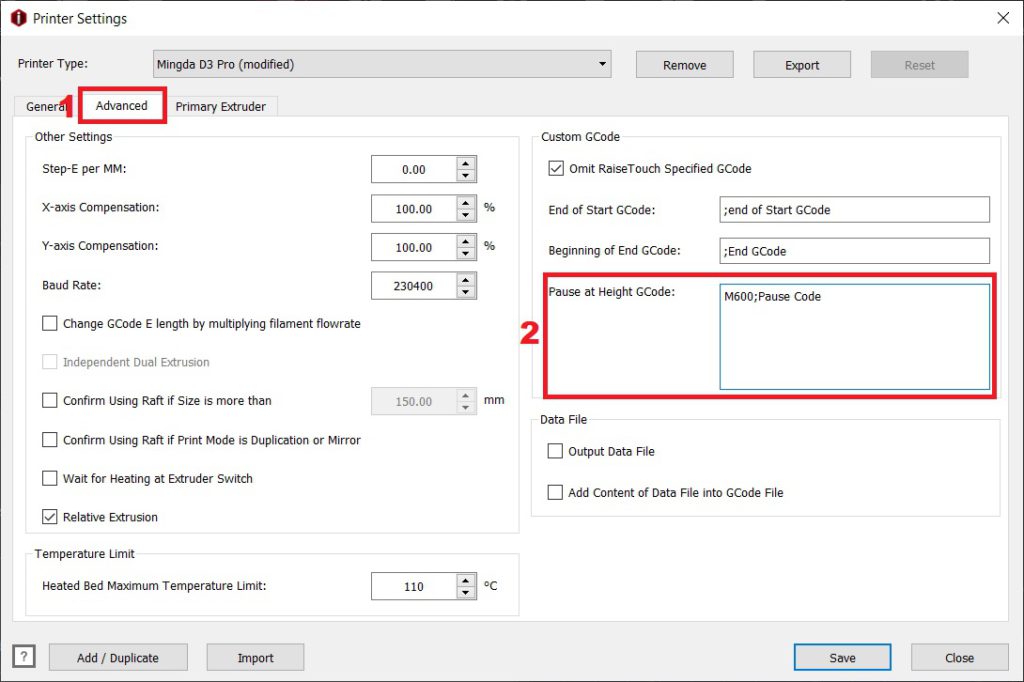
In this section, navigate to the Advanced tab and add M600 to the Pause at Height GCode.
This will instruct the slicer to insert the M600 command in your sliced G-code to stop the print and allow the filament change.
How to do Filament Change with IdeaMaker ?
Find a good model to do filament change
For the best results, I recommend you look for a good model to use. I like to use the filament change feature for plaques which have extruder letters and features.
You can also do some nice dual-color QR codes that can be used for a wide range of actions. For example, you could use the qrcode2stl site to generate a QR code which contains your Wi-Fi network name and password. After you print the QR code, you can easily connect to your Wi-Fi network by just pointing the camera to the code.
The phone will automatically detect the QR code and will connect automatically without the need of entering the password.
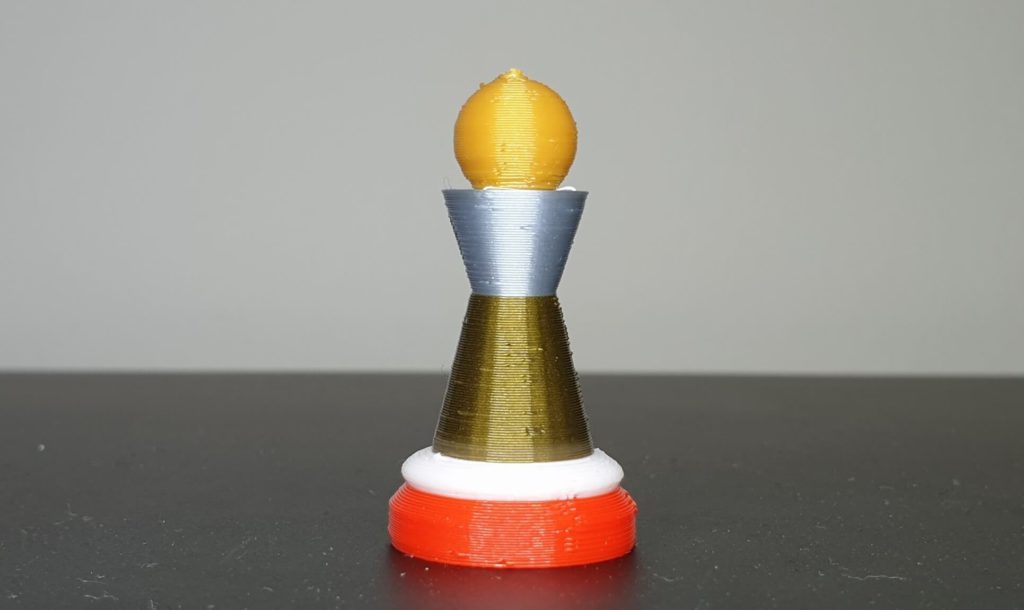
In this guide, I will use the Chep Pawn from Thingiverse to show you how you can use the filament change feature in IdeaMaker using the Mingda D3 Pro 3D printer.
Find the positions for the filament change
It’s a bit hard to find the correct positions for filament change with IdeaMaker because it doesn’t have a function that allows you to easily see how the print will look in multiple colors. To make things easier, I use Prusa Slicer for this, then move the filament change positions in IdeaMaker. In case you don’t have Prusa Slicer installed, download and install it from Prusa’s website.
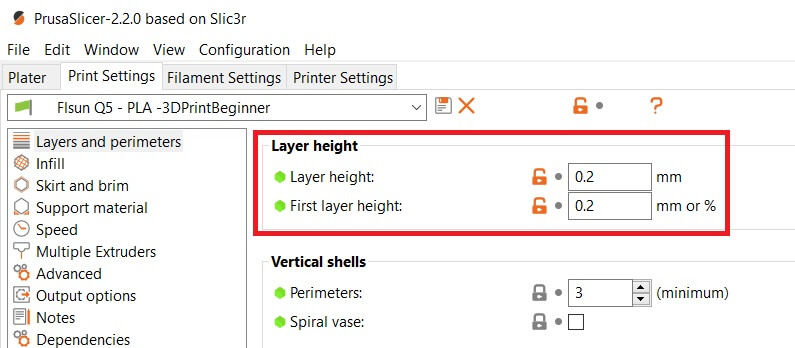
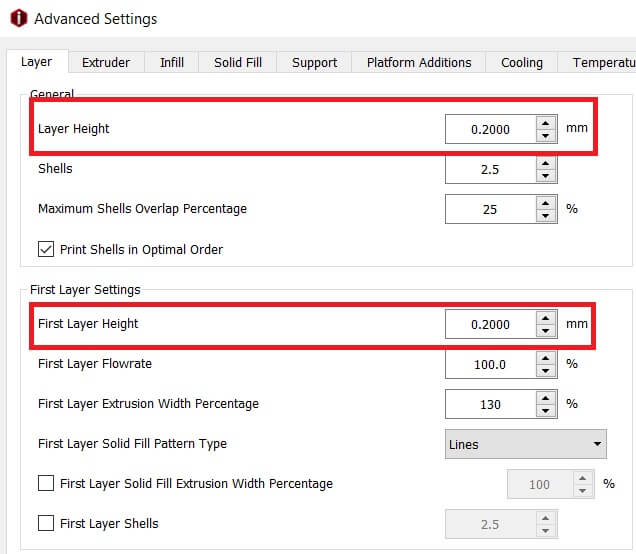
First, make sure the layer height and first layer height are the same for both Prusa Slicer and IdeaMaker.
In Prusa Slicer, you can find this under Printer Settings.
In Ideamaker, you can edit the layer height from the Layer tab, under Advanced Settings.
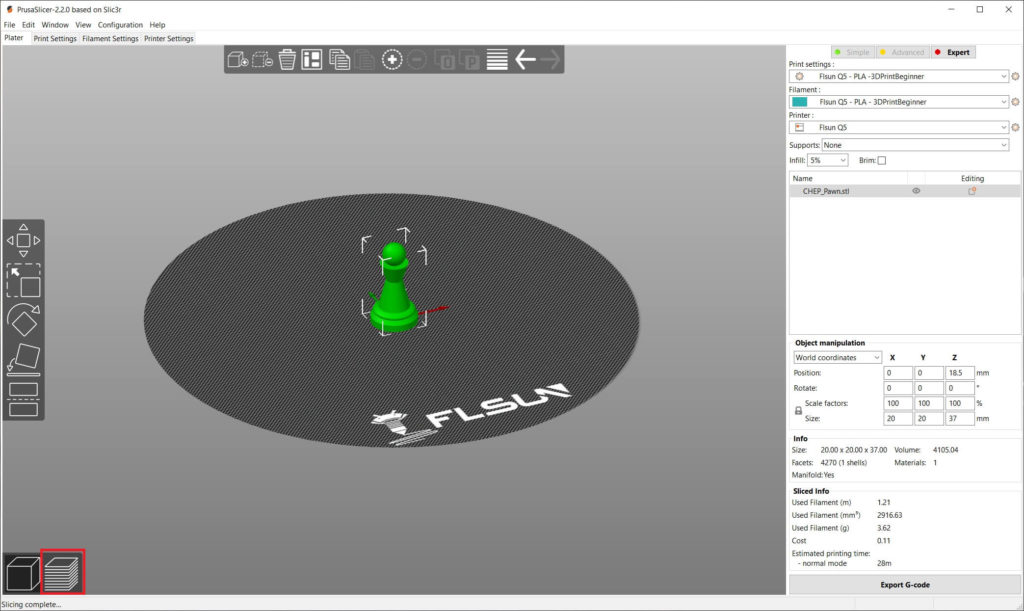
Next, drag and drop the Chep Pawn in Prusa Slicer and click on the Preview icon.
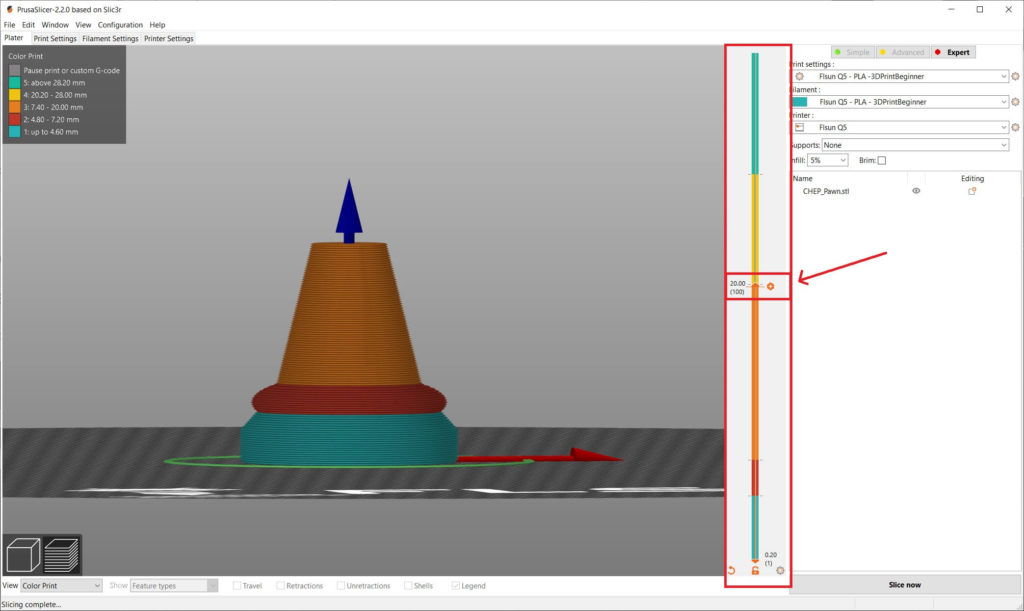
In the Preview screen, we can now add the points where we want the filament to be changed. Move the slider up and down according to the position you want to add the filament pause, then click the “+” button on the to add the filament pause location.
Take a note of the layer height on each location where you want to do the filament change. In my case, I used 4 filament changes and these are the values I got:
4.80
7.40
20.00
28.20
Add the filament change positions to IdeaMaker
Now that we have the correct filament change positions, we can move to IdeaMaker to slice the model. In IdeaMaker, click on the “Play” icon, then click on the setting icon under template to open Advanced Settings.
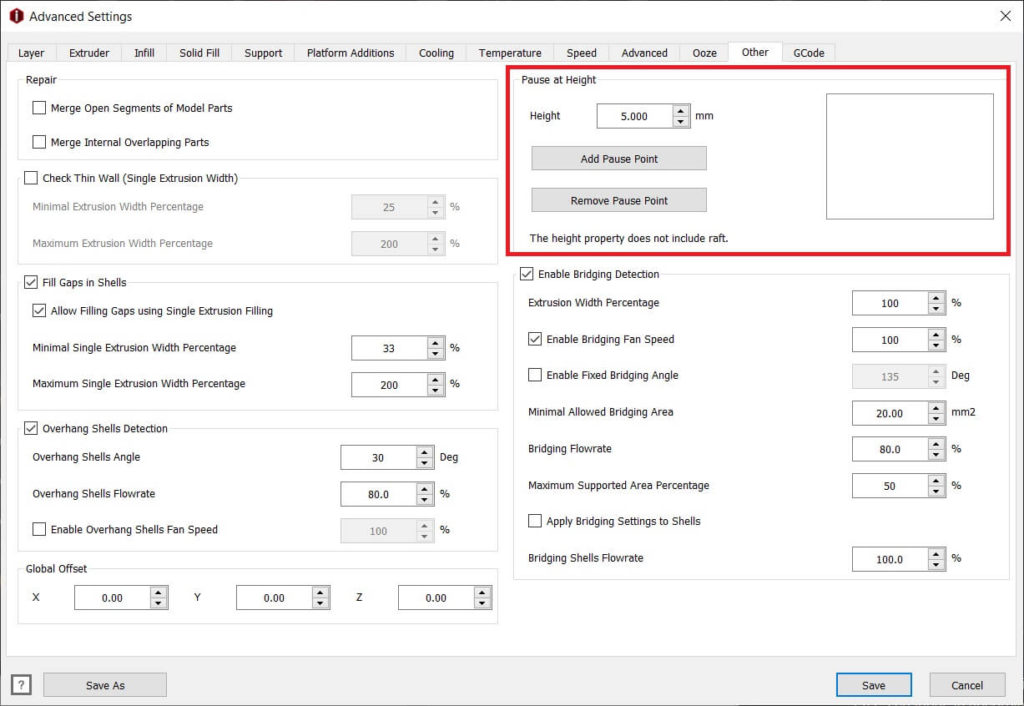
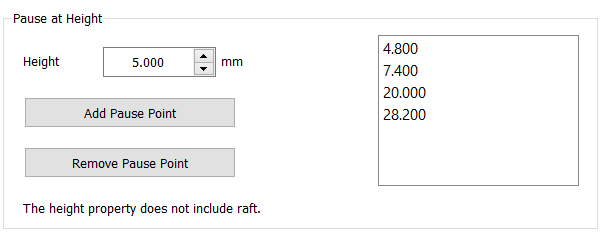
Next, navigate to the Other tab where you will find the section where you can input the filament change positions which are called Pause Points in IdeaMaker.
Enter the filament change positions we got in the previous step, then click Add Pause Point. In the end, you should have something like this:
After adding the pause positions, click on Save, then export the G-code and move to the next step.
Start the print and change the filament
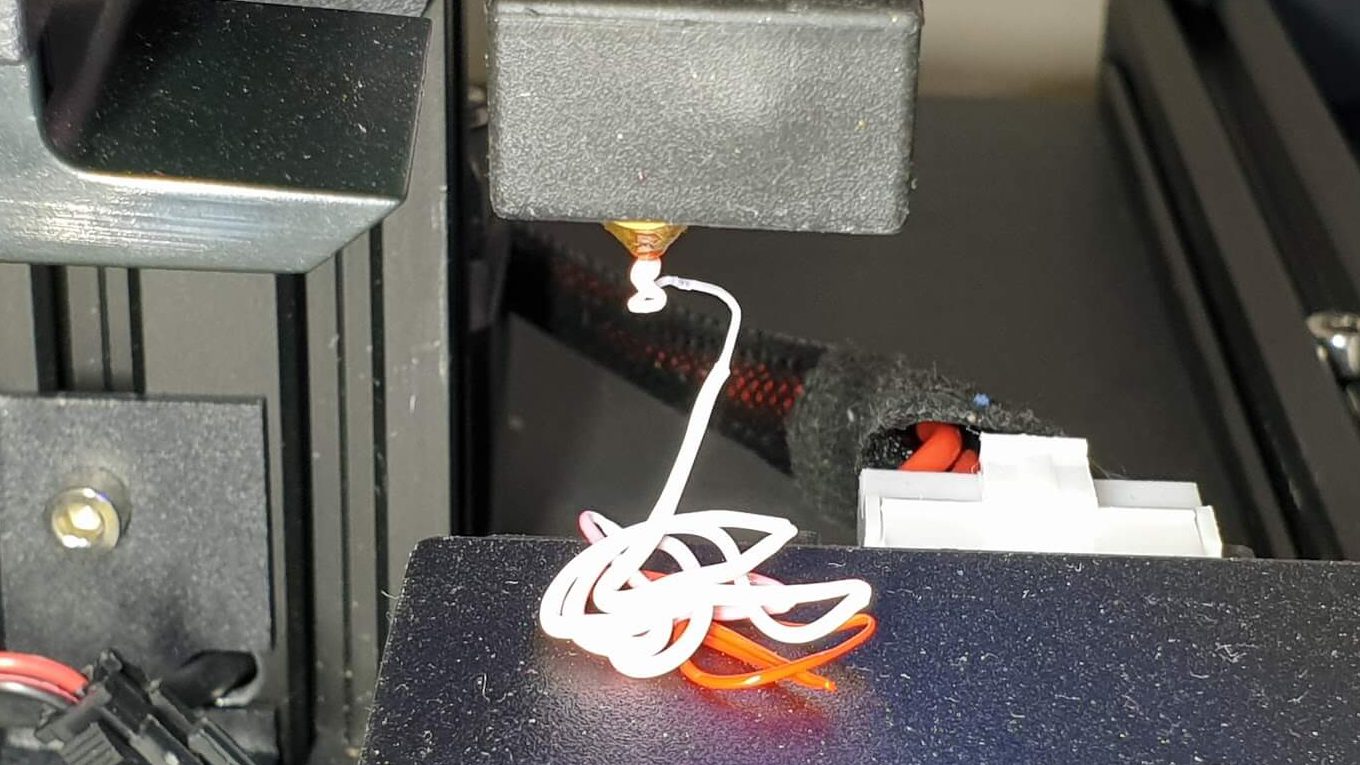
With the sliced G-code file, we can now start the print. You can start the print just as any other print and wait for the print to pause. In my case, the Mingda D3 Pro displays a “Nozzle Parked” message on the screen and moves the hotend in the left.
Now it’s the time to pull out the old filament and insert the new one into the extruder. It’s important to push the new filament enough until the new color is extruding cleanly. That way, you ensure the color change will be perfect.
In the end, you should get something like this. Ignore the quality because it’s just a quick test print.
Test prints with the Filament Change in IdeaMaker
Bioshock Plaque
This Bioshock Plaque was printed on the Mingda D3 Pro and I performed 6 filament changes. As you can see, if you choose the filament colors carefully, the results can be amazing.
- Printer: Mingda D3 Pro
- Material: Eryone Silk Silver PLA, Sunlu Copper Silk PLA, FilamentOne Glint Gray and Gold PLA
- Layer Height: 0.12mm
- Nozzle Temperature: 210C
- Bed Temperature: 45C
- Print Speed: 50 mm/s
Capitan America bust base
Another print I did with M600 is the support from Wekster’s Capitan America. For this base, I did 4 filament changes. This is a really nice example of how filament changes can improve the overall looks of a print.


- Printer: Biqu B1
- Material: FilamentOne Glint Gray and Gold PLA
- Layer Height: 0.15mm
- Nozzle Temperature: 210C
- Bed Temperature: 50C
- Print Speed: 50 mm/s
Wrapping up
Hopefully, this guide helped you understand how to filament change with IdeaMaker. I can’t wait to see what other people can do with this technique, so feel free to post pictures below, or tag me in your social posts.
If you have any questions, you can join the 3DPrintBeginner Discord server where there’s an IdeaMaker channel.
Liked it?
|
|

