Faster Klipper Bed Probing Macro
I recently found an awesome Klipper macro made by ChipCE which makes probing faster and more efficient so I thought an article would be helpful.
This macro will allow you to probe the bed only over the zone where the model is printed. For example, if you print a 3D Benchy, only a few points will be probed, instead of the whole bed. But when you decide to print a larger object, the probed section of the bed automatically be increased.
The Raise3D E2 probes the bed in a similar fashion, and I loved that feature, so being able to do it using Klipper is awesome. In the video below, you can see a comparison between the regular BED_MESH_CALIBRATE macro, and the fast probing macro in this article.
How to setup the bed probing macro?
Edit the printer.cfg
The installation process for the bed probing macro is really easy. First, we need to open the printer.cfg file and add the macro to the bottom of the file.
[gcode_macro BED_MESH_CALIBRATE]
rename_existing: BED_MESH_CALIBRATE_BASE
; gcode parameters
variable_parameter_AREA_START : 0,0
variable_parameter_AREA_END : 0,0
; the clearance between print area and probe area
variable_mesh_area_offset : 5.0
; number of sample per probe point
variable_probe_samples : 2
; minimum probe count
variable_min_probe_count : 3
; scale up the probe count, should be 1.0 ~ < variable_max_probe_count/variable_min_probe_count
variable_probe_count_scale_factor : 1.0
gcode:
    {% if params.AREA_START and params.AREA_END %}
        {% set bedMeshConfig = printer["configfile"].config["bed_mesh"] %}
        {% set safe_min_x = bedMeshConfig.mesh_min.split(",")[0]|float %}
        {% set safe_min_y = bedMeshConfig.mesh_min.split(",")[1]|float %}
        {% set safe_max_x = bedMeshConfig.mesh_max.split(",")[0]|float %}
        {% set safe_max_y = bedMeshConfig.mesh_max.split(",")[1]|float %}

        {% set area_min_x = params.AREA_START.split(",")[0]|float %}
	{% set area_min_y = params.AREA_START.split(",")[1]|float %}
	{% set area_max_x = params.AREA_END.split(",")[0]|float %}
	{% set area_max_y = params.AREA_END.split(",")[1]|float %}

        {% set meshPointX = bedMeshConfig.probe_count.split(",")[0]|int %}
        {% set meshPointY = bedMeshConfig.probe_count.split(",")[1]|int %}

	{% set meshMaxPointX = meshPointX %}
	{% set meshMaxPointY = meshPointY %}


        {% if (area_min_x < area_max_x) and (area_min_y < area_max_y) %}
            {% if area_min_x - mesh_area_offset >=  safe_min_x %}
                {% set area_min_x = area_min_x - mesh_area_offset %}
            {% else %}
                {% set area_min_x = safe_min_x %}
            {% endif %}

            {% if area_min_y - mesh_area_offset >=  safe_min_y %}
                {% set area_min_y = area_min_y - mesh_area_offset %}
            {% else %}
                {% set area_min_y = safe_min_y %}
            {% endif %}

            {% if area_max_x + mesh_area_offset <=  safe_max_x %}
                {% set area_max_x = area_max_x + mesh_area_offset %}
            {% else %}
                {% set area_max_x = safe_max_x %}
            {% endif %}

            {% if area_max_y + mesh_area_offset <=  safe_max_y %}
                {% set area_max_y = area_max_y + mesh_area_offset %}
            {% else %}
                {% set area_max_y = safe_max_y %}
            {% endif %}

            {% set meshPointX = (meshPointX * (area_max_x - area_min_x) / (safe_max_x - safe_min_x) * probe_count_scale_factor)|round(0)|int %}
            {% if meshPointX < min_probe_count %}
                {% set meshPointX = min_probe_count %}
            {% endif %}
	    {% if meshPointX > meshMaxPointX %}
                {% set meshPointX = meshMaxPointX %}
            {% endif %}

            {% set meshPointY = (meshPointY * (area_max_y -area_min_y ) / (safe_max_y - safe_min_y) * probe_count_scale_factor )|round(0)|int %}
            {% if meshPointY < min_probe_count %}
                {% set meshPointY = min_probe_count %}
            {% endif %}
	    {% if meshPointY > meshMaxPointY %}
                {% set meshPointY = meshMaxPointY %}
            {% endif %}

            BED_MESH_CALIBRATE_BASE mesh_min={area_min_x},{area_min_y} mesh_max={area_max_x},{area_max_y} probe_count={meshPointX},{meshPointY} samples={probe_samples|int}
        {% else %}
            BED_MESH_CALIBRATE_BASE
        {% endif %}
    {% else %}
        BED_MESH_CALIBRATE_BASE
    {% endif %}
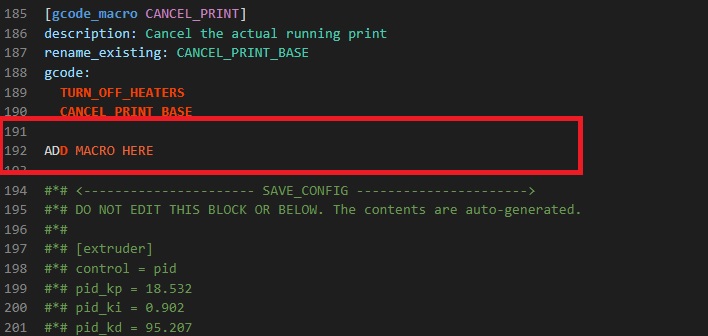
I added the macro between the CANCEL_PRINT and the SAVE_Config section.
After adding the macro, we need to update the start g-code in our slicer, to call this macro and probe the bed before each print. This is how I set up my slicer profiles for the printers which are running Klipper.
Update the Start G-code in your slicer
IdeaMaker Start G-code
In IdeaMaker, we need to edit the printer profile and navigate to GCode -> Start GCode and add the following code like shown in the image below:
BED_MESH_CALIBRATE AREA_START={print_pos_min_x},{print_pos_min_y} AREA_END={print_pos_max_x},{print_pos_max_y}Click on OK to save the change. Now every time you start a new print, the printer will home then probe the bed only over the section where the model will be printed.
Prusa Slicer Start G-code
In Prusa Slicer, we need to edit the printer profile and navigate to Printer Settings -> Custom G-code -> Start G-code and add the following code like shown in the image below:
BED_MESH_CALIBRATE AREA_START={first_layer_print_min[0]},{first_layer_print_min[1]} AREA_END={first_layer_print_max[0]},{first_layer_print_max[1]}Click on OK to save the change. Now every time you start a new print, the printer will home then probe the bed only over the section where the model will be printer.
Wrapping Up
This faster bed probing macro is really useful and saves quite a bit of time when probing the bed before a print. I added this macro on all of my Klipper printers and I love it. As previously mentioned, all the credits should go to ChipCE who made this awesome klipper macro.
Check back soon, because I am working on a dedicated article which covers my favorite Klipper macros to automate some of the 3D printing tasks. If you have other awesome macros to use with Klipper, feel free to leave a comment. I’m quite interested in seeing what other people use with Klipper.
You can also join the 3DPrintBeginner Forum where there’s a dedicated thread for Klipper Firmware, with Klipper enthusiasts ready to help.
Liked it?
|
|





Is there a cura solution?