Creality Ender 5 Plus Review – Print Big!
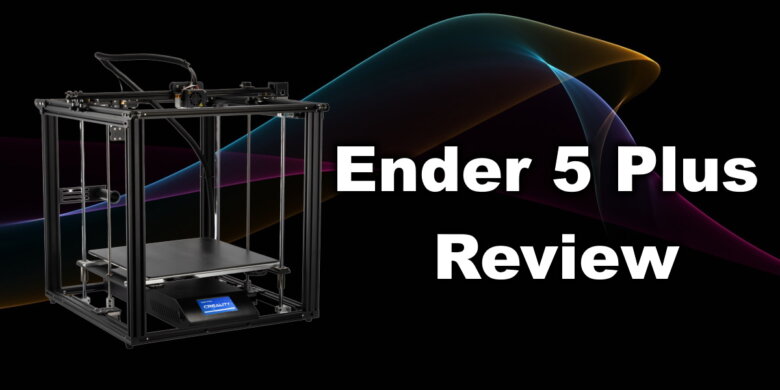
The Ender 5 Plus is one of the biggest printers you can buy from Creality. This was made specifically for people looking to do big prints, without breaking the bank. Let’s see if the Creality Ender 5 Plus is worth your money.
Why choose the Creality Ender 5 Plus?
The Ender 5 Plus from Creality was designed for people looking to do big prints. The main selling point of the printer is the big 350×350 mm build plate and a 400 mm build height.
Creality Ender 5 Plus Shipping and Packaging
The Ender 5 Plus comes in a huge cardboard box with ample protection. Ordered from Banggood, shipped from the UK warehouse and arrived in about a week. Delivery was fast, considering the Covid slowdowns.
In the package we get the usual Creality goodies: screws for assembly, power cable, spare nozzle and bowden coupler, wire management clips, and a USB card reader.
Assembly of the Ender 5 Plus
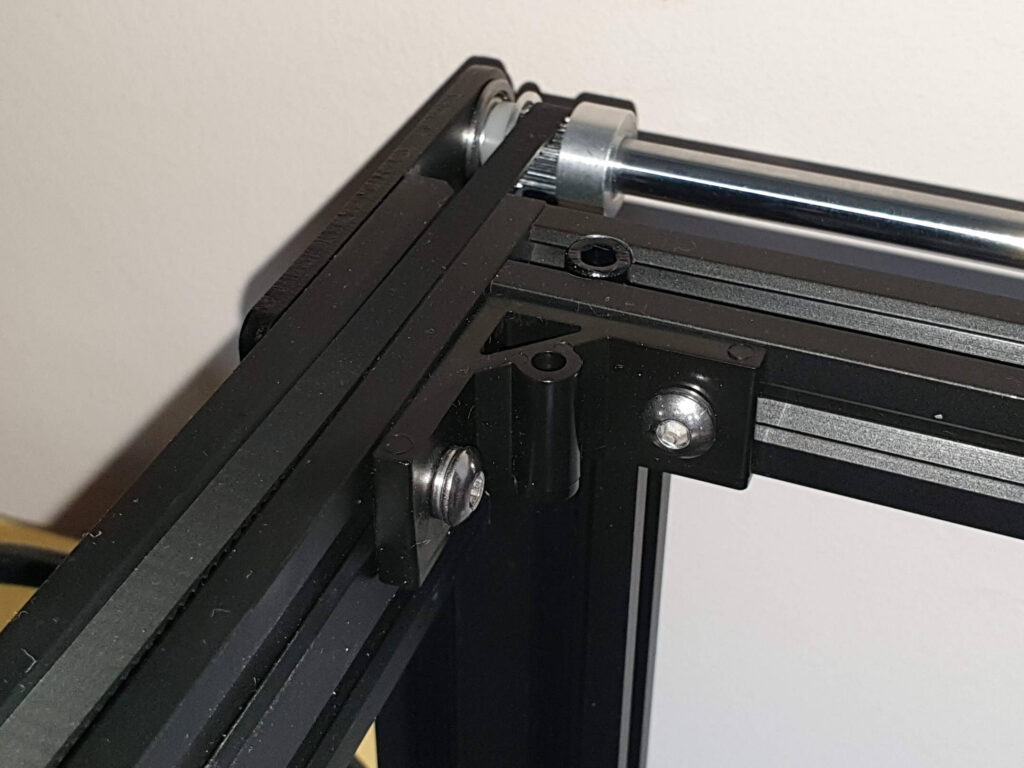
The Ender 5 Plus comes partially assembled and it takes around 30 minutes to finish. When assembling the printer, it’s important to make sure the extrusions are properly squared to get the best print results. The Ender 5 Plus uses plastic corner brackets to square the top and bottom frame. While this seems fine for now, I am thinking about adding some aluminum corner brackets in the future to further improve the rigidity of the frame.
Considering the Ender 5 Pro comes with aluminum corner brackets, I don’t understand why Creality chose to use plastic.
After the assembly was complete, all I can say is that the Ender 5 Plus is HUGE! make sure you have enough space for it because you need about 1 meter cubed to fit it in your workspace. Compared with my BLV Cube which has a 300x300x365 print volume, the Ender 5 Plus is mostly the same size. The benefit is that on the Ender 5 Plus you have a bigger volume of 350x350x400 for your prints with the same overall size.
Creality Ender 5 Plus specs
| Specifications | |
| Brand | Creality |
| Model | Ender-5 Plus |
| Printing Method | FDM |
| Printing accuracy | ±0.1mm |
| Layer thickness | 0.1-0.4mm |
| Nozzle diameter | 0.4mm |
| XY axis positioning accuracy | 0.012mm |
| Z-axis positioning accuracy | 0.001mm |
| Number of nozzles | 1 |
| Nozzle temperature | ≤260℃ |
| Hot bed temperature | ≤110℃ |
| Operating mode | online or TF cards are printed offline |
| file format | STL, OBJ, AMF |
| Slicing software | Creality Slicer/Cura/Repetier-Host/Simplify3D |
| Power parameter | Input:100-240V AC; Output:DC 24V 21A; Max25A |
| Power Supply | Plug EU Standard |
| Machine power | 550W Max |
| Print material | PLA/ABS/Soft Glue/Wooden/ Copper Containing/Gradient filament, etc. |
| Consumable diameter | 1.75mm |
| Rated voltage | 115V/230V 50/60Hz |
| Power output voltage | 24V |
| Hot bed power | 460W |
| Control panel type | 2560 |
| Motor parameters | 42-40 stepper motor, 42-34 stepper motor, step angle 1.8° |
| motor driven | A4988 16 subdivision |
| Display | 4.3inch touch screen |
| Computer operating system | Windows XP/Vista/7/10 MAC Linux |
| Machine size | Length 632 width 666 height 619 |
| Package dimensions | Outer size L730*W740*H310 |
| Machine gross weight | 23.8KG |
| Machine net weight | 18.2KG |
| Power Supply | Plug EU Standard (Default) |
Cube Frame
When assembled, the Creality Ender 5 Plus is a big cube. It uses 2040 V-Slot extrusions for the Y and Z axis. For the X axis, Creality chose to use 2020 extrusion. To be honest, I would have liked to see the same 2040 extrusion throughout the printer for increased rigidity, but after assembling the printer I think it’s good enough.
The frame is rigid enough and considering the bed moves only on the Z axis, I can’t complain.
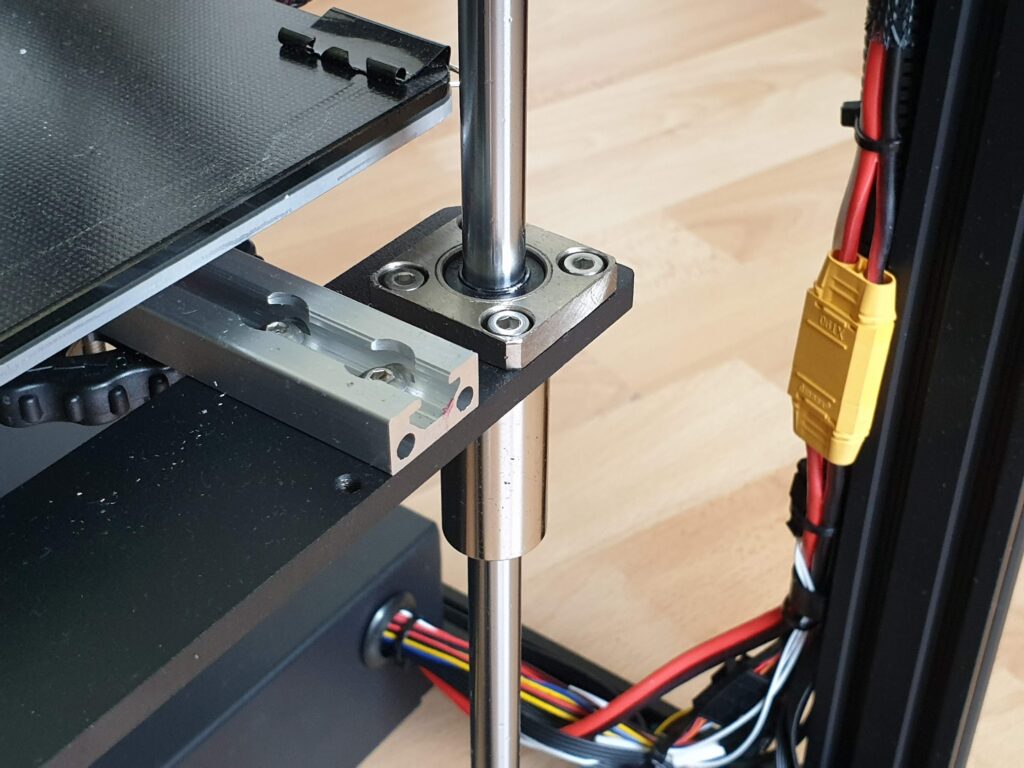
Extra rigidity is added from the Z linear rods which are mounted with aluminum holders.
Please note that on my printer, the Z screws and linear rods were not properly greased, and they needed a bit of extra lubrication for smooth movement.
What I like the most on the Cube Ender 5 frame is the possibility of enclosing the printer with ease. After buying some plexiglass panels, you will easily be able to print ABS or other high temp materials without issues.
Dual Z Axis
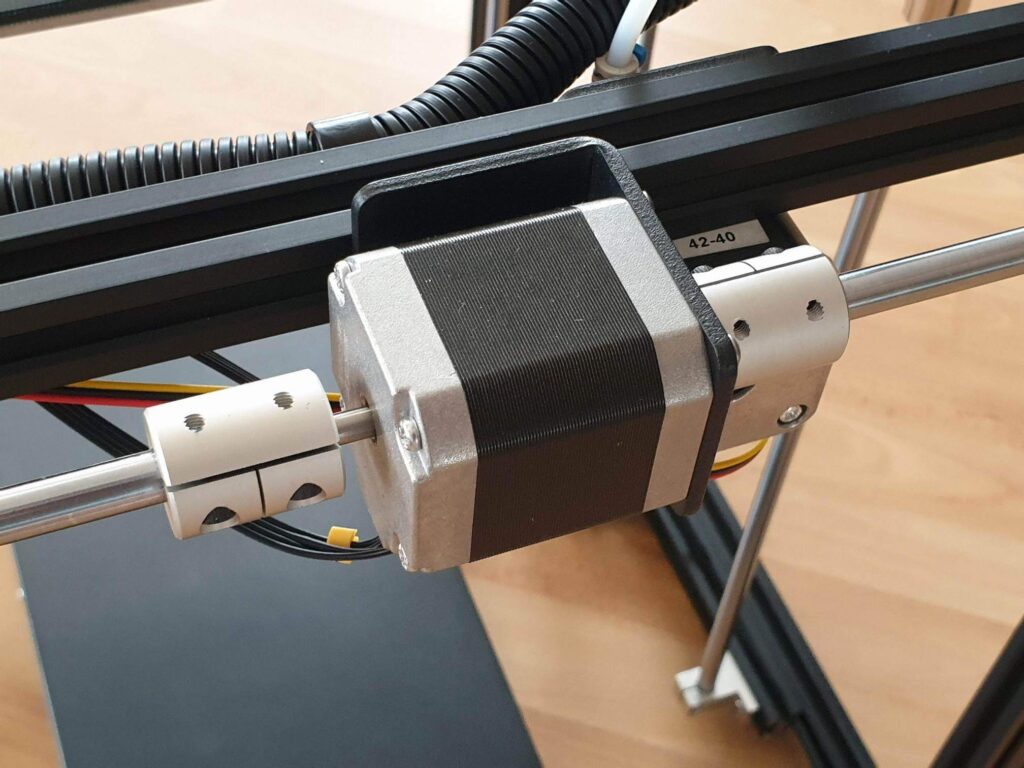
Considering the huge bed used by the Ender 5 Plus, the dual-axis setup used is a no brainer. Dual Z stepper motors drive the heavy bed up and down with ease, and precision. After proper greasing, the bearings run smoothly and i can’t find any issue with the movement system on the Z axis.
Because the Ender 5 Plus uses four Z axis rods, Z wobble is not present. this translates in more accurate layers and less artifacts on the wall quality.
I would have loved to see some anti-backlash nuts or a sync belt to keep the motors in sync. But this can be an easy and cheap upgrade to do in the future.
Regular Creality hotend
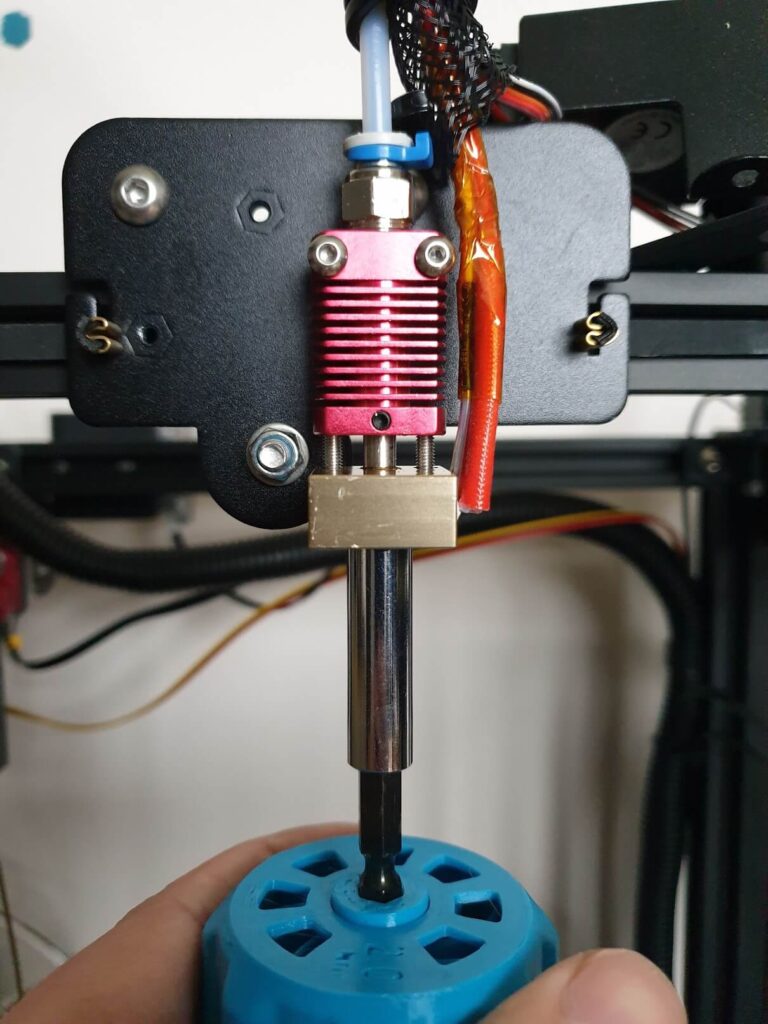
For the Ender 5 Plus, Creality chose to use the same hotend like in its other printers like the Ender 3, Ender 5 or CR 10. For regular prints with a 0.4 nozzle, this hotend is good enough. But if you buy a large format printer, you will probably want to use bigger nozzles for faster prints.
While you can still buy 0.6 or 0.8 nozzles for the Ender 5 Plus hotend, you will be limited by the capacity of the heatblock to melt filament efficiently. When using bigger nozzles, a Volcano heatblock is preferred because it is able to heat the filament more efficiently and allow you to print faster with bigger nozzles.
I know about this limitation since I started printing visors on the Sapphire Plus. The printer can do great when printing with the 0.4 nozzle but after I installed a 0.6 nozzle, I was held back by the similar heatblock used. With the 0.6 nozzle i needed to lower the speed in order to avoid skipped steps or bad layer adhesion. The same can be applied for the Ender 5 Plus.
For better reliability on the stock configuration, I recommend you install the L3D Hotend Fix. This improves the hotend by making sure the seal of the PTFE on the nozzle is good, and you will not encounter clogs.
If you want to print higher temperature materials, the Mellow all-metal hotend will be a direct-swap. The Micro Swiss All-Metal Hotend is also a popular upgrade option.
Plastic extruder in a bowden setup
I’ve previously mentioned I’m not a fan of bowden setups. It’s harder to properly tune a bowden setup because the extruder moves a long filament piece from a remote location. This translates in high retraction values, oozing and overall, less accuracy when extruding filament. Linear Advance benefits are almost nonexistent.
This is the best description of a bowden setup, from the Marlin Linear Advance page.
It’s like painting a picture: try to paint with a 1m long brush, grabbing the rear end of the handle which is made from rubber.
Another reason why I preffer a direct drive setup instead of bowden is because of the use of bowden fittings. I was not able to find quality fitting to use with the PTFE tube. Trianglelab recently added some metal fittings but i did not have the opotunity to test them. Creality sells its printer with low quality fittings that often break after a few prints. The PTFE can either start moving in the fitting or fail completely.
I had multiple issues with the bowden setup on my Creality CR10s Pro, and also the Sapphire Plus from Two Trees. Both machines are currently running direct drive setups, and I will probably upgrade the Ender 5 Plus. It’s just easier to calibrate, and less problems overall.
If you want to keep the stock setup, but want a better extruder, you can easily upgrade to a metal extruder with dual-gears. Or even better, a BMG extruder.
Odd movement setup
The Ender 5 Plus printer is NOT a Core XY printer. While the movement looks like a Core XY machine, the Ender 5 Plus uses the same cartesian movements. In order to have better stability, Creality chose to move the X gantry on the Y plane.
By doing this, they manage to minimize the weight moved when printing and (in theory) produce better prints.
8-bit board with noisy drivers
The Ender 5 Plus was launched in the summer of 2019. During that period, the 32-bit boards were just starting to emerge. While this aspect can be forgiven, the use of 4988 drivers ruins part of the printer’s appeal.
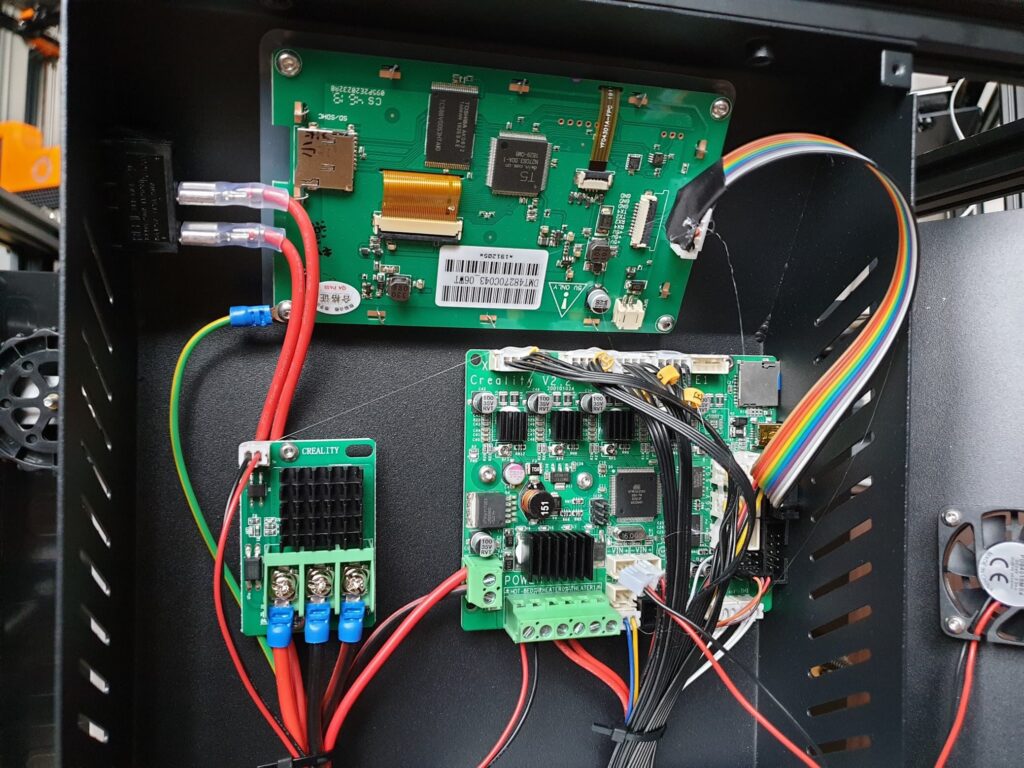
Ender 5 Plus uses the Creality 2.2 board which for 2020 is outdated. Most of the printers launched in 2020 are using TMC2208 drivers and some of them are already upgraded to 32-bit.
If you are using the printer in another room, where noise is not a problem this is not a big issue. But the benefits that come with the new Marlin 2.0 firmware can’t be used. The limited memory available and the limitations caused by the 8-bit CPU can hold the printer capabilities back. Another issue with this old board is the salmon skin effect it leaves on the prints. It’s not bad, but a newer board and drivers can help eliminate this issue.
The good news is that aftermarket 32-bit boards like the SKR Mini E3 are cheap. Creality also sells an upgraded silent board that can be purchased for an easy direct swap.
BLTouch for auto bed leveling
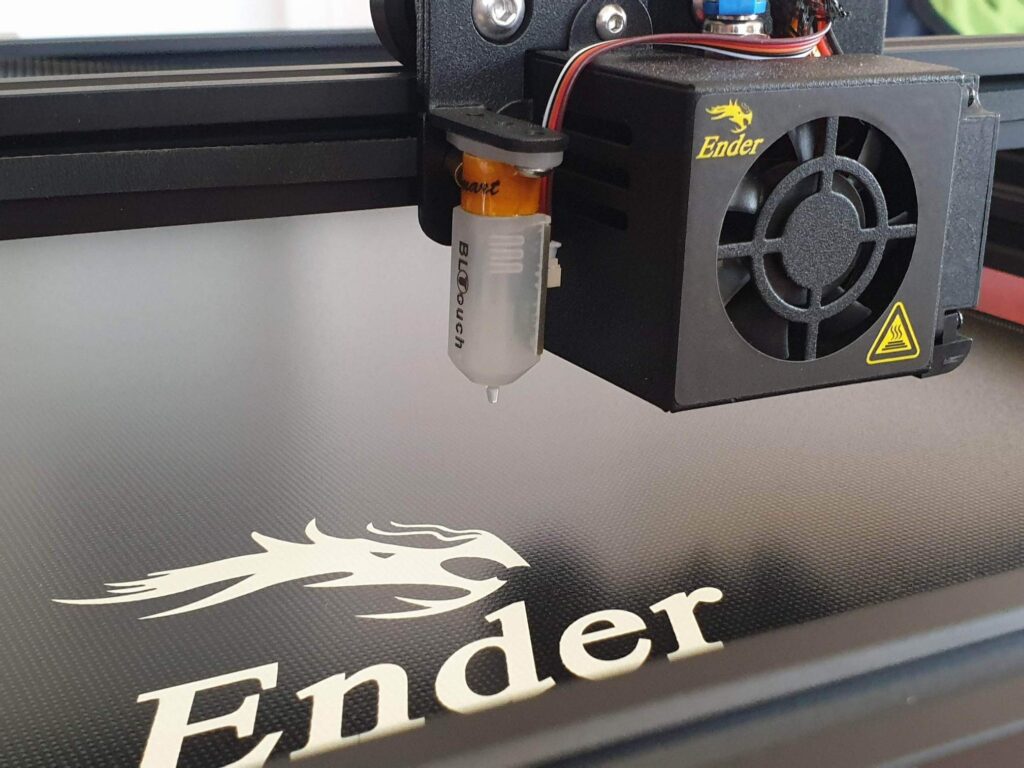
Considering the size of the heated bed, the inclusion of an original BLTouch from Antclabs was a good decision. In order to make sure prints adhere well on the build plate, the BLTouch is used for auto bed leveling.
The printer measures the bed in multiple points and generates a mesh that is used when printing, to make sure the nozzle sits at a constant distance from the bed.
Plastic Creality extruder
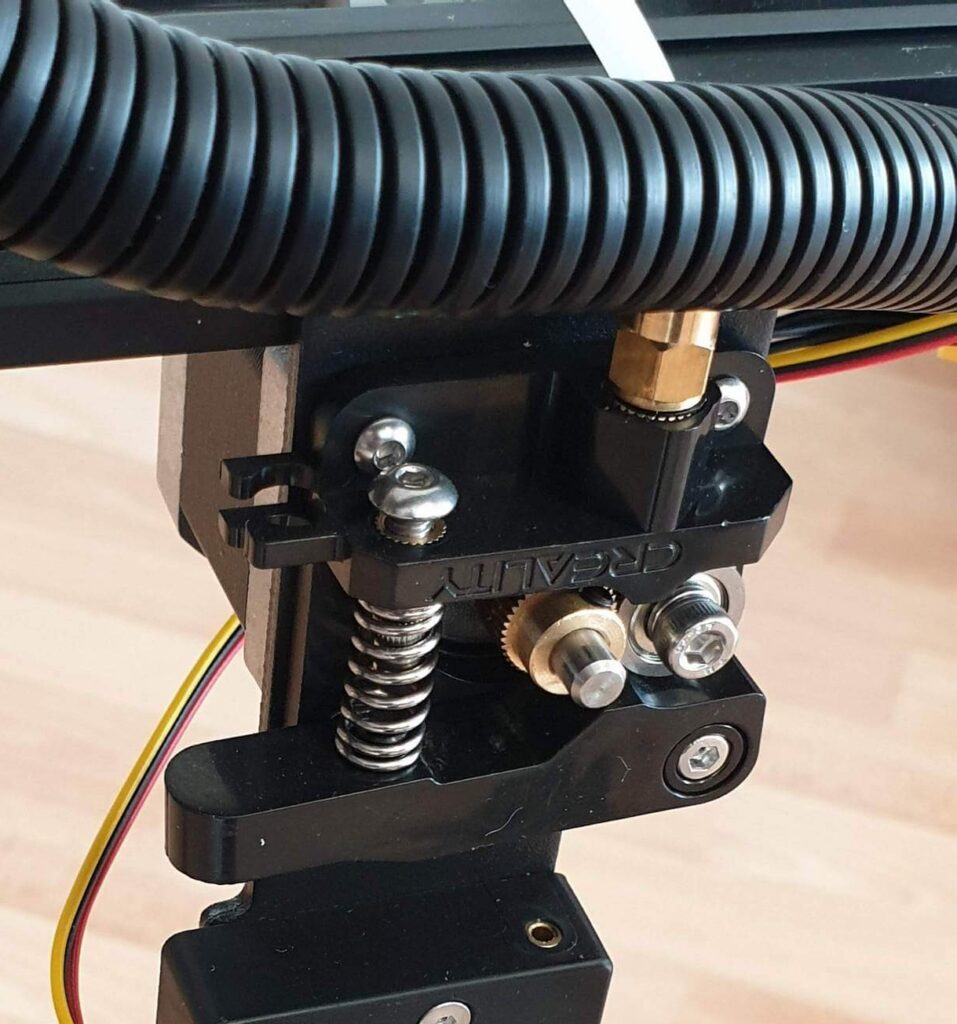
Another place where Creality saved cost is the plastic extruder. Newer printers from Creality come with a metal extruder, or even better, with dual-gear exturder. This plastic extruder is plain bad. The idler lever can crack and the tension cannot be controlled.
A dual-gear extruder like on the Creality CR-10s PRO would have solved any issues and the quality of the printer out of the box would be much better.
When buying the Ender 5 Plus, you should also order a cheap dual-gear extruder. If you can spare extra cash, a BMG extruder can improve the extrusion quality even further. In my case, I found that the stock extruder is not consistent enough. Because of this, the layers are not consistent enough even after extruder calibration.
Huge build plate
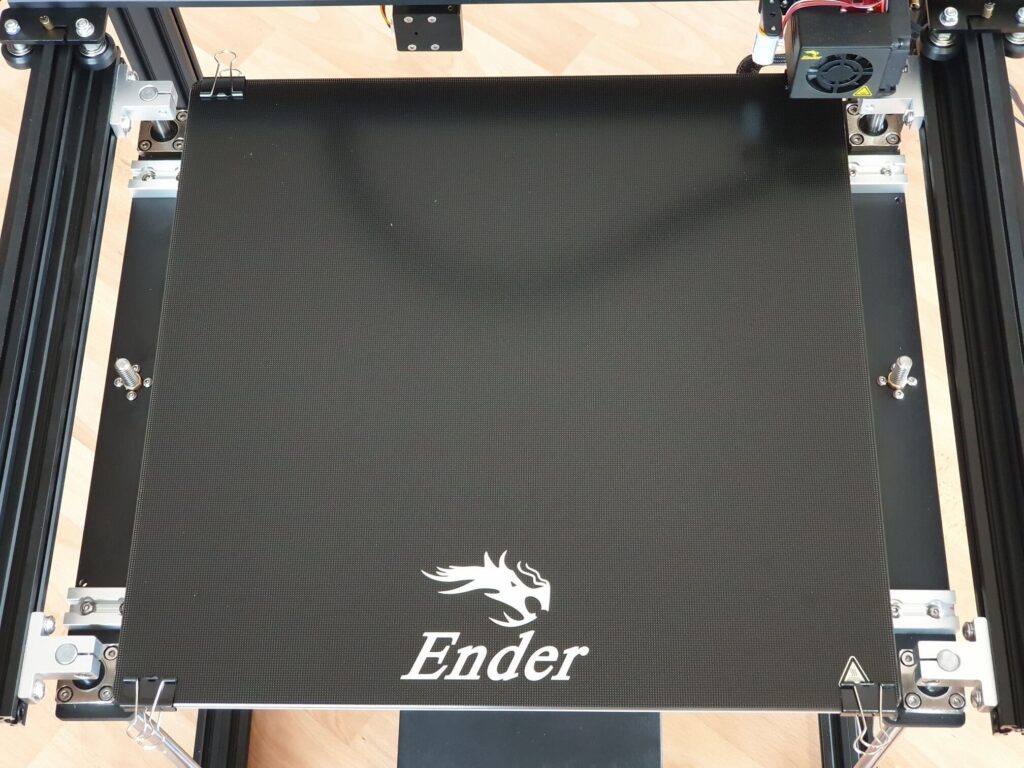
This is the main selling point of the Ender 5 Plus. The 350×350 mm dimensions will satisfy most of the users. It allows you to do huge prints without splitting into pieces.
The heatbed uses an aluminum resistance and it’s being powered by the main power supply. It reaches 60C in about 5 minutes, and 100C in 15m.
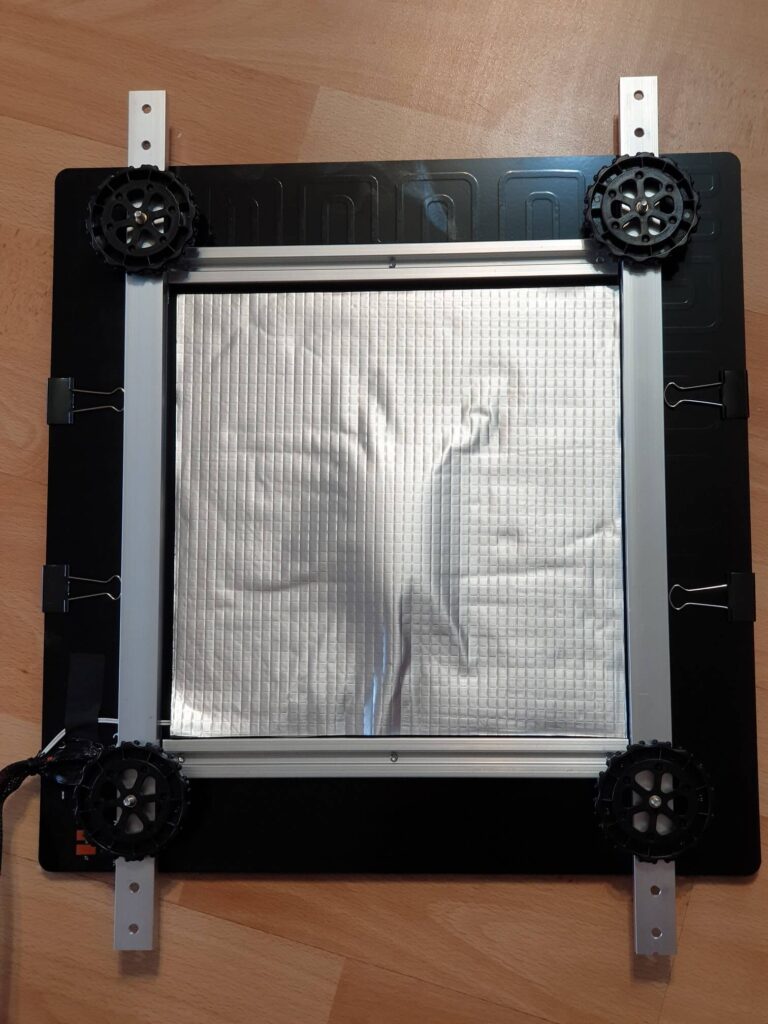
On top of the aluminum heatbed, the Ender 5 Plus uses a tempered glass plate, with a textured top cover. This is a cheap way to ensure the bed is flat. Another benefit is really good adhesion when the bed is hot, while prints can be removed easily after the bed cools. The tempered glass plate is held in place with paper clips. The Ender 5 Plus heatbed has a bit of insulation material, but only on the middle of the bed. On the sides, there is no insulating material. This can cause inconsistent temperatures across the bed, where the external surface has a lower temperature.
To make things worse, Creality used some aluminum extrusions to reinforce the heatbed. This is a good idea if you are using some insulating material between the bed and the reinforcement. Unfortunately, in the Ender 5 Plus’ case, the aluminum reinforcements touch the heatbed directly and act like a heatsink drawing the heat out of the bed.
For a bed like this, I would have liked to see an AC powered heatbed. Creality could have easily use a lower power power supply and use the money for a SSR and AC heating element. This would translate in much faster heating times. But if you don’t mind waiting for a few minutes, this is not a problem.
In the future, I may buy a PEI Magnetic Spring Steel Sheet, which can be easily removed after a print, without having to wait for the heatbed to cool.
Not the best power supply
The huge heated bed included with the Ender 5 Plus draws a lot of power. When the printer is heating both the hotend and the heatbed, the power draw is over 480W (measured from a smart plug).
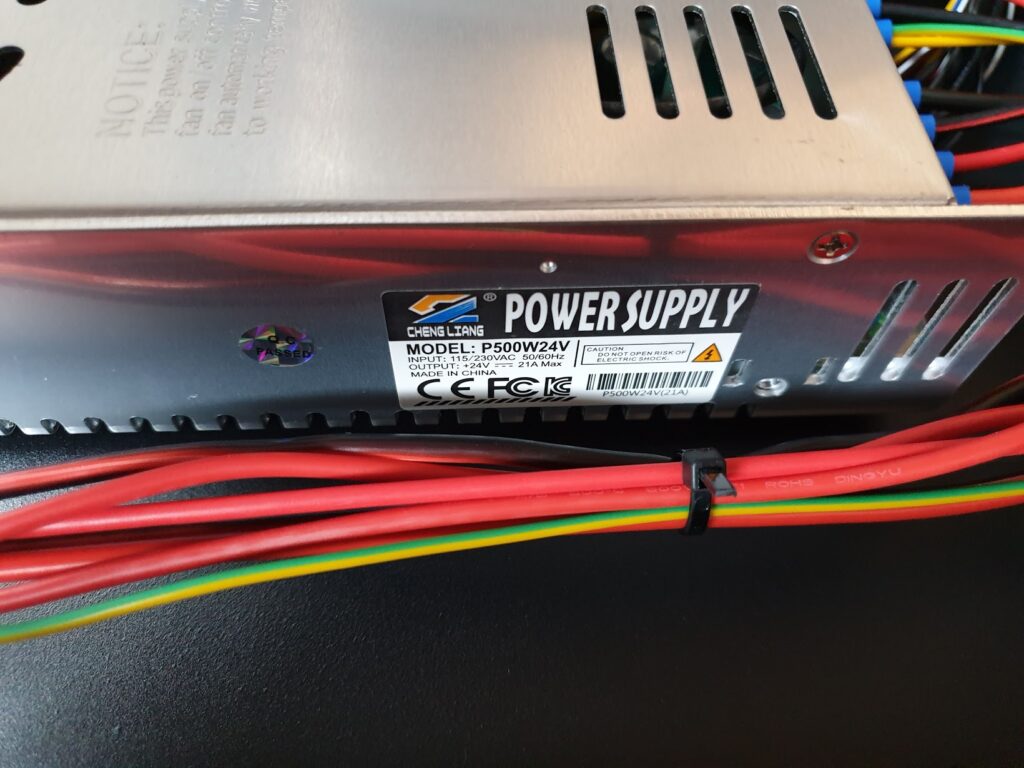
This causes the power supply to be right at the limit of its capabilities. Considering the included power supply is not a brand name, it’s probably barely handling this load.
There are multiple reports online where the stock power supply eventually dies. Creality now started to include better power supplies, specifically the Meanwell 500W power supply, like on the CR-10S Pro.
This issue could have been easily avoided by using an AC heater, but it is what it is.
Unfortunately, my printer is probably one of the earlier batches, and it uses the regular no-name PSU.
I did not have any issues yet, but I will update this review if something happens in the future.
Test Prints on Ender 5 Plus
As always, the first prints consist of a calibration cube and a 3D Benchy. As you can, the stock configuration works pretty well. In order to get better prints, I did the extruder calibration and flow calibration managing to improve print quality a bit.
Eevee Pokemon
After I did the calibration, first test print was the Eevee from MyMiniFactory, printed with Sunlu Gray PLA, with 0.15 mm layer height, 200C and 60mm/s.
Print quality is fine, with some bad overhangs caused by the part cooling fan. The airflow is not directed right under the nozzle. This issue can be fixed later on by using a better air duct.
Gary the Snail
Gary the Snail from Thingiverse was my next print. I used Gembird Marble PLA, with 0.15 mm layer height, 200C and 60mm/s. Marble filament does a good job on hiding the layer lines, but the inconsistent extrusion can still be seen on the external walls.


Lunael’s Dream
Next on the list is Lunael’s Dream by Jukka Seppanen, one of my favorite designers. The model does not need any kind of supports and can be printed as is.
I used Copper PLA from Sunlu, with 0.15 mm layer height, 200C and 60mm/s.
This time, the finished print looks better, and I can’t really complain.


Young Tortollan
Finally, I printed the Young Tortollan from MyMiniFactory with Devil Design Azure Blue PLA with 0.2 mm layer height, 200C and 70mm/s.
Printed fine, but in this case the inconsistent extrusion issues show up the most. This was right before the board died.


Ender 5 board issue
Unfortunately, after the prints previously shared, my printer stopped working. The board released the “magic smoke” and the extruder stopped working, stopping my Ender 5 Plus review prints.
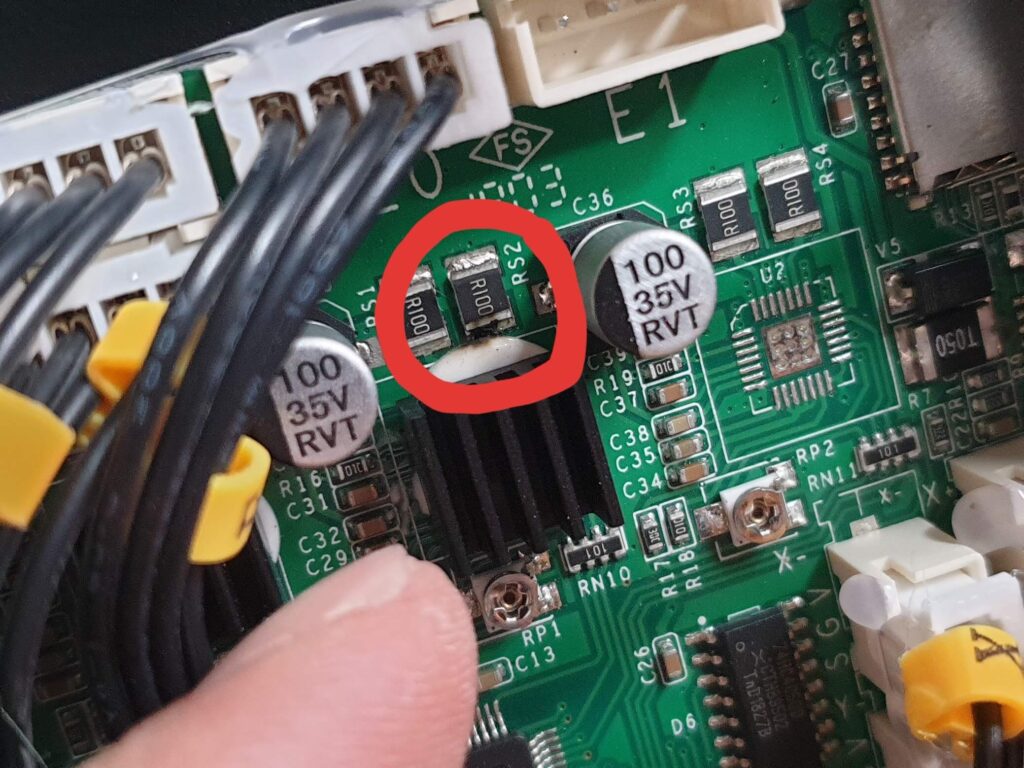
To be honest, from the start I was thinking that there has to be some sort of issues with the extruder, because the layers were not consistent enough. And on my Ender 3, I previously used the same driver and extruder combo with better results.
The burnt driver was the one which handled the extruder. I am thinking that somehow, the uneven extrusion issues were also caused by the bad stepper driver which eventually failed.
Fortunately, Banggood was really helpful and after I sent pictures with the burnt board, a replacement was sent the next day.
We need to understand that these things can happen. The stock boards are not the best boards when it comes to build quality, but it’s nice to see the seller is helpful. That’s why I recommend you always buy your printers from trustworthy sellers to get support if something like this happens.
Conclusions – Is the Ender 5 Plus worth it?
After this Ender 5 Plus review, here are my closing toughts. Overall, the Ender 5 Plus is a good machine, perfect for anybody who is looking for a big format 3D printer. It has a big print volume with a sturdy frame and the print quality is good even when stock. Unfortunately, in order to turn this printer into a workhorse some money need to be invested for a better extruder and a newer board.
The other upgrades proposed in this review only improve the printing experience. They are not needed right of the bat, and can be added over time.
Creality’s Ender 5 Plus is currently available for around ~500$. A bit expensive, if you ask me, considering that it uses and old 8-bit board and a bad quality extruder. If you are planning to buy one, consider you should invest an extra ~50$ and some of your time to upgrade the board and the extruder.
I will do a series of articles where I will show you how do these upgrades. I will add a new 32-bit board like the SKR Mini E3 V2.0 or the SKR 1.4, a BMG extruder in Direct Drive configuration and better insulation to the heatbed.
The Good
- Generous 350x350x400 build volume.
- Sturdy cube frame.
- Good print quality.
- Flat heatbed with good adhesion.
- Original BLTouch is included.
- The Ender 5 Plus can be easily enclosed to allow for easy ABS prints.
The Bad
- Extruder is bad, and should be replaced as soon as possible.
- The Ender 5 Plus uses an old 8-bit board with noisy drivers.
- Power supply is undersized.
The Ugly
- The hotend is not able to keep up with larger nozzles while maintaining the same speed.
- The bowden setup is not the most reliable (personal opinion that applies to any bowden setup).
- The power supply fans are noisy.
- Headbed insulation is not great and it needs some work.
- The board died after a few prints (probably just bad luck).
Where to buy the Ender 5 Plus?
The Ender 5 Plus from Creality can be bought from multiple stores. You can check the links below for the most up to date prices available:
Amazon
Aliexpress
Banggood
Comgrow
I recommend checking out the Discount Codes page before purchasing. I regularly update the article with discount codes for various online shops, and you might find one for this particular model.
The Ender 5 Plus was provided free of charge by Banggood for the purpose of this review, and all the opinions are my own. While the article includes affiliate links, all opinions are my own. Nobody reviewed the article before it was posted, following the Review Guidelines.
Liked it?
|
|


