TronHoo T220s Review: Missed Opportunity
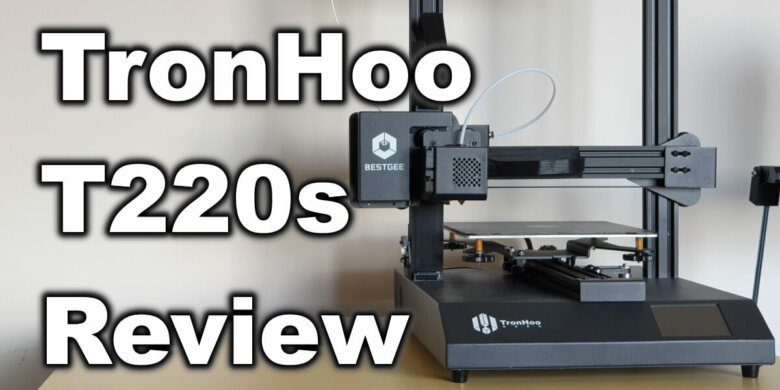
The TronHoo T220s was first brought to my attention by a reader, and after taking a look at its design I thought it would be a nice printer to review. It looked like a cheaper alternative to the already popular Artillery Genius I reviewed a while ago, with better ribbon connectors and a bowden setup.
Unfortunately, I did not have the best experience with this printer, and I will detail my findings in this review, so continue reading to learn what happened with the T220 during my period with it.
Update: Nov.2020
After the review was published, I was contacted by TronHoo and they gave me a list with the issues I discovered, with their plan to fix them. After a month I was sent an updated T220s printer with most of the issues fixed. Please see the what changed here.
TronHoo T220s Shipping and Packaging
The T220s was shipped directly from China, from the manufacturer’s warehouse. It took about a week to arrive. It’s packed in a large box with foam protection around the printer.
Unfortunately, the two of the bed carriage wheel mounts were damaged, so I could not assemble the printer when I got it.
I contacted TronHoo regarding this issue and they said it was caused by incorrect handling during shipping, and sent me a new bed carriage. This replacement arrived in about 2 weeks and I could start and work on the T220s review.
To make sure there is no movement during shipping, TronHoo also uses some pieces of plastic which go into the extrusions. All the three axis had these “stoppers” which is nice.
Assembly of the TronHoo T220s
It took me around 60 minutes to completely assemble the T220s. The printer comes mostly pre-assembled and I only needed to install the gantry using 4 screws on the bottom of the machine then connect some wires. TronHoo also includes a helpful video on the SD card which you can use when assembling the printer.
Because of the damage I told you about, I also needed to replace the bed carriage, and the replacement was a bit more complicated.
To make sure your printer works well, it’s important to do some checks while assembling:
Check all the wheels
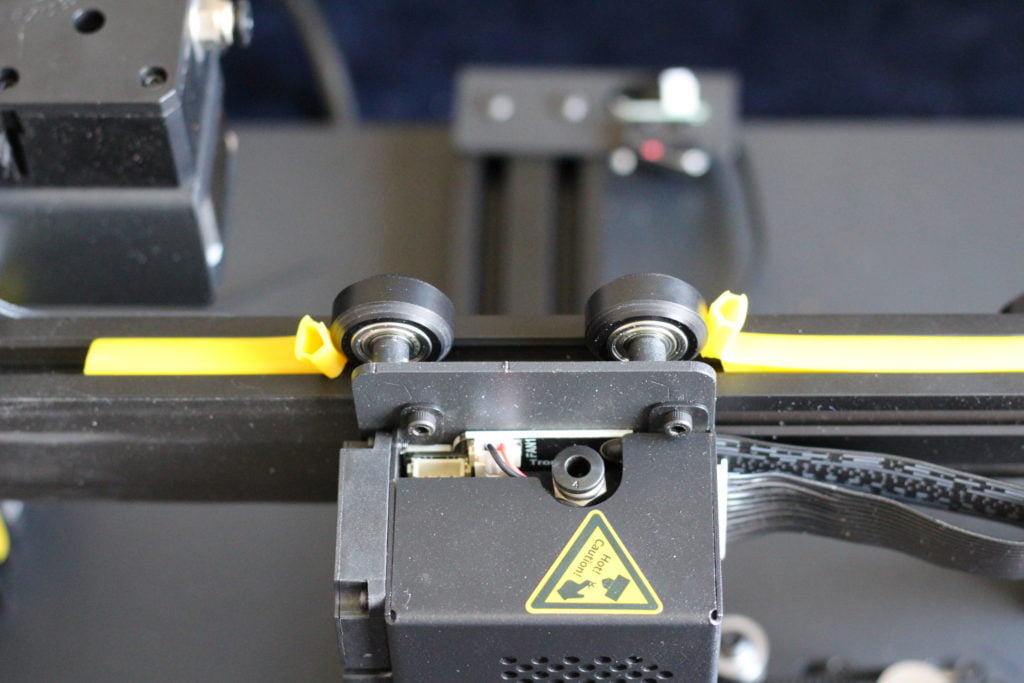
The first thing I check on a new printer are the wheels. They should be tightened just right. If they are loose, issues can show up on the prints and if they are too tight, the wheels will develop flat spots. In my case, the T220s had its wheels too tight and developed a few flat spots. I checked all the wheels and they were all overtightened.
After loosening the wheels and properly tightening them, the issue was fixed. It took a few days for the wheels to recover and come back to their original shape.
I tighten the wheels using the eccentric nuts just enough so they don’t slip when I try to turn them manually. This ensures the wheels are correctly tightened and the movement is smooth.
The three main locations where you can check this is the bed, the hotend and the Z wheels. If the wheels are properly adjusted, then you can proceed to the next step.
Ensure the frame is square
Another important step in getting quality prints is making sure that the printer is square. After I install the gantry on the base, I level the X gantry using two 3D printed supports. When both sides of the X gantry sit flush on the supports, I then double check the wheels to be properly tightened onto the Z extrusions.
Next, I manually raise the X gantry to the top of the printer. The movement should be smooth and there shouldn’t be any kind of difference in the tightness of the wheels. If there is any play, or the wheels are too tight on the top, I loosen the top screws a bit then tighten them up again.
By doing this, you ensure that the Z extrusions are parallel and the movement on the Z axis is not impacted.
There was no issue with the alignment of the gantry for the T220s. The Z extrusions were parallel, and the X gantry was moving smoothly (after fixing the wheels)
Unfortunately, the quality control when it comes to the assembly of the printer is not as good as I would have hoped to be. If this printer would have arrived to a beginner, I am sure it would have caused a lot of frustration
Make sure the lead screw is properly greased
To ensure smooth motion on the Z axis, the lead screws should be greased. The T220s is shipped without a greased lead screw and it’s imperative to add some grease if you do avoid Z banding.
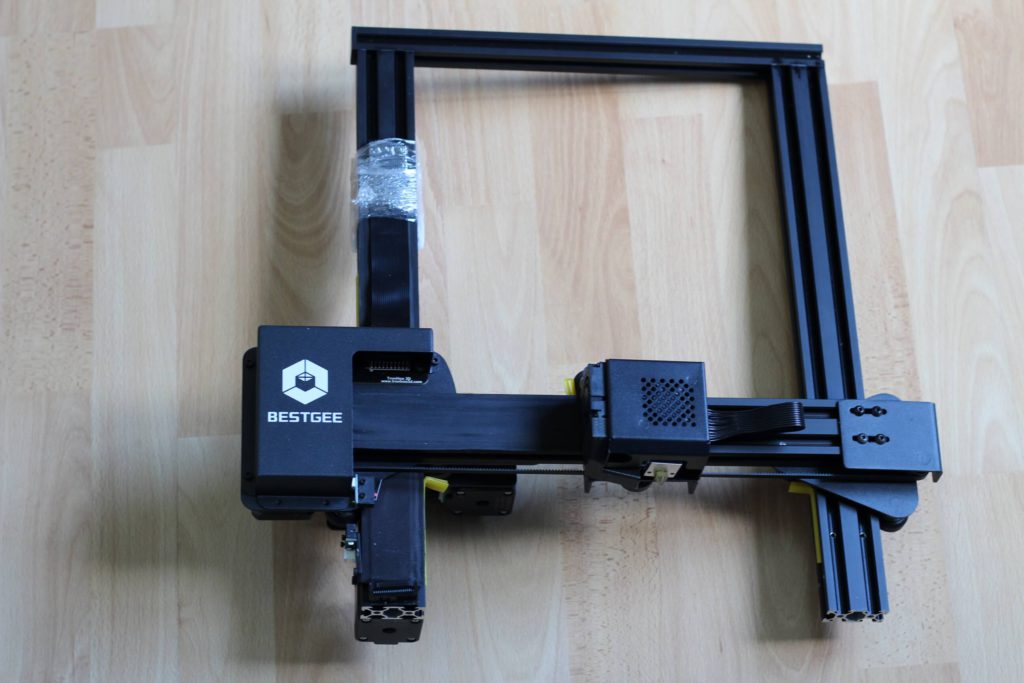
This is how the T220s looks after the assembly process:
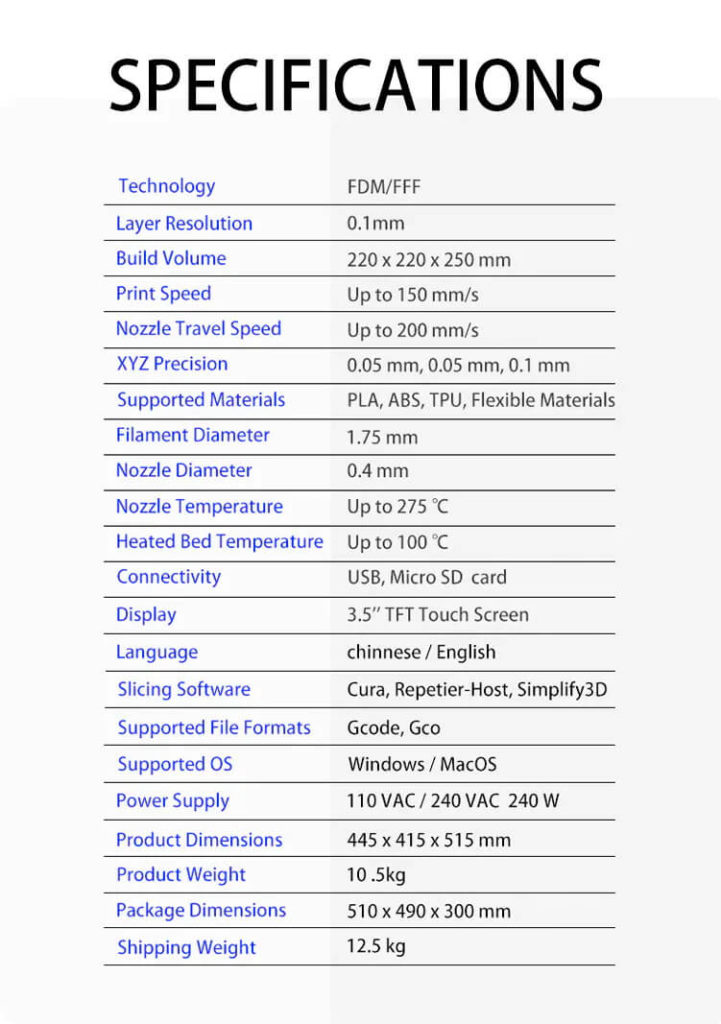
TronHoo T220s Specs
Ribbon cables for X and Z axis
The inclusion of ribbon cables with the TronHoo T220s was the thing that sparked my interest in wanting to review it. Two ribbon cables are used to connect the hotend to the main board and the wiring setup is nice.
Considering that the Artillery Genius uses thinner ribbon cables and a lot of people reported issues with the connectors, I think TronHoo’s offering is a bit better. I am not sure how these wires will perform in the future after repeated bends during printing but I guess only time will tell.
Titan extruder clone
A Titan extruder clone is used for pushing the filament trough it’s bowden setup. The quality is decent but because the idler has a larger hole through where you load the filament, it’s pretty hard to do it.
You need to perfectly straighten the filament to make sure it reaches the idler wheel and gear, a process which is hard to do when facing the printer from the front. Having the filament sensor close to the extruder doesn’t help either.
I tried to fix this by adding a piece of PTFE tube to better guide the filament, but this is not possible due to the increased hole size of the extruder.
Bowden setup with decent hotend.
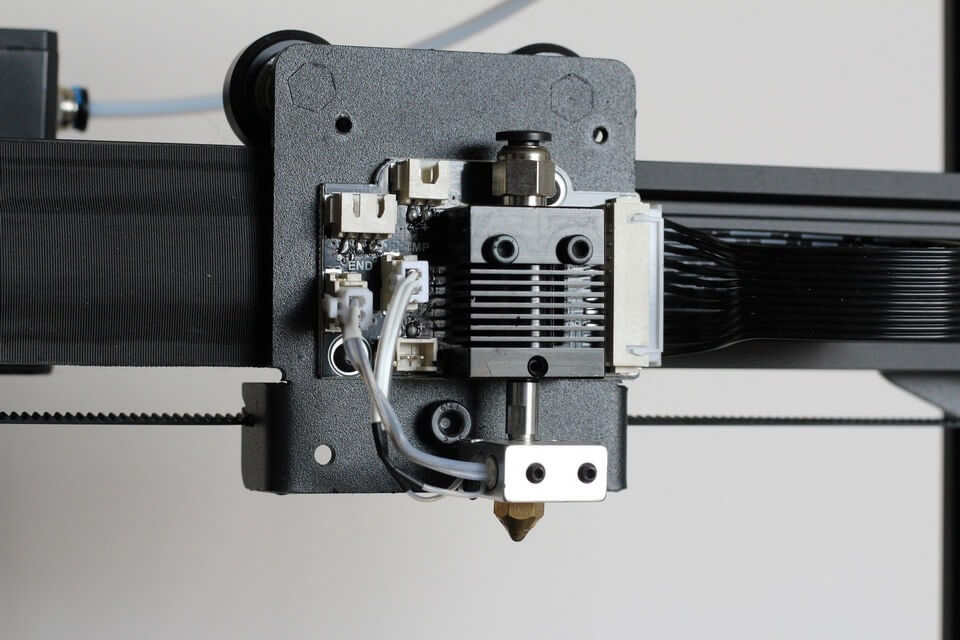
Even though the TronHoo T220s uses a bowden setup, they included a relatively decent hotend. Compared to other hotends which have terrible cooling and use a PTFE tube up to the nozzle, the T220s is a bit better.
The heat break allows the PTFE tube to go inside the heat break and it stops just before the connecting section. This means that you can print hotter without having to worry about the PTFE tube starting to degrade.
You can see in the images above that I was forced to use an M3 nut to hold the thermistor in place. The stock screw was too big and because of that, the thermistor was not sitting right in the heat block. You don’t want the heater to get loose during printing because it’s a big fire hazard if the firmware doesn’t detect this.
The X ribbon cable connects into a breakout board which powers the hardware for the hotend.
Unfortunately, the soldering quality on the breakout board is really bad and it feels like it was done by a total beginner. Not the best sight to have when judging this printer’s quality.
8-bit board and noisy drivers
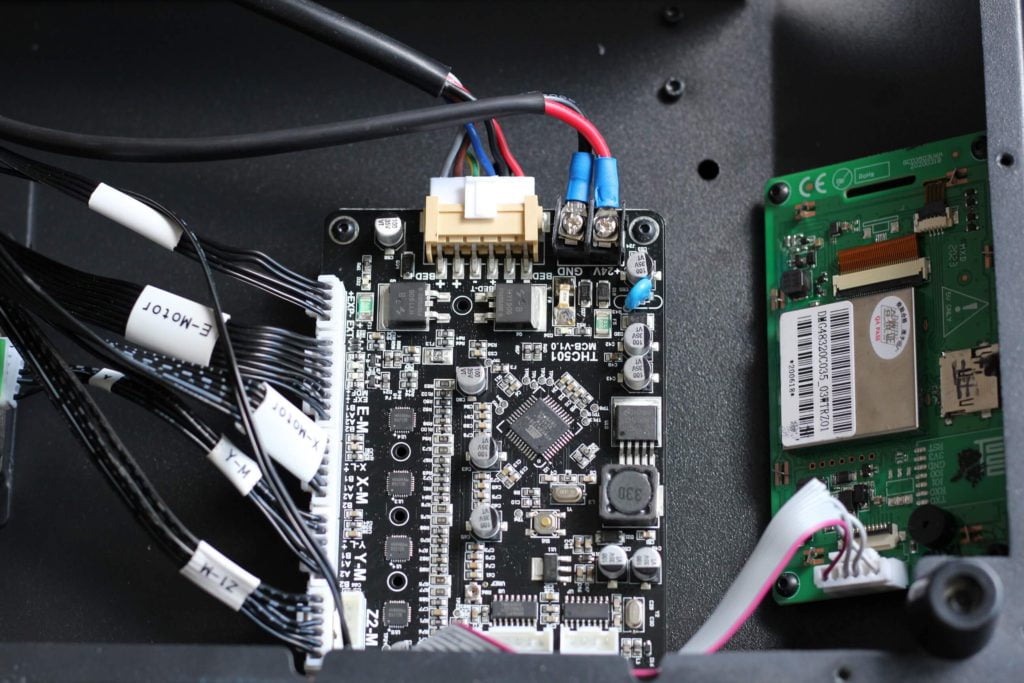
A big disappointment for me is the 8-bit board with noisy drivers. Judging by the sound made by the printer, the stepper drivers are A4988.
I was told by TronHoo that this board will be replaced soon with a 32-bit board and silent stepper drivers, but I am testing the current state of the printer, and right now I am not that happy.
To make things worse, the board and screen is proprietary, so if you are looking to replace the board with a better alternative, it’s harder than on other printers. You would need to re-crimp the connectors which is not an easy task.
A lot of budget printers made the jump to 32-bit and most of them also include silent stepper drivers, so it’s not really an excuse to sell the printer with old drivers right now.
Heated bed with magnetic bed surface
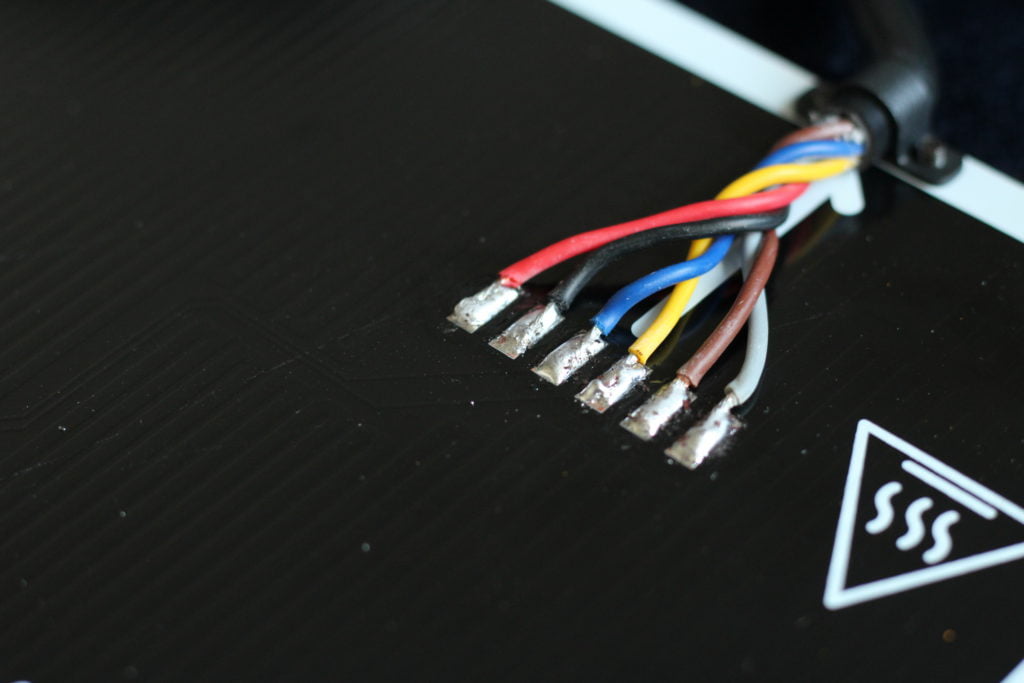
With the TronHoo T220s you get a heated bed with the wires soldered on the bottom of the bed. Unfortunately, the soldering work on the bed is bad and I don’t really trust it.
I understand that it’s hard to solder a 3D printer bed, because the thermal mass can suck all the heat from the soldering iron, but this can be easily fixed with some patience.
Instead of properly soldering the bed, the manufacturer chose to do this “just so it works” without thinking about the issues which can come up in the future for the user. The wires also have a bracket that holds them in place so it could work well, but I would still like to see better soldering in the future.
The heatbed reaches 60C in less than 2 minutes, and 100C in 6 mintes which is pretty good considering there’s no heatbed insulation present.
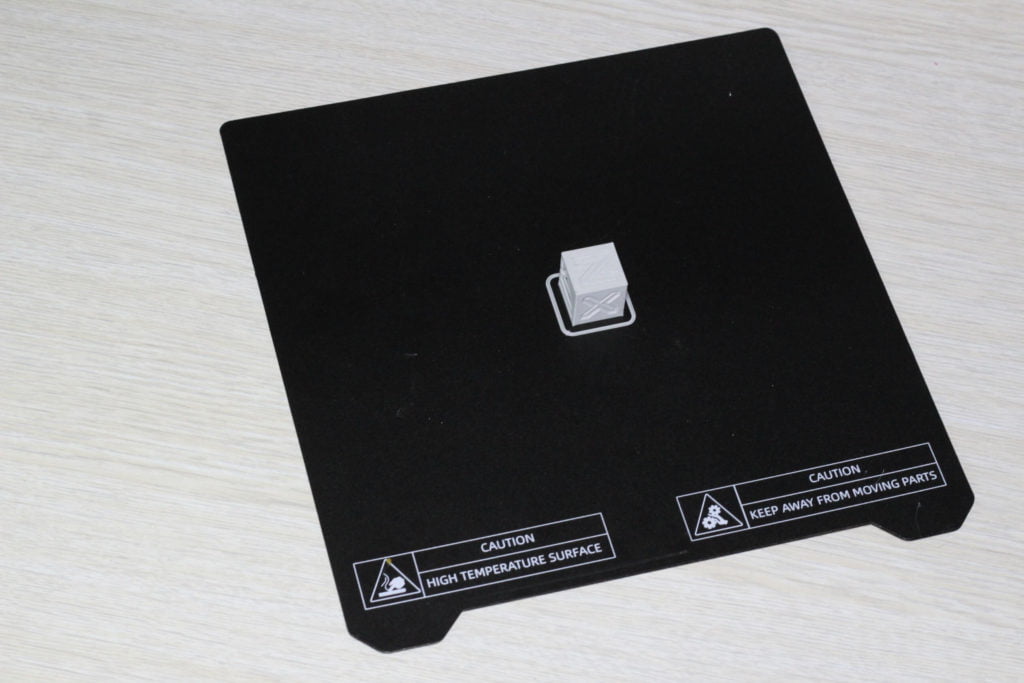
The TronHoo T220s includes a magnetic print surface which can be removed when a print is finished, helping with the removal of the model.
Adhesion is good and the overall flatness of the bed is also good so nothing to complain here. What I noticed is that the heat transfer is not the best trough this print surface. The heated bed can be felt much hotter compared to the top of the print surface.
Locked EEPROM and no thermal protection features detected
Another issue I found with the TronHoo T220s is the locked EEPROM. This does not allow any kind of modification of the stock firmware (for example, to calibrate the extruder). Besides that, the firmware shows up as being the same as the T300 printer but I can’t confirm if this is true or not.
The thermal protection features are not detected by Octoprint for some reasons which first lead me to believe that there are no thermal protection features enabled. I noticed this after connecting the T220s to my Octoprint server and I was greeted by a big red message where I was told that there’s no safety features enabled in the firmware.
The good news is that the printer halts in about 15 seconds if there’s an issue with the heaters, so that’s nice to see. Probably this is a false detection from Octoprint because of the firmware. Unfortunately, there’s no message on the screen and the printer just becomes unresponsive.
All of this could be fixed if the firmware sources would be available, but they are not. I asked TronHoo to provide the sources so I can try to build an up to date Marlin with thermal protection detected, but they did not provide them.
Unresponsive screen
Another frustrating issue with the T220s is the screen. For every print I started from the SD card, I needed to restart the printer for the file to show up on the screen. On some occasions, the files would show up on the screen, but I could not select the file / start the print.
Overall, a frustrating experience and I really hope the firmware will be updated soon.
Test prints on TronHoo T220s
3D Benchy
The first 3D benchy I printed was not that good. This was caused by the lack of tuning for the slicing profile but it gave me an idea about what can be tweaked to get better results. So I tuned the flow rate and speed then I moved to the next print.
- Material: Fiberlogy HD Grey PLA
- Layer Height: 0.2mm
- Nozzle Temperature: 210C
- Bed Temperature: 60C
- Print Speed: 50 mm/s
Phil-A-Ment
The second print came out much better with more consistent layers but as you can see there’s still some inconsistent extrusion present and Z banding.
- Material: Fiberlogy HD Grey PLA
- Layer Height: 0.15mm
- Nozzle Temperature: 210C
- Bed Temperature: 60C
- Print Speed: 60 mm/s
Voron Cube
Next print was the Voron Cube which came out fine, with good detail and bridging performance. Unfortunately, the Z banding I was getting from the start still occurs on the surface of the print and some inconsistent extrusion. Otherwise, the dimensional accuracy is good.
- Material: Fiberlogy HD Grey PLA
- Layer Height: 0.2mm
- Nozzle Temperature: 210C
- Bed Temperature: 60C
- Print Speed: 50 mm/s
Rook
I also tested the printing performance for PETG and the quality is fine. I can’t say it’s one of my best PETG prints, but good enough to continue tweaking the slicer profile. The top is a bit stringy, but the layers are consistent and bridging works well.
- Material: Devil Design Pink PETG
- Layer Height: 0.2mm
- Nozzle Temperature: 240C
- Bed Temperature: 60C
- Print Speed: 60 mm/s
Baby Krabs
With the printing profile finally tuned, I printed this Baby Krabs in PLA which came out better than expected. This gave me more reasons to continue the testing and try to get better prints.
- Material: Devil Design Red PLA
- Layer Height: 0.12mm
- Nozzle Temperature: 210C
- Bed Temperature: 60C
- Print Speed: 50 mm/s
Baby Scrat
The Baby Scrat print confirmed that with a correctly tuned profile, you can get good results with the TronHoo T220s. Layers are consistent and the quality is good, so I started an overnight print.
- Material: Sakata 3D Ingeo 3D850 Gold PLA
- Layer Height: 0.12mm
- Nozzle Temperature: 215C
- Bed Temperature: 60C
- Print Speed: 50 mm/s
John McLane
My final print was this John McLane bust made by Wekster. It was printed at a higher speed than usual, and I’d say the results are good. There’s some minor banding present which could be caused by the speed but overall, I’m happy with the end result. If you lower the print speed with about ~10mm/s you should get even better results.
- Material: Gembird Silver Silk and Grey PLA
- Layer Height: 0.12mm
- Nozzle Temperature: 215C
- Bed Temperature: 60C
- Print Speed: 60 mm/s
Updated T220S changes
The new T220s printer which I received has the following fixes:
- Wheels where properly tightened this time and I just needed to do small corrections for them to be just right
- Lead screw is now greased from factory And movement is much smoother.
- The extruder now has a plastic guide which makes filament loading much easier.
- The hotend PCB soldering is now better
- The board has been updated to 32 bit and it’s running silent stepper drivers. This increased print quality and lowered the noise significantly.
- Thermal protection is now correctly detected.
- SD card files are now detected easier, but long filenames are not shown.
- One of the X gantry rollers was damaged during shipping but TronHoo offered to send me the replacement. I was able to fix this by myself without much trouble.
- The 3D printed filament runout sensor was also damaged during shipping but Tronhoo offered to send me the STL file to print a replacement or send me the printed replacement part.
- The heatbed connections now have a cover to protect from short circuit and ensure the wires don’t get damaged.
- The heatbed belt is still a bit loose but it can be tightened with a bit of work.
- The display now shows the correct machine type.
Overall, the improvements brought to the new version of the T220s make the printer better and I like seeing companies devoted to improving their product.
Conclusions: Is the TronHoo T220s worth it?
In its current state, I don’t think the TronHoo T220s is a good buy. The soldering on important parts in not great and there are other minor issues which could have been detected sooner with enough time spend during quality control.
Right now, the T220s is an unfinished printer which still needs some work to be interesting for potential buyers. That’s a shame, because the printer has a lot of potential and as you can see, it’s capable of decent prints. But currently it’s held up by the lack of proper quality control. Hopefully, the T220s will be improved over time.
If TronHoo can upgrade the printer with a silent 32-bit board, work on their quality control and fix the firmware for both the screen and the board, the T220s can be a good printer. But in its current condition, it’s hard for me to recommend it considering there are other machines available.
Nov. 2020 Update
The updated T220s printer has most of the issues described in this review ironed out and it’s a much attractive machine compared to what I got in the first place.
The price for which it is sold right now is fair, and if you find it discounted then it might be a good buy.
Print quality is improved, noise levels are lower and the printer is now more reliable.
Considering that the build quality of the printer is better, I would recommend you take it into consideration, but make your own decision if it’s a good purchase. I can’t guarantee all these fixes will be present on your machine but considering that TronHoo took the time do address these issues, I think’s it’s a good sign.
Where to buy the TronHoo T220s?
The TronHoo T220s can be purchased from the following websites:
Gearbest
Banggood
I recommend checking out the Discount Codes page before purchasing. I regularly update the article with discount codes for various online shops, and you might find one for this particular model.
The TronHoo T220s was provided free of charge by TronHoo for the purpose of this review. While the article includes affiliate links, all opinions are my own. Nobody reviewed the article before it was posted, following the Review Guidelines.
Liked it?
|
|


