Funssor Voron Kit – A detailed look at all the components
A little over a year ago, I decided to buy my first 3D printer. After reading some positive reviews, I decided on the Artillery Genius. I fell absolutely in love! Learning 3D printing and CAD unlocked amazing possibilities in my main job as a biologist and has grown into something approaching a passion.
Recently, my print queue started growing faster than my Genius and X1 could keep up, and my project printer is unlikely to become stable enough to meet the demand any time soon. It was time to invest in something big, fast, and reliable.
So why undermine that last criterion and cheap out on a questionable kit from AliExpress? Well, for you, dear readers. For you.
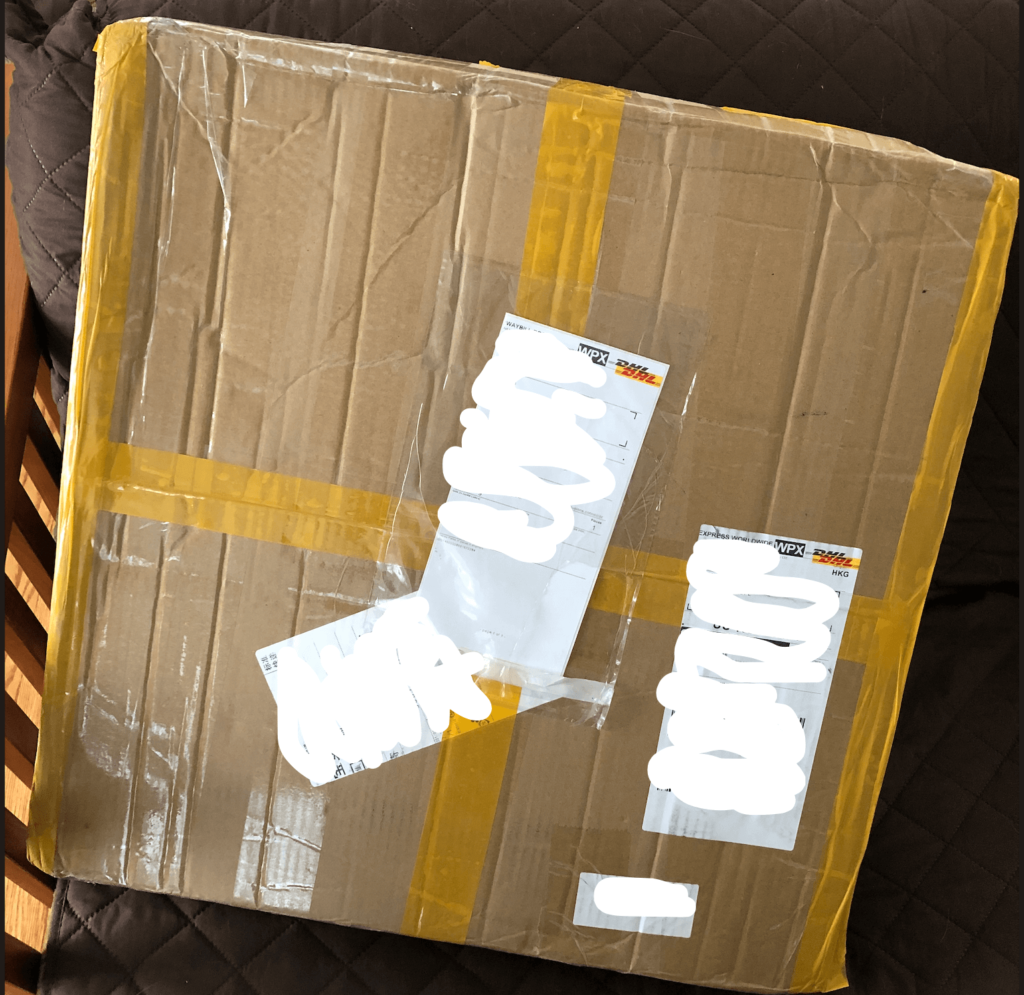
So, let’s dig into this beat up cardboard box and see what we find, eh?
A complete-ish, good-ish, cheap-ish Voron DIY Kit?!
The Voron dev team has put together a meticulously complete Bill Of Materials (BOM) configurator and sourcing guide over at vorondesign.com. For some types of people, the prospect of spending hours trawling AliExpress assembling the perfect set of parts is half the fun of building a Voron.
I am not that type of people.
So when I came across what appeared to be a reasonably-priced, reasonably specced, reasonably complete kit, I had a very hard time saying no. At the time, I didn’t know of any other similar options on the market. (Naturally, I learned about MagicStudio, which is very highly rated in the Voron community, about a week later; FormBot has also released a kit.)
I bought the kit mostly on hope. It arrived yesterday. I’ve gone through and compiled my impressions of each component in hopes of giving you valuable information with which to make a decision. Was it worth the price? Or will I, as they say in Germany, “buy cheap, buy twice?”
Let’s find out!
Funssor Voron Kit – How good is it?
There is, quite literally, a lot to unpack here. I’ve done my best to thoroughly go through and document each set of parts. I’ll start with the ordering process, and then continue systematically through each section of the official Voron BOM.
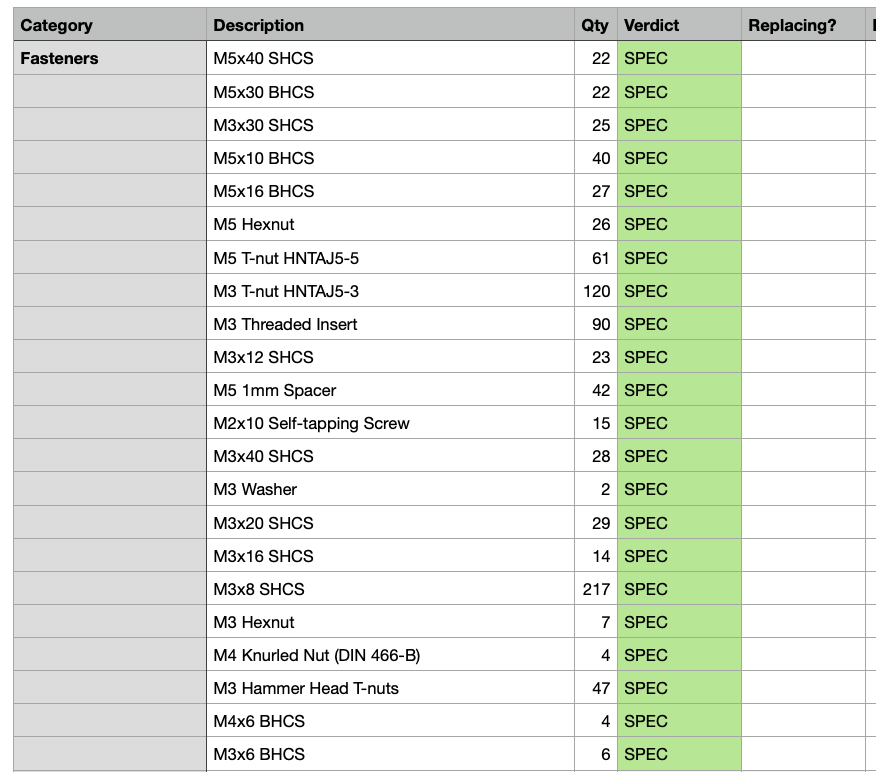
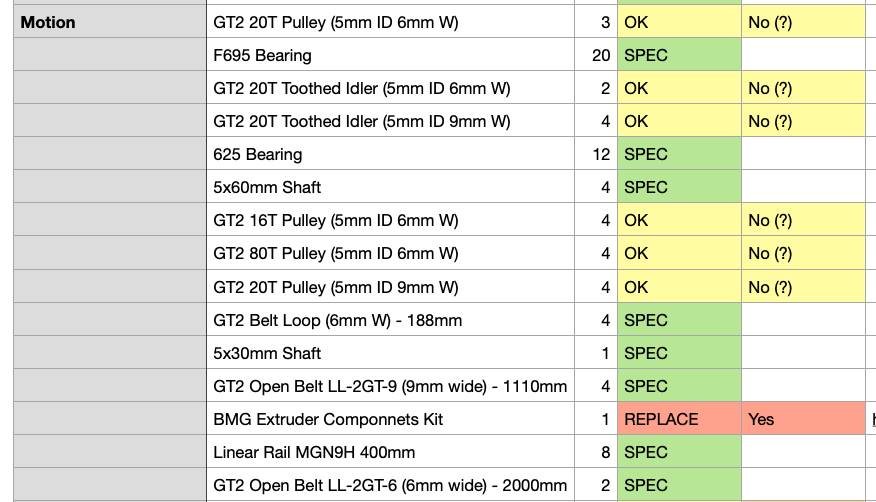
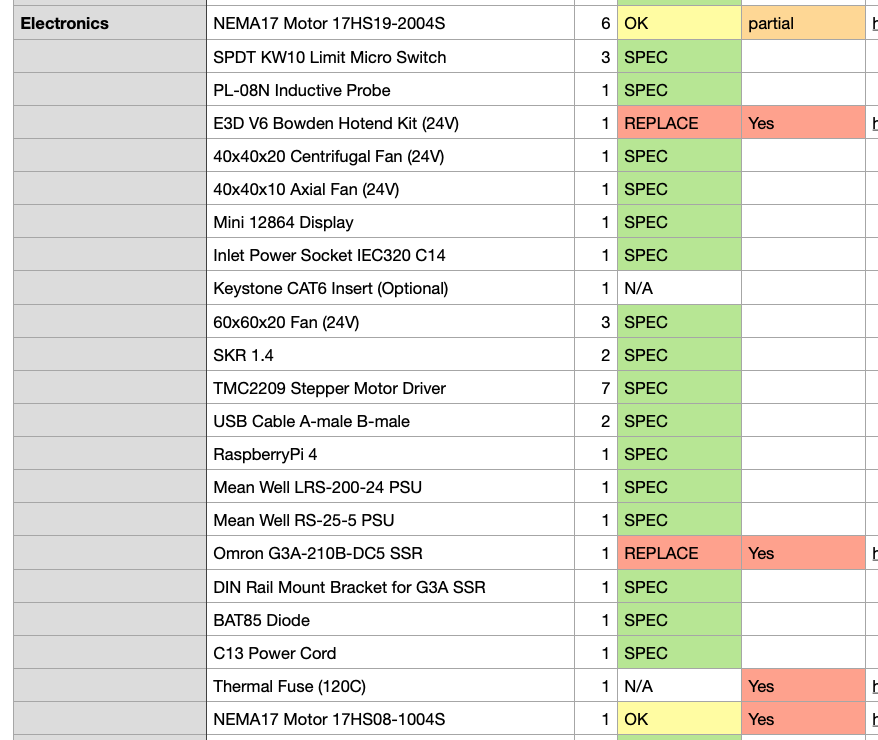
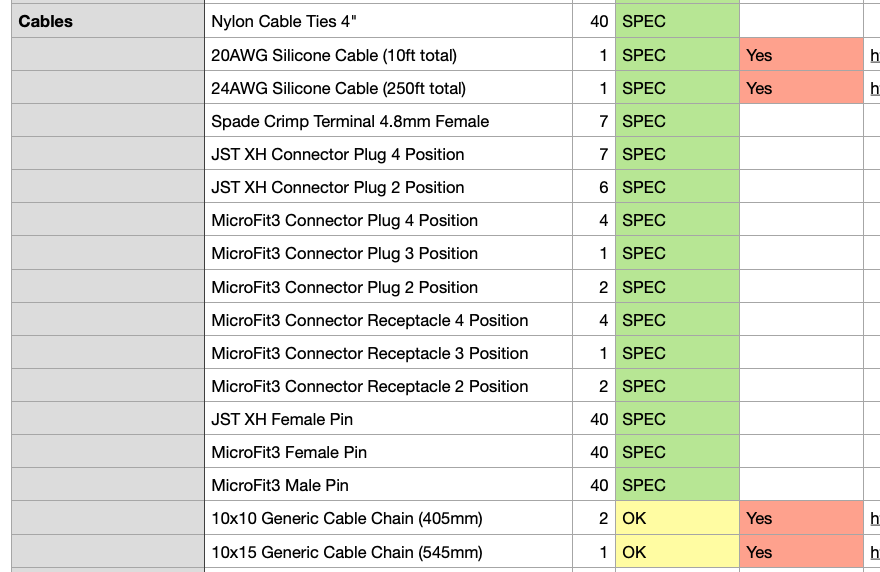
For each BOM section, I’ll include a snapshot of a spreadsheet detailing my assessment of each item, and whether it is (as best I can tell) more or less up to the official spec, just OK, or should definitely be replaced, along with what I am choosing to do with it.
You can find the complete spreadsheet here, along with links to the sources for the parts I am buying to upgrade or replace things.
The ordering process and communication
Funssor offers kits in the three standard Voron v2.4 build sizes — 250, 300, and 350 mm — and gives you the option of ordering with or without printed parts, which will set you back another $130 or so. (I’ll be printing my own, so can’t speak to their quality.)
The price of the 350mm kit ended up at around $1100 when I purchased it, including shipping via DHL. Despite a claim of shipping within four business days, my order (on 15/1) took about two weeks to ship (on 02/2). It arrived at my house a week later.
During the delay, the folks at Funssor were reasonably communicative, answering my queries usually within half a day.
Unboxing the Funssor Voron Kit
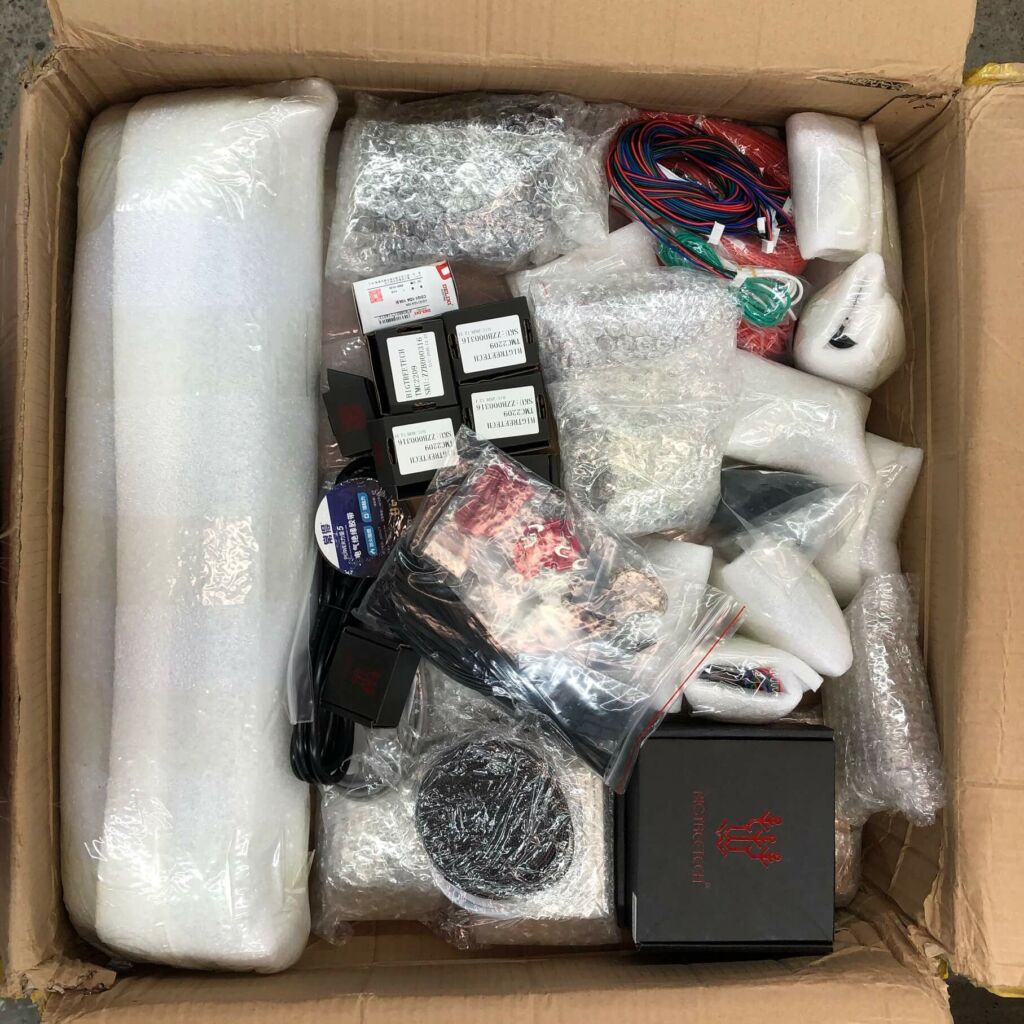
A deconstructed 3D printer is a tough thing to ship around the world — it’s got heavy metal parts, fragile electronic parts, and lots of little, tiny parts. The best kits, like the BluRolls BLV Cube kit that has become my white whale, come in well-thought-out custom-cut layers of foam. This kit… doesn’t.
Still, I was surprised at how little things seem to have shifted in transit. Look at those little stepper driver boxes, all in a row!
Fasteners
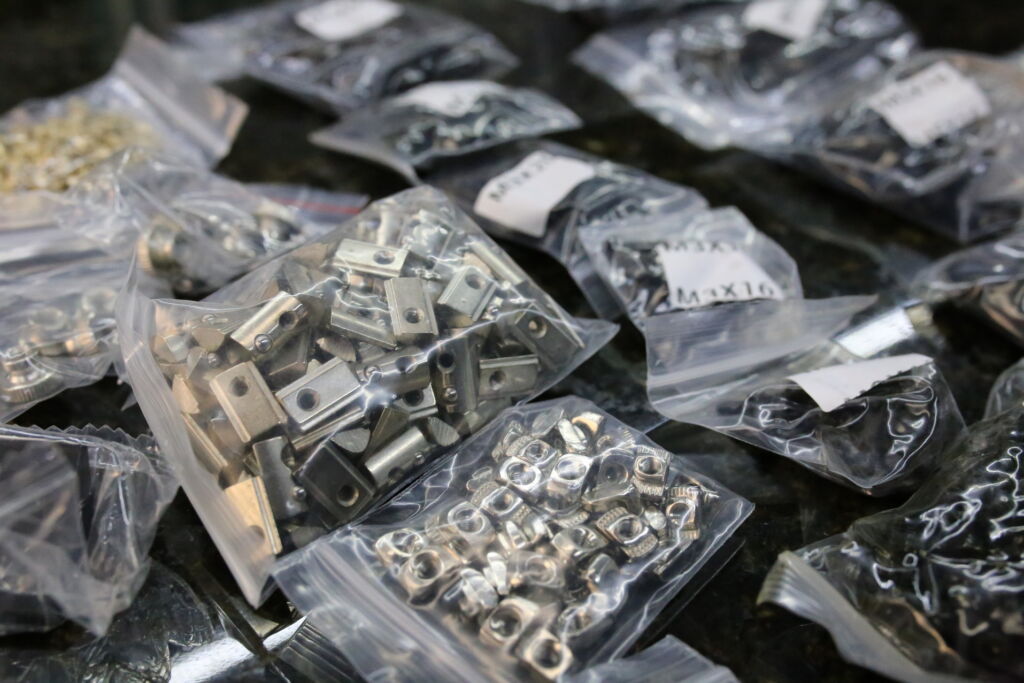
By and large, the fasteners all seem fine. They are primarily black-oxide steel, and mostly come in nicely labeled bags.
There’s some good news here. The included channel nuts are the specific recommended type — I was definitely expecting all cheap hammer T-nuts!
Additionally, the heat-set M3 threaded inserts are not only the higher-quality type that are easier to set, but are the exact correct dimensions (4 x 5 mm) — often difficult to find, at least in the US! Overall, I’m quite pleased with the fasteners. And although I haven’t counted every last nut and bolt, they seem mostly correct.
Motion: Linear rails, gears and pulleys
Motion system components are a mixed bag.
The good news is the rails — which, alone, probably account for a quarter of the total value of the kit. The rails and carriages appear to be genuine Hiwin. They come individually sealed and in a light shipping oil.
Travel is smooth, although — unlike the cheapest rails — there is a substantial preload on them (this is a good thing, and means they are unlikely to be ‘sloppy’). They will need to be lubricated before use with an appropriate grease; the BOM recommends Mobilux EP2.
The bad news is the pulleys and gears. They look… pretty rough. The large Z-axis pulleys are very scratched and pitted, and some of the toothed idlers are mismatched across the set, which may cause issues. Because tearing down an axis to replace a pulley in a CoreXY is such a mission, I decided to go ahead and replace these components. At least the belts are nice.
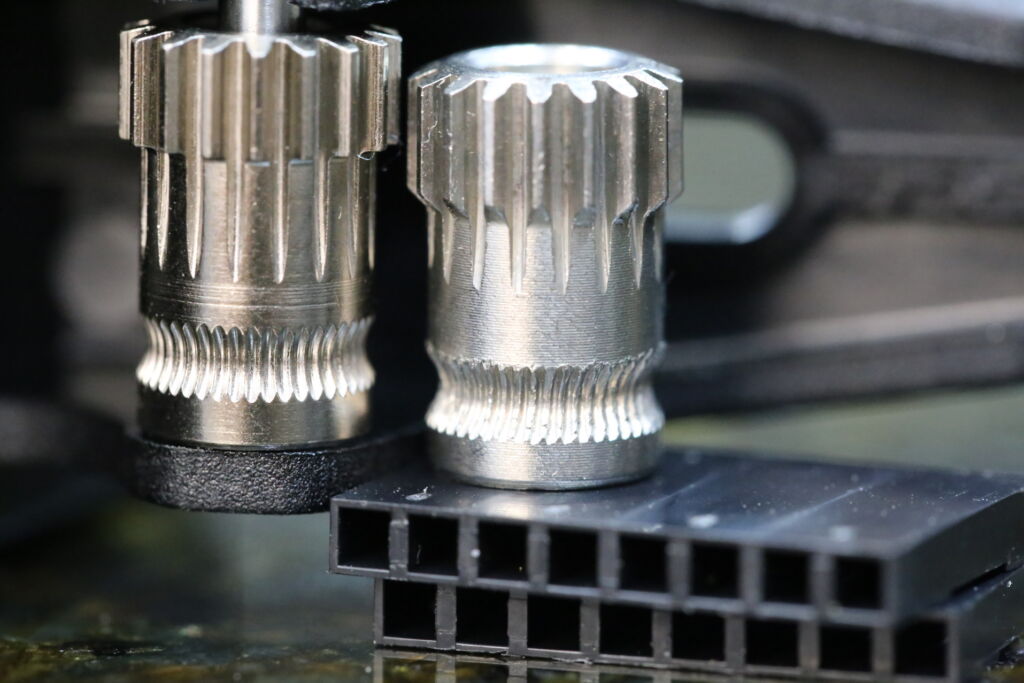
Finally, I would recommend you not count on the BMG gear parts from the kit. The machining quality of the gears leaves a lot to be desired. Compared to a set from a standard TriangleLabs BMG extruder, the difference is night and day:
Electronics
For the most part, the electronics components are a pretty good match to the BOM specs. The power supplies appear to be genuine MeanWell, the main boards and stepper drivers are all standard BTT parts.
The steppers are generic (and unlabeled) but are probably fine — although I am replacing the A/B and extruder motors with LDO motors rated for higher temperatures, as I plan on printing more technical materials.
The fans are also generic, but will probably get the job done, especially for materials like PETG or ABS that don’t need as much cooling.
The only item I would 100% recommend replacing is the solid-state relay. When these fail they tend to fail “on”, so it is much wiser to spend $25 or $30 on a brand you know and trust.
Aluminum extrusions for the frame
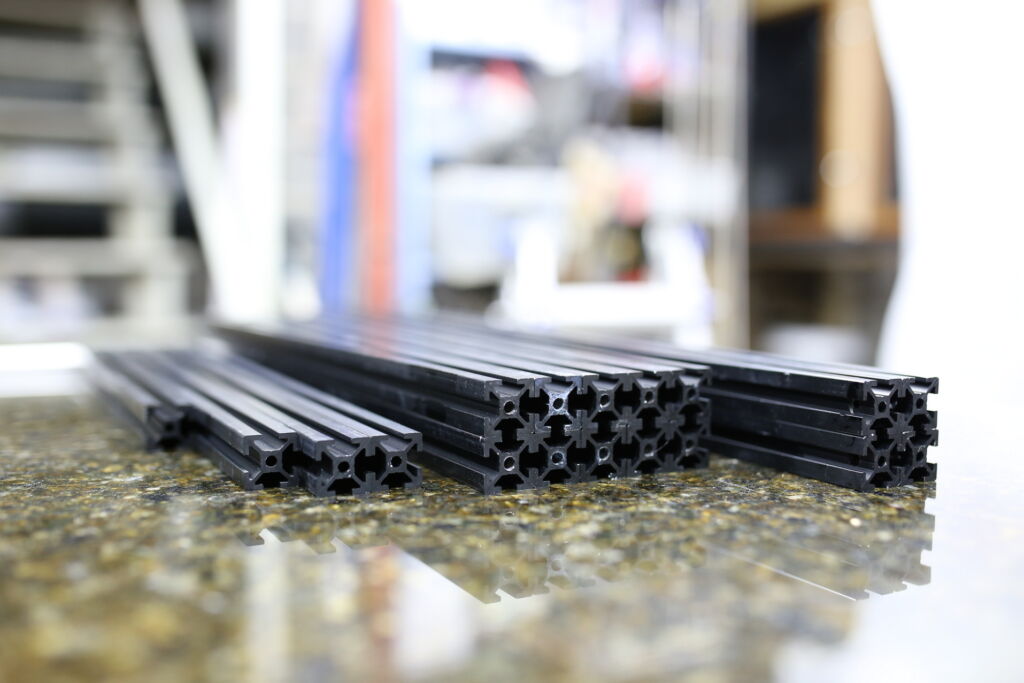
Are these actually Misumi extrusions, as advertised? I don’t really think so.
As far as I know, Misumi extrusions are never anodized after cutting. These extrusions also have very light anodization, as well as some occasional scuffing and discoloration. But are they good? Yes. They are good.
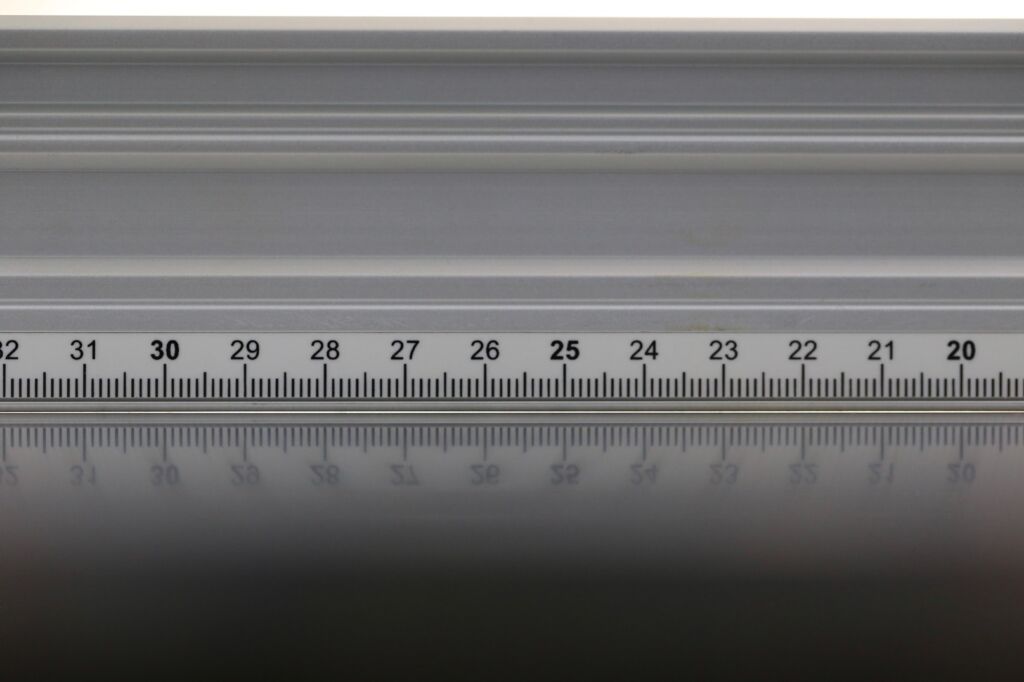
Cuts are very precise, square, and consistent. Each extrusion is within a mm of its specified length. More importantly, they seem to be very straight. Using my machinist’s straightedge, which has a rated straightness of 1/1000″ over 24 inches, the most deflection I was able to measure across the length of any of the extrusions I measured was about .04 mm.
Believe it or not, the official Misumi specification for bend tolerance in 2020 extrusion is 1.3 mm over 300 mm — around thirty times what I measured! While they may have some cosmetic blemishes, I have no doubt as to the utility of these extrusions.
Decent quality cables
The cable components are in general satisfactory. All the appropriate connectors and crimp pins are included, and sufficient quantities of spec silicone-insulated wire.
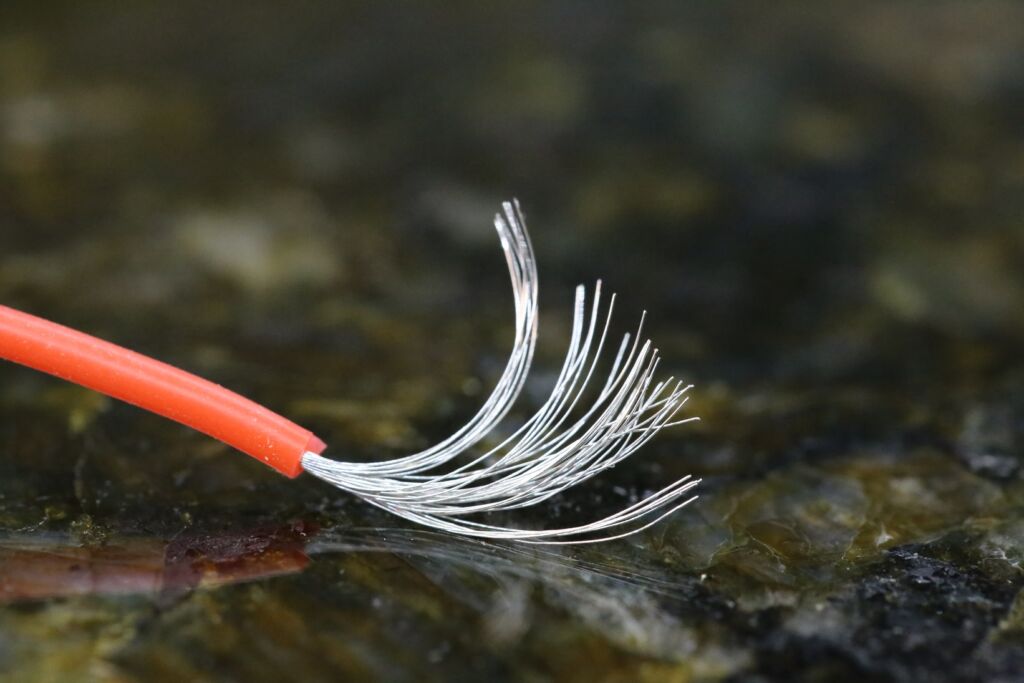
I was impressed by the wire quality — the 24 and 20 AWG wire is exceptionally flexible, and the 24 AWG wire has a very large number of fine, tinned conductors. It will be more likely to hold up in the repetitive flexion of cable chain than cheaper wire with fewer, thicker conductors.
That said, I decided to go ahead and order high-quality PTFE-insulated wire from Remington Industries, a US-based supplier. The PTFE-insulated wire is much thinner than the silicone-insulated wire, and the tougher, slippery PTFE insulation is reputed to hold up even better. Plus, it meant that I could get a variety of insulation colors for easier conductor tracking through the long cable runs.
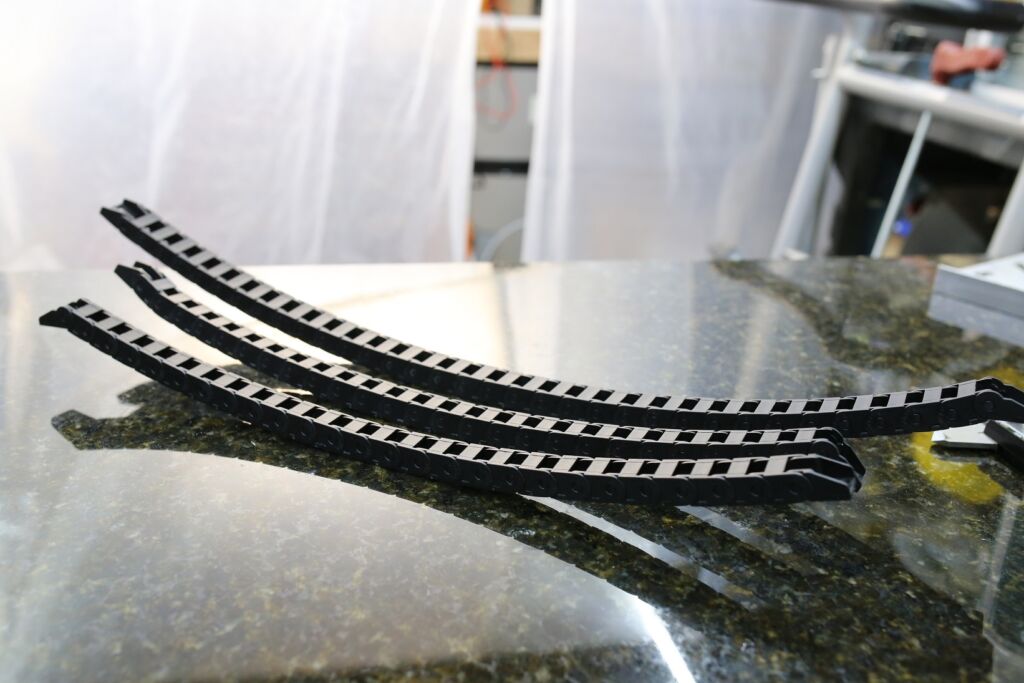
I will likely replace the included cable chains. They don’t lay fully flat, which may place undesirable forces on the gantry and hotend.
Build Plate: Ugly but flat
Finally, the build plate — the very foundation of 3D printing! The Voron design is built around the primacy of the build plate; the idea that it should remain, unmoving, beneath the complexities of the flying CoreXY gantry hovering above it.
Does our build plate, hewn from a solid block of aluminum in China and flown halfway across the world, live up to its weighty expectations?
Reader: I am conflicted.
It is ugly, certainly. These were clearly left in a moist environment, and there are dirt and water stains. It arrived with the top side barely covered in a peeling piece of ‘protective’ plastic.
Furthermore, I’m not totally convinced that the plate is, as specified, cast tooling plate. Cast tooling plate is cast in a solid piece and annealed to relieve internal stresses, unlike cheaper plate and sheet, which is extruded between enormous rollers. The annealed metal is less likely to spontaneously deform with temperature changes — certainly, a desirable property of a heated printer bed!
At least in the US, cast tooling plate also comes from the factory with a milled surface finish. If this was indeed milled flat, it was later brushed out.
Nonetheless, as best as I can tell: it is extremely flat.
You can just barely make out some light making it between my straightedge and the bed. This is a very fine gap — even at its widest point, certainly narrower than my thinnest feeler gauge, at 0.04 mm thick. This is better than the guaranteed surface flatness of Mic 6 brand tooling plate, which is only rated to +/- .127 mm.
Will it stay that flat when it gets some heat in it? It remains to be seen.
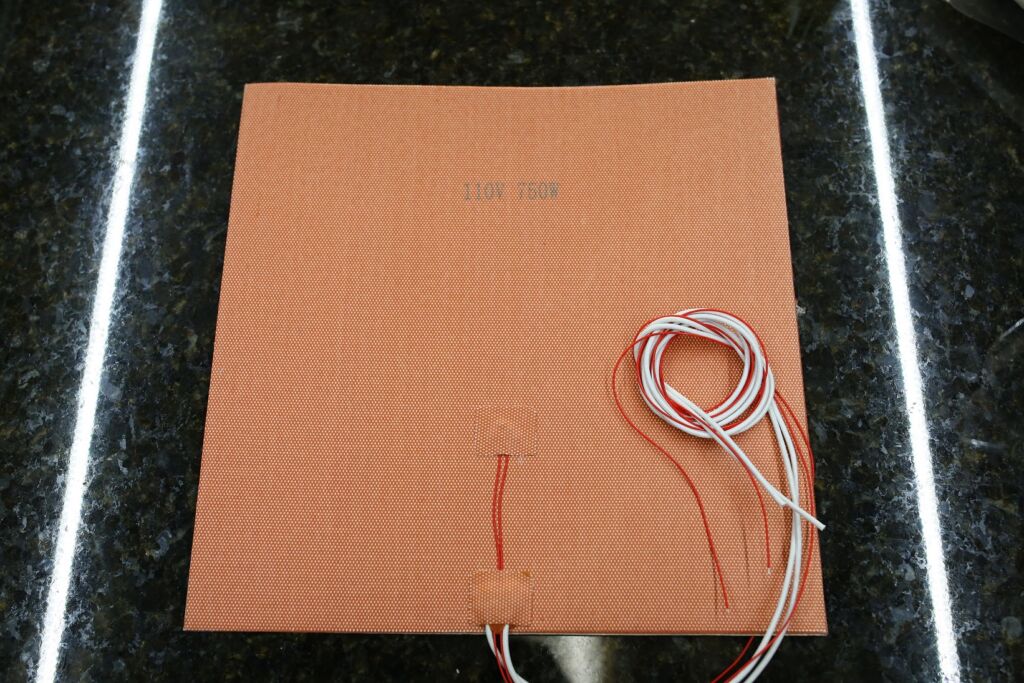
The other build plate components — silicone heater, PEI sheet — are generic. Depending on your risk tolerance, you may or may not want to upgrade to a name-brand Keenovo heating pad.
On my build, I will be using a magnetic spring steel build surface from Energetic, so the PEI sheet will be kept around as a backup. Note that, as far as I can tell, the heater does not include an inbuilt thermal fuse, so you would be best served to source one yourself in case of trouble.
Overall Assessment of the Funssor Voron v2.4 Kit
Could you assemble a functional Voron v2.4 from this Funssor Voron kit? Yes, I think you could. Are there cut corners that should be rectified in such an expensive machine? Also, yes.
Do you get what you pay for? Well…
When I game everything out against the nearest Voron Discord-approved kit, that from MagicStudio, I come out something like $100 ahead, including shipping — and that’s without replacing any of the pulleys or the build plate, items which are almost certainly just fine in the MagicStudio kit. If I had known about them when I ordered (and, if I did know about them, could have remained patient long enough for them to restock), I probably would have.
I hope that, if you are thinking about whether to purchase this kit for your own Voron build, this post has given you enough information to make a more informed decision one way or the other.
As I go through the build process, I’ll be sure to check back with any updates. In the meantime, happy 3D printing!
Where to buy the Funssor Voron v2.4 Kit?
The Funssor Voron v2.4 Kit is available on the following stores:
AliExpress
This is a guest post made by whoppingpochard, an awesome member of the 3DPrintBeginner Discord Server. If you also want to contribute with information, send me an email.
Liked it?
|
|













Great review, will you be giving an update/review of the Voron once it is built? I’d be particularly curious to hear if the build plate remains flat when it gets hot…
Funny you wanted to replace the Omron SSR as you mentioned to replace it with a brand you know and trust. Omron is one of those brands that major OEM’s use for electro-mechanical components.
I am curious about how this build is coming together. I am looking at the Formbot kit for a Voron 2.4 right now.
Nice review. I do wonder about the hiwin rails though. If they are real, that seems to be a pretty good deal. The bed being flat is also a huge win. Thanks for taking the time to write this up.
Thanks, sure thing! We’ll see how it all comes together!