Hotend and Heatbed PID Tuning
Going from a finished print to a great print takes a lot of calibration steps. Besides having the heatbed leveled correctly, and the extruder perfectly calibrated to melt just enough filament, the temperature of the hotend and the heatbed is just as important.
Today I am going to show you how to perform a PID Tuning to have constant and accurate temperatures during your prints.
What is PID Tuning?
Before starting with the guide on how to do a PID tuning, we fist need to understand the concept. In just a few words, PID is an algorithm that makes sure the heaters for both hotend and heatbed supply just enough heat in order to have the difference between the highest and lowest temperature as small as possible.
If you are interested in learning more about what is PID, you can check this Wikipedia article where a PID controller is described
Prerequisites for 3D Printer PID Calibration
In order to perform a successful 3D printer PID tuning, you need to have the 3D printer connected to your computer via USB.
Next, you need to access the terminal for your printer firmware. Today I will use Pronterface but anything will do, as long as you are able to send G-Code commands to the printer.
Hotend PID Tuning
Now that we have the 3D Printer connected to the computer, we can start the Hotend PID Calibration.
- Get the current PID settings using the
M503command. Your printer will return the current PID settings. - Run the
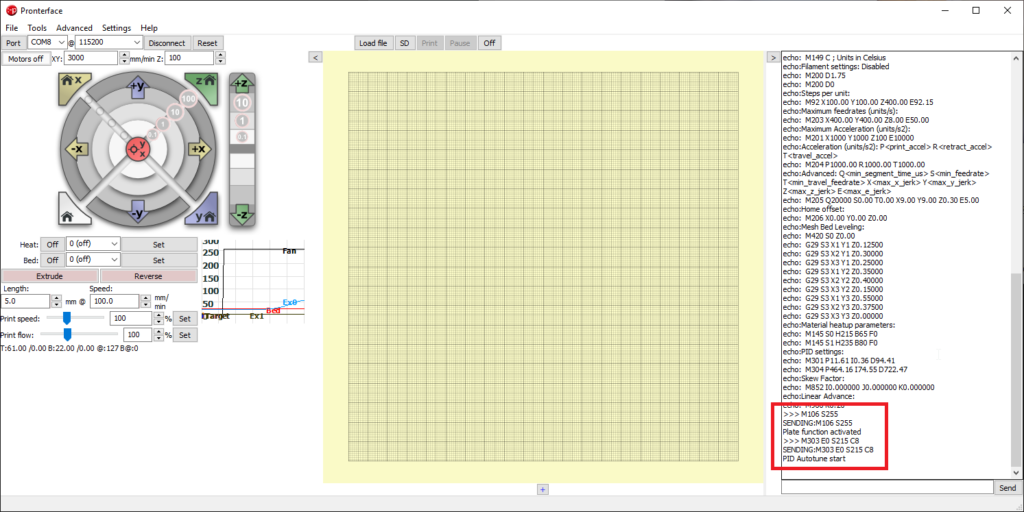
M106 S255command in order to set your cooling fan to 100% - Run the
M303 E0 S215 C8command and wait for the process to finish.
The message “PID Autotune start” will appear in the terminal. Your hotend will start to gradually heat and get new readings.
While the hotend PID Calibration is underway, let’s understand the command we ran.
M303 – This command initiates a process of heating and cooling to determine the proper PID values for the specified hotend or the heated bed.E0 – This argument selects the extruder we want to calibrate. I have only one extruder, so I will set it to 0.S215 – This argument sets the temperature for the extruder PID Calibration to 215C.C8 – This argument sets the number of cycles we want to run. I selected 8 because it’s the recommended value in Marlin firmware, but any value from 3 to 10 is great.
When the message “PID Autotune Finished” is displayed in the terminal window, the hotend PID Tuning is complete.
You will also see new Kp, Ki and Kd constants that need to be saved so let’s do that now. The previous values were so we need to adapt the command with the new values and save them.
- Run the
M301 P24.36 I1.39 D106.76command to add the new values - Run
M500to save the values. - Run
M503to check your current values. These should be the same as the values we just saved.
Heatbed PID Tuning
If you managed to perform the hotend calibration, then the heatbed PID Calibration will be much easier.
- Get the current PID settings using the
M503command. Your printer will return the current PID settings for the heatbed. - Run the
M303 E-1 S60 C8command and wait for the process to finish.
The message “PID Autotune start” will appear in the terminal. Your heatbed will start to gradually heat and get new readings. While the heatbed PID calibration is underway, let’s understand the command we ran.
M303 – This command initiates a process of heating and cooling to determine the proper PID values for the specified hotend or the heated bed.E-1 – This argument selects the heatbed we want to calibrate. I have only one heatbed, so I will set it to 1.S60 – This argument sets the temperature for the heatbed PID Calibration to 60C.C8 – This argument sets the number of cycles we want to run. I selected 8 because it’s the recommended value in Marlin firmware, but any value from 3 to 10 is great.
When the message “PID Autotune Finished” is displayed in the terminal window, the hotend PID Tuning is complete.
You will also see new Kp, Ki and Kd constants that need to be saved so let’s do that now. The previous values were so we need to adapt the command with the new values and save them.
- Run the
M304 P824.78 I154.89 D1097.99command to add the new values - Run
M500to save the values. - Run
M503to check your current values. These should be the same as the values we just saved.
More information about PID Tuning can be found on the RepRap wiki
Liked it?
|
|

